AWS
The configuration guide for the AWS end of the Site-to-Site VPN tunnel.
Introduction
In order to complete the AWS side of the Site-to-Site VPN connection, you must first complete the following steps from your AWS dashboard
For more in-depth information on AWS Virtual Private Gateway configurations, refer to the AWS documentation.
The following describes precisely how to do each of these steps in such a way that the AWS side of the VPN connection will behave as expected.
Creating a virtual private gateway
First, you'll need to create a virtual private gateway and attach it to the existing AWS VPC. This gateway that will act as a VPN concentrator on the AWS side.
From the VPC creation screen in your AWS account, navigate to Virtual private network (VPN) -> Virtual private gateways.
 (1) (1) (1).1c419d0.450.png)
Select the orange Create virtual private gateway button in the upper right-hand corner to begin configuring the gateway. This will lead you to the configuration screen, as shown below.
.d16fdde.802.png)
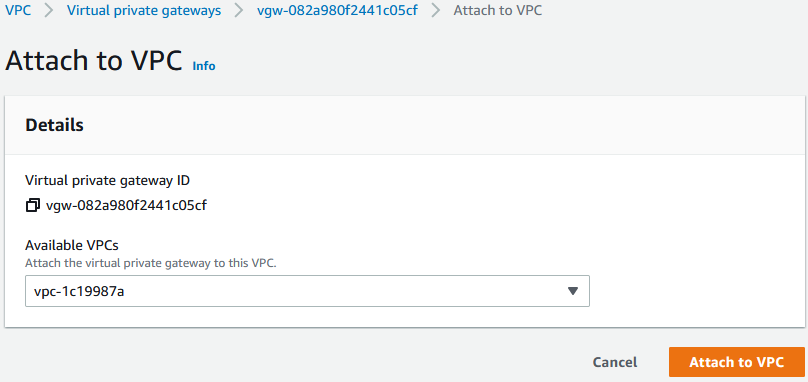
After the virtual private gateway has been created, attach the gateway to the VPC by selecting Actions -> Attach to VPC.
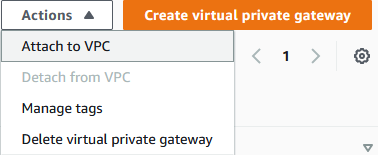
Select the VPC to which you'd like the gateway to be attached. Then, click Attach to VPC.
Initial VPN setup
Next, using the inputs described below to configure the VPN, you'll need to initialize the Site-to-Site VPN connection on the AWS side.
Navigate to Virtual private network (VPN) -> Site-to-Site VPN Connections.
.8f99c56.450.png)
Select the orange Create VPN connection button in the upper right hand corner of the screen. This will launch the configuration screen for the VPN connection.
Options will be configured as shown in the screenshot and detailed in the table below.
Please review the IP address details section before completing configuration.
 (1) (1).e32f0bd.842.png)
Configuration
| Option name | Instructions |
|---|---|
| Target gateway type | Select "Virtual Private Gateway," then choose the virtual private gateway you created earlier in the dropdown that follows. |
| Customer gateway | Select "New." |
| IP address | ⚠️ See details below this table. |
| Routing options | Select "Static." |
| Static IP fixes | Specify the CIDR IP of your CoreWeave VPC network, e.g. 10.100.100.0/24. |
IP address
This will be the IP address of your CoreWeave VPN, however configuring this is at the time of this guide's writing comes with a bit of a catch.
At this time, there is no way to get the AWS tunnel endpoint IP before going through all steps, so the following workaround must be employed.
- A random IP must be added as the IP address for the first pass of these steps.
- After the VPN has been created and the provided tunnel details have been noted, then create the CoreWeave VPN.
- After the CoreWeave VPN has been created and you have taken note of the IP assigned to your CoreWeave VPN, create a new AWS Customer Gateway with the new CoreWeave VPN IP Address by navigating to Virtual Private Network -> Customer Gateways.
- After the new Customer Gateway is created, edit the previously created VPN by navigating to Virtual Private Network -> Site-to-Site VPN Connections.
- Select your VPN, then edit it by seleting Actions -> Modify VPN connection.
- Select your newly created Customer Gateway in the Target customer gateway dropdown.
Tunnel 1
After completing the initial setup for the VPN, you'll need to configure further VPN settings for the tunnel under the Tunnel 1 options menu.
These options should be configured following the instructions detailed in the following table.
 (1) (1) (1).b32722b.1200.png)
Configuration
| Option name | Instructions |
|---|---|
| Inside IPv4 CIDR for tunnel 1 | Choose a network to be used on the tunnel, or let AWS choose one for you. ℹ️ The first usable IP address in the /30 network address space will be on the AWS side. The last usable IP address will be on the CoreWeave side. |
| Pre-shared key for Tunnel 1 | A 32- to 64-character Alphanumeric random string. ⚠️ CoreWeave will not allow a pre-shared key under 32 characters. |
| Advanced options for Tunnel 1 | Select the "Edit tunnel 1 options" radio button. ℹ️ This will prompt the second set of options to appear. |
| Phase 1 encryption algorithms | • Remove AES128 and AES256.• Leave AES-128-GCM-16 and AES-256-GCM-16. |
| Phase 2 encryption algorithms | • Remove AES128 and AES256.• Leave AES-128-GCM-16 and AES-256-GCM-16. |
| Phase 1 integrity algorithms | Leave as is; will include SHA2-256, SHA2-384, and SHA2-512. |
| Phase 2 integrity algorithms | Leave as is, which will include SHA2-256, SHA2-384, and SHA2-512. |
| Phase 1 DH group numbers | Leave as is; should include 2, 14, 15, 16, 17, 18, 19, 20, 21, 22, 23, and 24. |
| Phase 2 DH group numbers | Leave as is; should include 2, 5, 14, 15, 16, 17, 18, 19, 20, 21, 22, 23, and 24. |
| Phase 1 lifetime (seconds) | Leave as is; the default is 28,800. |
| Phase 2 lifetime (seconds) | Leave as is; the default is 3,600. |
| Rekey margin time (seconds) | Leave as is; the default is 540. |
| Rekey fuzz (percentage) | Leave as is; the default is 100. |
| IKE version | • Remove ikev1.• Keep ikev2. |
| Replay window size (packets) | Leave as is; the default is 1024. |
| DPD timeout (seconds) | Leave as is; the default is 30. |
| DPD timeout action | Select the "Restart" radio button. |
| Startup action | Select the "Start" radio button. |
Advanced Tunnel 1 options
The following table describes what the configurations for the advanced Tunnel 1 options should be.
| Option name | Instructions |
|---|---|
| Phase 1 encryption algorithms | • Remove AES128 and AES256.• Leave AES-128-GCM-16 and AES-256-GCM-16. |
| Phase 2 encryption algorithms | • Remove AES128 and AES256.• Leave AES-128-GCM-16 and AES-256-GCM-16. |
| Phase 1 integrity algorithms | Leave as is; will include SHA2-256, SHA2-384, and SHA2-512. |
| Phase 2 integrity algorithms | Leave as is, which will include SHA2-256, SHA2-384, and SHA2-512. |
| Phase 1 DH group numbers | Leave as is; should include 2, 14, 15, 16, 17, 18, 19, 20, 21, 22, 23, and 24. |
| Phase 2 DH group numbers | Leave as is; should include 2, 5, 14, 15, 16, 17, 18, 19, 20, 21, 22, 23, and 24. |
| Phase 1 lifetime (seconds) | Leave as is; the default is 28,800. |
| Phase 2 lifetime (seconds) | Leave as is; the default is 3,600. |
| Rekey margin time (seconds) | Leave as is; the default is 540. |
| Rekey fuzz (percentage) | Leave as is; the default is 100. |
| IKE version | • Remove ikev1.• Keep ikev2. |
| Replay window size (packets) | Leave as is; the default is 1024. |
| DPD timeout (seconds) | Leave as is; the default is 30. |
| DPD timeout action | Select the "Restart" radio button. |
| Startup action | Select the "Start" radio button. |
The following screenshot exemplifies what these configurations look like.
 (1).7d199a2.488.png)
Configure Routes
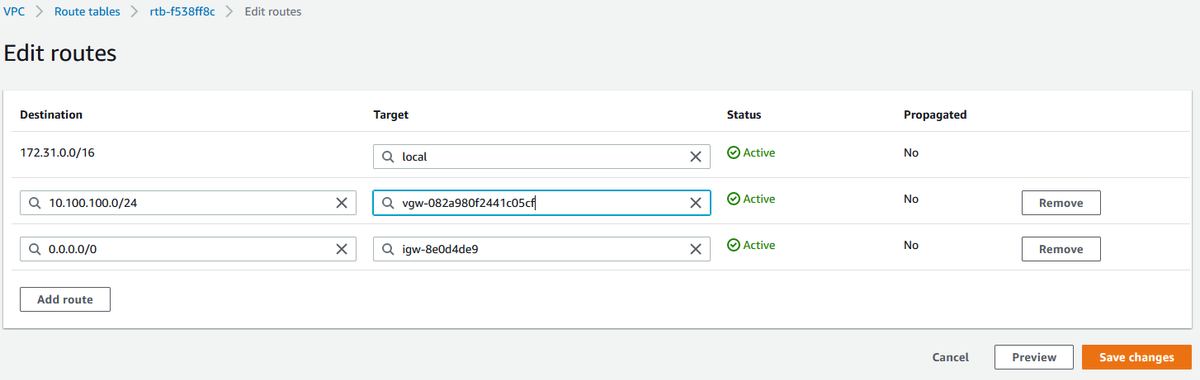
Once the AWS VPC has been created and the VPN connection has been configured, a route must be added back to the CoreWeave VPC network.
To do this, configure the routing tables found under Virtual private cloud -> Route tables.
 (1) (1).2f8ca2c.1200.png)
Click the route table ID to open the configuration options for that table, and click the gray Edit routes button in the upper-right hand corner of the lower menu.
In the Edit routes menu, configure Destination as the CoreWeave VPC network name, and for Target, configure the AWS virtual private gateway that was created at the beginning of this process.
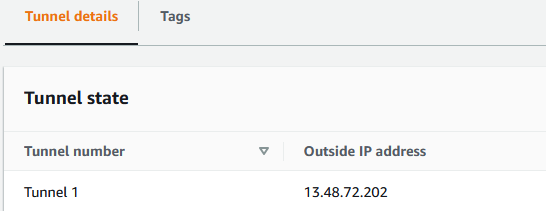
Tunnel details
The newly created VPN is now viewable by navigating to Virtual Private Network -> Site-to-Site VPN Connections. Click the VPN ID to see details about the tunnel.
Take note of the Tunnel 1 outside IP address. This will be needed in the CoreWeave VPN setup; review the IP address details for more information.