Deploy Thinkbox Deadline
Learn how to deploy a managed Thinkbox Deadline instance
On CoreWeave Cloud, the industry standard render management platform Thinkbox Deadline is offered as a fully managed implementation including all of the platform's necessary components. Managed Deadline instances are ideal for those working in VFX and rendering who require quick setup, zero management, and automatic, limitless scalability.
Deadline is deployed using a Kubernetes Helm Chart so that instances are highly configurable and may be templated for additional, multistage Kubernetes deployments. Because CoreWeave implementations of Deadline are delivered as high-availability services via Kubernetes, every component of Deadline is replicated, redundant, and containerized. This makes Deadline deployments faster, more durable, and more scalable than ever.
Containerization and its benefits come at the cost of needing to convert existing Deadline Worker images. This document provides the names of some usable images. If you are interested in viewing example Dockerfiles used in the process of building and configuring Deadline Worker groups, reach out to your CoreWeave support specialist.
Prerequisites
This guide presumes that you already have an active CoreWeave account, and that you have some familiarity with Thinkbox Deadline. For more information on Deadline, refer to the official Thinkbox documentation. This guide also presumes some knowledge of working with YAML and Helm charts.
Deploy Deadline
CoreWeave users who wish to deploy Deadline instances simply provide information specific to their pipelines - the rest is managed automatically behind the scenes.
There are two methods for deploying Thinkbox Deadline on CoreWeave. This guide provides instructions for deploying using either method.
- (Recommended) Fully Managed: CoreWeave deploys the repository and all related components entirely.
- Workers-Only: CoreWeave deploys only autoscaled Deadline workers, which then connect to an on-premise Deadline repository.
First, log in to your CoreWeave Cloud dashboard, then navigate to the Applications Catalog from the menu on the left.
From the Catalog, search for Deadline, then select the Deadline application from the list of results. Thinkbox Deadline configurations are presented only as YAML values. Clicking the Deploy button in the upper right-hand corner opens the YAML configuration screen, as shown below.
The value of version in your deployment may differ from what is shown in this example.
.7616574.1200.png)
Although some example values are provided by default in this editor, this tutorial removes them all by beginning with a blank manifest.
For reference only, here is the complete example manifest:
Click to expand - Example Deadline manifest
#### GENERAL ####
global:
  pipelineCommit: 1dec7484
  version: 10.1.18.5
  branch: master
####REPOSITORY###
repository:
  enabled: true
  persistance: true
  archive:
    enabled: false
    pvc:
      useExisting: false
      name: archive
      size: 2Ti
  remoteRepository:
    host: 127.0.0.1
    port: 4433
    auth:
      certSecret:
        name: client-secrets
      password: temp123
  affinity: &controlPlaneAffinity
    nodeAffinity:
      requiredDuringSchedulingIgnoredDuringExecution:
        nodeSelectorTerms:
          - matchExpressions:
              - key: cpu.coreweave.cloud/family
                operator: In
                values:
                  - epyc
              - key: topology.kubernetes.io/region
                operator: In
                values:
                  - ORD1
              - key: node.coreweave.cloud/class
                operator: In
                values:
                  - cpu
  resources:
    limits:
      cpu: "4"
      memory: 4Gi
    requests:
      cpu: 1
      memory: 4Gi
  pvc:
    name: repository
    storageClassName: shared-nvme-ord1
    size: 30Gi
###CLIENT###
client:
  licenses:
    mode: standard
    # Remote License Server will be used when license server is disabled in the chart
    remoteLicenseServer: "[email protected]"
  resources:
    limits:
      cpu: "4"
      memory: 1Gi
    requests:
      cpu: 1
      memory: 128Mi
  launcher:
    listeningPort: 17000
    startup:
      delay: 5
    configPort: 17001
  startupPort: 17003
  dataRoot: /tmp/jobs
  user: root
  configMap:
    name: clientconfig
### RCS ###
rcs:
  enabled: true
  port: 8080
  replicas: 1
  tlsEnabled: true
  tlsPort: 4433
  affinity: *controlPlaneAffinity
  resources:
    limits:
      cpu: 4
      memory: 1Gi
    requests:
      cpu: 450m
      memory: 128Mi
  autoGenerateCerts: true
  certSecret:
    name: ""
  pass: temp123
  service:
    name: rcs
#    annotations:
#      metallb.universe.tf/address-pool: public-ord1
#      metallb.universe.tf/allow-shared-ip: default

### WEBSERVER ###
webserver:
  enabled: true
  replicas: 2
  service:
    name: webserver
    port: 8082
  resources:
    limits:
      cpu: 4
      memory: 1Gi
    requests:
      cpu: 150m
      memory: 128Mi
pulse:
  enabled: false
  replicas: 2
  affinity: *controlPlaneAffinity
  resources:
    limits:
      cpu: 4
      memory: 1Gi
    requests:
      cpu: 75m
      memory: 128Mi
  port: 17002
  initialDelaySeconds: 60
### METRICS ###
scalingMetrics:
  enabled: true
  version: 0.1
  replicas: 1
  # Remote Web Server to use when local webserver is disabled
  remoteWebServer:
    host: "your.hostname.here"
    port: 8080
  affinity: *controlPlaneAffinity
  resources:
    limits:
      cpu: 4
      memory: 4Gi
    requests:
      cpu: 150m
      memory: 128Mi
  port: 8081
  pollInterval: 2
  timeout: 10
  defaultMetrics:
    Pool:
      enabled: true
    Group:
      enabled: true
    User:
      enabled: true
  configMap:
    name: metrics-config
### LICENSESERVER ###
licenseServer:
  port: 2708
  enabled: false
  replicas: 1
  macAddress: ""
  version: 1.1.0
  affinity: *controlPlaneAffinity
  resources:
    limits:
      cpu: 4
      memory: 1Gi
    requests:
      cpu: 150m
      memory: 128Mi
  service:
    name: ls
  auth:
    secret: license-secret-deadline
### LicenseForwarder ###
licenseForwarder:
  enabled: false
  commandPort: 17004
  port: 443
  replicas: 1
  affinity: *controlPlaneAffinity
  resources:
    limits:
      cpu: 4
      memory: 1Gi
    requests:
      cpu: 150m
      memory: 128Mi
  service:
    name: license-forwarder
  auth:
    secrets:
      name: thirdpartylicenses
### MONGODB ###
mongodb:
  UpdateStrategy:
    type: "OnDelete"
  persistence:
    storageClass: block-nvme-ord1
  global:
    storageClass: block-nvme-ord1
  enabled: true
  extraFlags:
    - "--enableMajorityReadConcern=false"
  architecture: standalone
  auth:
    enabled: true
    existingSecret: deadline-mongodb
  resources:
    limits:
      cpu: 6
      memory: 16Gi
    requests:
      cpu: 150m
      memory: 16Gi
  image:
    debug: false
    tag: 4.2
  affinity: *controlPlaneAffinity
  tolerations:
    - key: "is_cpu_compute"
      operator: "Exists"
      effect: "NoSchedule"
workers:
  init: {}
  pulse: {}
  scaleDown:
    policies:
      - periodSeconds: 10
        type: Percent
        value: 10
    stabilizationWindowSeconds: 20
  coolDownPeriod: 60
  pollingInterval: 15
  ### DEFAULT WORKER TEMPLATE ###
  images:
    - name: blender-gpu
      enabled: true
      image: registry.gitlab.com/coreweave/render-images/blender:2.93
      users:
        - userName: render
          groupName: utility
          uid: 1001
          gid: 1001
          home: /home/render
          shell: /bin/bash
          renderUser: true
        - userName: add_user
          groupName: additional
          home: /home/add_user
          uid: 3001
          gid: 1001
          shell: /bin/bash
          renderUser: false
      scale:
        minReplicas: 1
        maxReplicas: 10
        pollingNames:
          - name: blender-gpu
            type: Group
      pulse:
        enabled: false
      affinity:
        nodeAffinity:
          requiredDuringSchedulingIgnoredDuringExecution:
            nodeSelectorTerms:
              - matchExpressions:
                  - key: gpu.nvidia.com/class
                    operator: In
                    values:
                      - RTX_A4000
                  - key: topology.kubernetes.io/region
                    operator: In
                    values:
                      - ORD1
      preStop:
        enabled: true
      command:
        override: false
      groups:
        - blender_gpu
        - blender
      pools:
        - animation
        - vfx
        - test
      resources:
        requests:
          cpu: 16
          memory: 64Gi
          nvidia.com/gpu: 1
        limits:
          cpu: 16
          memory: 64Gi
          nvidia.com/gpu: 1
The manifest is split into two parts:
These values set the application version, configure connectivity, set up authentication, and enable or disable various Deadline components.
WorkersThese values set the definition of the Deadline workers, and configure autoscaling settings.
Initialization
First, the version of Deadline to deploy is specified in the version field.
version: 10.1.18.5
Click to expand - All supported Deadline versions
Currently supported versions of Deadline on CoreWeave Cloud are:
10.1.9.210.1.10.610.0.24.410.1.11.510.1.6.410.1.12.110.1.13.210.1.15.210.1.17.410.1.18.510.1.23.6
Upon request, versions 10.2.1.0 and 10.2.10.1 may also be configured.
If your desired version of Deadline is not included in this list, please reach out to your CoreWeave support specialist for assistance.
Workers-only
If this is a workers-only configuration, add the following to a new repository stanza.
repository:
    remoteRepository:
        host: <ON-PREM HOST OR CL FORWARDS>
        port: <REPOSITORY PORT>
        auth:
          certSecret:
            name: <SECRET NAME>
          password: temp123
Edit the values to represent the connection details to your on-premises Deadline repository. If your repository is not accessible over a public IP, consider first setting up Cloudlink to proxy your connections through.
Once ready, run kubectl get services and look for the Cloudlink forwards Service. Use the external IP of that Service as the value of host in your YAML file.
TLS certificates
For either deployment method, if the on-premise repository utilizes TLS certificates, you will need to create a Kubernetes Secret that contains that certificate using kubectl create secret.
$ kubectl create secret generic <secret name> --from-file=<local full path to certificate file>
To learn more about creating Kubernetes Secrets, see Managing Secrets using Kubectl
Specify the password that is used to decode the certificate in the password field of the YAML chart. If deploying the full repository, specify:
rcs:
  pass: <CERTIFICATE PASSWORD>
CoreWeave automatically generates a Deadline certificate for the repository. This value allows you to specify the password used to decode the generated certificate.
License forwarding
To enable license forwarding, add the following fields to the manifest:
licenseForwarder:
  enabled: true
  auth:
    secrets:
      name: <SECRET NAME>
This will enable a license forwarder for utilizing Thinkbox UBL. To authenticate your marketplace license allocations, you will need to create a Secret containing your certificates from the thinkbox marketplace using the following command:
$ kubectl create secret generic <secret name> --from-file=<local full path to directory containing all certificates>
The manifest so far
If you have been following along up to this point, your YAML manifests should look like one of the following, depending on which deployment style you have chosen.
- Fully managed
- Workers-only
Fully managed
If this is a fully-managed deployment, the manifest should look like the following so far.
version: 10.1.18.5
rcs:
  pass: password123
 licenseForwarder:
  enabled: true
  auth:
    secrets:
      name: ubl-certificates
Workers-only
If this is a workers only deployment, the manifest should look like the following so far.
version: 10.1.18.5
repository:
    remoteRepository:
        host: 127.0.0.1
        port: 4433
        auth:
          certSecret:
            name: on-prem-cert
          password: password123
 licenseForwarder:
  enabled: true
  auth:
    secrets:
      name: ubl-certificates
Workers
In order for Deadline workers to spin up, the manifest specifies which Docker images are used to render each type of job, which type of hardware is used for those workers, as well as how compute is to scale the jobs in the given repository.
Here's an example of a workers section in the manifest:
Click to expand - Example workers excerpt
workers:
- name: maya-epyc
    enabled: true
    groups:
      - maya-epyc
      - maya
    pools:
      - vfx
    scale:
      pollingNames:
      - name: maya-epyc
        type: Group
      minReplicas: 0
      maxReplicas: 100
      scalingFactor: 1
    image: registry.gitlab.com/coreweave/render-images/maya2022:1
    imagePullSecrets: &imagePullSecrets
      - name: render-images
    env:
      - name: ARNOLD_LICENSE_ORDER
        value: network
      - name: ADSKFLEX_LICENSE_FILE
        value: 127.0.0.1
    affinity:
      nodeAffinity:
        requiredDuringSchedulingIgnoredDuringExecution:
          nodeSelectorTerms:
            - matchExpressions:
                - key: node.coreweave.cloud/cpu
                  operator: In
                  values:
                    - amd-epyc-rome
                    - intel-xeon-v4
                - key: node.coreweave.cloud/class
                  operator: In
                  values:
                    - cpu
        preferredDuringSchedulingIgnoredDuringExecution:
            - weight: 100
              preference:
                matchExpressions:
                  - key: topology.kubernetes.io/region
                    operator: In
                    values:
                      - ORD1
    resources:
      limits:
        cpu: 35
        memory: 130Gi
      requests:
        cpu: 35
        memory: 129Gi
The following values are included in the workers stanza of the manifest.
enabled
The enabled field enables or disables different worker types during upgrades, without ever fully removing them from the application.
workers:
- name: maya-epyc
    enabled: true
groups and pools
The values of groups and pools are provided as lists. These enumerate the names of the groups and pools to which workers are assigned. During initialization, workers will attempt to join these pools and groups respectively and in the order they appear in the given list. yaIf the group or pool does not exist, the workers will attempt to create them.
groups:
  - maya-epyc
  - maya
pools:
  - vfx
scale
The scale value specifies how workers scale in response to the jobs submitted to the repository.
scale:
  pollingNames:
  - name: maya-epyc
    type: Group
  minReplicas: 0
  maxReplicas: 100
  scalingFactor: 1
scale.pollingNames
scale.pollingNames defines which tasks are monitored for scaling up or down. In the example provided above, scale is based off the number of tasks submitted to the Deadline group named maya-epyc - the same group that the workers join.
If no polling names (pollingNames) are specified, workers will automatically create a limit with the same name as your worker group. Scaling will then be based off that limit.
Other default options for the .scale.pollingNames.type field are User and Pool. Custom polling types are also possible - scale may be based on any job association, including tags.
For more information on Custom polling types, reach out to a support specialist.
scale.minReplicas and scale.maxReplicas
Scaling limits for this worker type may be configured using limits inside of Deadline, but for now, minReplicas and maxReplicas are configured as backstops.
This way, if Deadline limits are accidentally modified incorrectly, they will still never exceed the maximum or go below the minimum number of Deadline workers of this type.
scalingFactor
scalingFactor adds an overall multiplier to scaling. For example, a scalingFactor of .5 would mean that for every two tasks submitted to the queue, one worker is spun up. For most use cases, this value can remain at 1, which means that for each task submitted to the queue, a worker is spun up.
Worker Docker values
Next, Docker images are configured for the workers. A worker Dockerfile looks like the following:
image: registry.gitlab.com/coreweave/render-images/maya2022:1
imagePullSecrets:
- name: render-images
In this example, the base worker image maya2020 is provided. However, to use this image, an imagePullSecret must first be created.
To create the necessary credentials, first create a Secret using kubectl create secret:
$ kubectl create secret docker-registry render-images \
 --docker-username render-images --docker-password "rJX7s8EjsD8UmD6-73yc" \
 --docker-server registry.gitlab.com/coreweave/render-images
The imagePullSecret value defined in the worker definitions can accept multiple pull secrets if necessary.
Environment variables must be initialized in the containers on startup. This is a convenient way to provide environment variables such as license settings.
env:
  - name: ARNOLD_LICENSE_ORDER
    value: network
  - name: ADSKFLEX_LICENSE_FILE
    value: 127.0.0.1
Finally, the affinity stanza allows us to choose where and what node types the Deadline workers run on.
affinity:
      nodeAffinity:
        requiredDuringSchedulingIgnoredDuringExecution:
          nodeSelectorTerms:
            - matchExpressions:
                - key: node.coreweave.cloud/cpu
                  operator: In
                  values:
                    - amd-epyc-rome
                    - intel-xeon-v4
                - key: node.coreweave.cloud/class
                  operator: In
                  values:
                    - cpu
        preferredDuringSchedulingIgnoredDuringExecution:
            - weight: 100
              preference:
                matchExpressions:
                  - key: topology.kubernetes.io/region
                    operator: In
                    values:
                      - ORD1
In this example, the Maya worker is scheduled on amd-epyc-rome or on intel-xeon-v4 CPU nodes in that order of preference. They are scheduled in ORD1, CoreWeave's Chicago datacenter.
Resource requests
The resource requests at the end of the spec determines the CPU, GPU, and memory limits for the container:
resources:
      limits:
        cpu: 35
        memory: 130Gi
      requests:
        cpu: 35
        memory: 129Gi
Shared storage
A possible modification to the worker values ensures that shared storage is mounted to the worker Pods. This is accomplished by adding the following volumeMount definitions to the Worker manifest.
volumeMounts:
  - name: render-output
    mountPath: /mnt/output
volumes:
  - name: general
    persistentVolumeClaim:
      claimName: render-output
The worker section so far
A complete worker section of the Deadline manifest looks like the following:
Click to expand - Worker section
version: 10.1.18.5
rcs:
  pass: password123
 licenseForwarder:
  enabled: true
  auth:
    secrets:
      name: ubl-certificates
workers:
- name: maya-epyc
    enabled: true
    groups:
      - maya-epyc
      - maya
    pools:
      - vfx
    volumeMounts:
    - name: render-output
    mountPath: /mnt/output
    volumes:
    - name: general
    persistentVolumeClaim:
      claimName: render-output
    scale:
      pollingNames:
      - name: maya-epyc
        type: Group
      minReplicas: 0
      maxReplicas: 100
      scalingFactor: 1
    image: registry.gitlab.com/coreweave/render-images/maya2022:1
    imagePullSecrets: &imagePullSecrets
      - name: render-images
    env:
      - name: ARNOLD_LICENSE_ORDER
        value: network
      - name: ADSKFLEX_LICENSE_FILE
        value: 127.0.0.1
    affinity:
      nodeAffinity:
        requiredDuringSchedulingIgnoredDuringExecution:
          nodeSelectorTerms:
            - matchExpressions:
                - key: node.coreweave.cloud/cpu
                  operator: In
                  values:
                    - amd-epyc-rome
                    - intel-xeon-v4
                - key: node.coreweave.cloud/class
                  operator: In
                  values:
                    - cpu
        preferredDuringSchedulingIgnoredDuringExecution:
            - weight: 100
              preference:
                matchExpressions:
                  - key: topology.kubernetes.io/region
                    operator: In
                    values:
                      - ORD1
    resources:
      limits:
        cpu: 35
        memory: 130Gi
      requests:
        cpu: 35
        memory: 129Gi
If you'd like to learn more about what the pieces of this manifest mean, refer to our Virtual Server documentation.
Complete the manifest
An example of a complete Deadline manifest, created with non-default values, looks like this:
Click to expand - Example Deadline deployment YAML file
version: 10.1.18.5
rcs:
  pass: password123
 licenseForwarder:
  enabled: true
  auth:
    secrets:
      name: ubl-certificates
workers:
  images:
  - name: maya-epyc
      enabled: true
      groups:
        - maya-epyc
        - maya
      pools:
        - vfx
      scale:
        pollingNames:
        - name: maya-epyc
          type: Group
        minReplicas: 0
        maxReplicas: 100
        scalingFactor: 1
      image: registry.gitlab.com/coreweave/render-images/maya2022:1
      imagePullSecrets: &imagePullSecrets
        - name: render-images
      env:
        - name: ARNOLD_LICENSE_ORDER
          value: network
        - name: ADSKFLEX_LICENSE_FILE
          value: 127.0.0.1
      affinity:
        nodeAffinity:
          requiredDuringSchedulingIgnoredDuringExecution:
            nodeSelectorTerms:
              - matchExpressions:
                  - key: node.coreweave.cloud/cpu
                    operator: In
                    values:
                      - amd-epyc-rome
                      - intel-xeon-v4
                  - key: node.coreweave.cloud/class
                    operator: In
                    values:
                      - cpu
          preferredDuringSchedulingIgnoredDuringExecution:
              - weight: 100
                preference:
                  matchExpressions:
                    - key: topology.kubernetes.io/region
                      operator: In
                      values:
                        - ORD1
      resources:
        limits:
          cpu: 35
          memory: 130Gi
        requests:
          cpu: 35
          memory: 129Gi
To test this manifest, copy and paste the contents of the sample file provided above into your Deadline application's YAML configuration area, then click the Deploy button.
After deploying, Deadline Pods should appear in your namespace. These are viewable by running kubectl get pods. It is normal for some components to restart while the repository is installing. Once the Pod named repository-init reaches Complete, then those components should no longer continue to restart.
It is common to have many worker types, or even multiple different hardware variations for the same DCC (e.g. maya-epyc, maya-xeon, maya-A4000, etc.).
Deadline repository management
It is possible to connect to the Deadline repository once it is in the Running state.
By default, the simplest way to connect is by using the Deadline remote connection server. This can be reached at the domain:
rcs-<name of deadline release>-<your namespace>.coreweave.cloud
Where <name of deadline release> is the name used to deploy the Deadline application.
In the window named Select Repository, place the address in the Remote Server field. By default, the RCS connection uses port 4433.
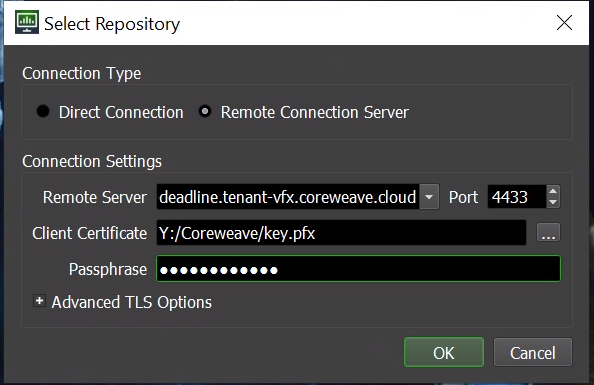
The client certificate may be retrieved using the following command:
$ kubectl cp $(kgp | grep rcs | grep "<Name of Deadline Release>" | grep -o '^\S*'):/tmp/clientkey.pfx <local directory to store key>/key.pfx
Replace <name of Deadline release> and <local directory to store key> with their actual values.
Select the downloaded certificate, then enter the passphrase specified in the YAML manifest. Finally, click the OK button to connect.
Once connected, navigate to View -> Panels -> Limits. The limits specified earlier appear here. Opening one presents the following configuration screen:
 (1) (1).d0fff2b.957.png)
This menu displays the license name, the usage level, the license count, the master worker list, the list of workers on the deny list, and the workers excluded from the limit.
Due to limitations in the Deadline API, license limits can only be created programmatically while they function identically to resource.
Security
Once the other components of Thinkbox Deadline are deployed, there are a few additional security settings that need to be adjusted.
Super user password
Secure the repository by creating a super user password.
When connected to the remote connection server, navigate to Tools -> Configure Repository Options -> User Security. From this menu, ensure that "Use the System User for the Deadline User" is enabled. This ensures that users cannot impersonate other user groups.
User groups
Next, configure user groups by navigating to Tools -> Manage User Groups.
.70e24d5.1200.png)
Consider creating a few user groups with different permissions for the different users who might be interacting with your repository.
Once this is complete, the Deadline instance is ready to render in a production environment!