Stable Diffusion: Text to Image
Deploy Stable Diffusion for scalable, high fidelity, text-to-image generation on CoreWeave Cloud
The open source diffusion model Stable Diffusion built by Stability.AI takes a text prompt as input to generate high-quality, photorealistic images as output. Stability.AI also offers a UI and an API service via Dream Studio for the model.
Generate images using Stable Diffusion on CoreWeave
This tutorial deploys the Stable Diffusion model as an autoscaling Inference Service on CoreWeave Cloud, which provides an HTTP API used to receive text prompt inputs for image generation.

Prerequisites
Tutorial source code
To follow this tutorial, first clone the tutorial source code repository from the CoreWeave GitHub.
The following tools are also required to run this tutorial:
- A CoreWeave Cloud account (with Kubectl configured to use your CoreWeave kubeconfig)
- kubectl
Optionally, Docker may also be used to create custom images for a model serializer and model server using the provided Dockerfile.
Tutorial files
The tutorial's source code repository contains the following files.
To deploy the tutorial using the public, pre-Tensorized model, the only required files are:
02-inference-service.yaml, and- the
servicedirectory and its contents.
Alternatively, it is possible to serialize the model yourself by leveraging the additional files provided in this tutorial's codebase.
It is also possible to create your own serializer and Inference Service images by using the provided Dockerfile. This Dockerfile utilizes CoreWeave's own PyTorch images, which ensures the final image is very lightweight.
| File name | Description |
|---|---|
serializer | Runs a job for custom-serializing models if desired. |
service | Runs the Inference Service. |
00-optional-s3-secret.yaml | Configures a custom S3 endpoint and S3 secrets for a custom Object Storage bucket, if desired. |
01-optional-s3-serialize-job.yaml | Deploys the serialization job (serializer) in order to custom-serialize a model, if desired. |
02-inference-service.yaml | Deploys the Stable Diffusion Inference Service onto CoreWeave Cloud. |
Dockerfile | The Dockerfile used to build both the model serializer image and model serving image, if it is desirable to create your own version of these images. |
(Recommended) Run the example using the pre-Tensorized model
The model used by default for this tutorial uses a publicly available model that was pre-serialized by CoreWeave's Tensorizer, a PyTorch module, model, and tensor serializer/deserializer that makes it possible to load models extremely quickly from HTTP/HTTPS and S3 endpoints. It also enables faster network load times, as well as load times from local disk volumes.
To run the example using this public, pre-Tensorized image, simply deploy the Inference Service using kubectl:
$ kubectl apply -f 02-inference-service.yaml
Then, test the Inference Service endpoint.
Run the tutorial using custom serialization
Serializing the Stable Diffusion model yourself requires an S3 endpoint and its associated secrets. Some of the provided files also need to be adjusted as described below.
Generate an S3 key
First, generate an S3 key from the Object Storage section of the CoreWeave Cloud App.
See Object Storage for more information.
Create an Object Storage bucket
Next, create a new Object Storage bucket using the s3cmd tool:
$ s3cmd mb s3://YOURBUCKET
Install the S3 secrets and endpoint hostname
To install the S3 access and secret keys created earlier, first base64-encode each of the key values.
$ echo -n "<your key>" | base64"
For example:
$ echo -n "<YOUR ACCESS KEY>" | base64
QUNDRVNTX0tFWV9IRVJF

$ echo -n "<YOUR SECRET KEY>" | base64
U0VDUkVUX0tFWV9IRVJF
Then, in the 00-optional-s3-secret.yaml file, replace the access and secret key placeholders in the .data.access_key and .data.secret_key fields with your base64-encoded keys, respectively. For example:
apiVersion: v1
data:
  access_key: QUNDRVNTX0tFWV9IRVJF
kind: Secret
metadata:
  name: s3-access-key
type: Opaque
---
apiVersion: v1
data:
  secret_key: U0VDUkVUX0tFWV9IRVJF
kind: Secret
metadata:
  name: s3-secret-key
type: Opaque
The S3 endpoint URL of the new S3 bucket must also be included in the 00-optional-s3-secret.yaml file.
First, base64-encode the endpoint URL. The endpoint URL should correspond to the region in which your new bucket is hosted. In this example, the ORD1 region is used, which means the hostname of the Object Storage endpoint URL is object.ord1.coreweave.com.
$ echo -n "object.ord1.coreweave.com" | base64

b2JqZWN0Lm9yZDEuY29yZXdlYXZlLmNvbQ==
Replace the host URL placeholder (.data.url) with the base64-encoded S3 endpoint URL of the new bucket. For example:
apiVersion: v1
data:
  url: b2JqZWN0Lm9yZDEuY29yZXdlYXZlLmNvbQ==
  kind: Secret
metadata:
  name: s3-host-url
type: Opaque
Once these values are replaced, create the Secrets object by applying the 00-optional-s3-secret.yaml file using kubectl.
$ kubectl apply -f 00-optional-s3-secret.yaml
Serialize the model
01-optional-s3-serialize-job.yaml runs the serialization Job for the model when deployed.
Before deploying the Job, adjust the following command arguments in the 01-optional-s3-serialize-job.yaml file.
- Replace the value of the command option
--dest-bucketwith the name of the bucket to which the model will be serialized. - Replace the value of the command option
--hf-model-idwith the ID of the model you would like to serialize. (By default, the model ID is set torunwayml/stable-diffusion-v1-5. Additional model IDs are available on Hugging Face.)
Once these values are added, deploy the Job using kubectl to run it:
$ kubectl apply -f 01-optional-s3-serialize-job.yaml
Run the Inference Service
To run the Inference Service, replace the model's URI in the 02-inference-service.yaml file with the S3 URI pointing to your custom model.
     containers:
      - name: kfserving-container
        image: ghcr.io/coreweave/ml-containers/sd-inference:amercurio-sd-overhaul-7d29c61
        command:
        - "python3"
        - "/app/service.py"
        - "--model-uri=s3://tensorized/runwayml/stable-diffusion-v1-5"
        - "--precision=float16"
        - "--port=80"
If you are using a custom-built Inference Service image using the Dockerfile provided in the tutorial repository, additionally replace the URL in .containers.image to point to the custom image.
      containers:
      - name: kfserving-container
        image: ghcr.io/coreweave/ml-containers/sd-inference:amercurio-sd-overhaul-7d29c61
        command:
        - "python3"
        - "/app/service.py"
        - "--model-uri=s3://tensorized/runwayml/stable-diffusion-v1-5"
        - "--precision=float16"
        - "--port=80"
Finally, start the Inference Service using kubectl.
$ kubectl apply -f 02-inference-service.yaml.
Test the endpoint
This example curl command can be used to test the Inference Service endpoint.
$ curl -X 'POST' \
  'https://sd.tenant-example-example.knative.ord1.coreweave.cloud/generate' \
  -H 'accept: application/json' \
  -H 'Content-Type: application/json' \
  -d '{
  "prompt": "a lazy cat sleeping on a pillow",
  "guidance_scale": 7,
  "num_inference_steps": 28,
  "seed": 0,
  "width": 512,
  "height": 512
}' --output cat.png
Here is an example output image from this query:
.ac9b878.512.png)
To find the value of YOUR_KSVC, use kubectl to list all Knative services.
$ kubectl get ksvc
For example:
$ kubectl get ksvc stable-diffusion

NAME               URL                                                                           READY   PREV   LATEST   PREVROLLEDOUTREVISION   LATESTREADYREVISION                        AGE
stable-diffusion   http://stable-diffusion.tenant-example-example.knative.ord1.coreweave.cloud   True           100                              stable-diffusion-predictor-default-00001   64m
Supported request parameters
The following parameters are supported for requests made to the endpoint:
guidance_scalenum_inference_stepsseedwidthheight
For example:
$ curl -X 'POST' \
  'https://sd.tenant-example-example.knative.ord1.coreweave.cloud/generate' \
  -H 'accept: application/json' \
  -H 'Content-Type: application/json' \
  -d '{
  "prompt": "a lazy cat sleeping on a pillow",
  "guidance_scale": 7,
  "num_inference_steps": 28,
  "seed": 0,
  "width": 512,
  "height": 512
}' --output cat.png
Hardware and performance
This example is set to one A40 node for the production of higher resolution images. Inference times are around 4.78 seconds for a default resolution of 512x512 with 50 steps. Larger resolutions take longer - for example, a resolution of 1024x768 takes around 47 seconds.
Multi-GPU Inference is not supported.
Depending on use case, GPUs with less VRAM will also work down to 8GB GPUs, such as the Quadro RTX 4000, however output resolution will be limited by memory to 512x512.
Benchmarks
The graph and table below compare recent GPU benchmark inference speeds for Stable Diffusion processing on different GPUs. For each GPU, the values represented on the graph and table below are comparisons between inference steps per second.
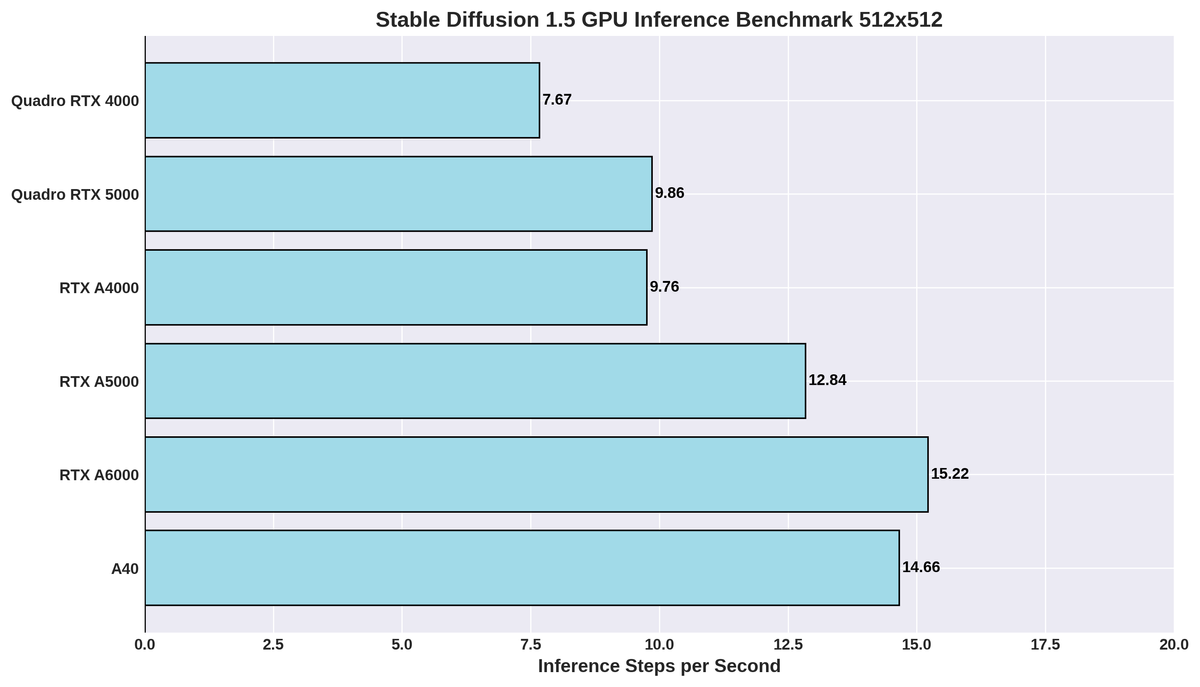
| GPU | Inference steps per second |
|---|---|
| Quadro RTX 4000 | 7.67 |
| Quadro RTX 5000 | 9.86 |
| RTX A4000 | 9.76 |
| RTX A5000 | 12.84 |
| RTX A6000 | 15.22 |
| A40 | 14.66 |
Refer to the Node Types page for more information about these GPUs.
Autoscaling
Autoscaling is controlled using annotations in the manifest for the Inference Service. By default, this example set to always run one replica, regardless of number of requests.
spec:
  template:
    metadata:
      annotations:
        autoscaling.knative.dev/minScale: "1"
        autoscaling.knative.dev/maxScale: "1"
Increasing the value of autoscaling.knative.dev/maxScale will allow CoreWeave's infrastructure to automatically scale up the number of replicas when there are multiple outstanding requests to the endpoints. Replicas will then automatically be scaled down as demand decreases.
Scale-to-Zero
Setting minReplicas to 0 enables Scale-to-Zero, a cost-effective measure that allows the Inference Service to be completely scaled down when no requests have been made for a period of time, preventing additional charges while the Service is idle. No cost is incurred when the Service is scaled to zero.