Monitor Slurm training jobs using CoreWeave’s Grafana dashboards for GPU utilization and performance metrics
SUNK StandardSUNK Self-ServiceThis is the fourth page of the Train on SUNK tutorial series. After submitting your training job in the previous step, you need a way to observe how it runs on the cluster. This page shows you how to use CoreWeave’s Grafana dashboards to monitor Slurm training jobs, inspect GPU utilization, and identify performance bottlenecks so you can confirm your job is progressing as expected. These dashboards also show whether a job is still making progress when its .out file looks empty or stale because of output buffering.
The following sections describe how to open Grafana and locate the dashboard used to inspect Slurm job activity.To open CoreWeave Grafana, first log in to the CoreWeave Cloud Console.From the Console, either navigate to Grafana from the left-hand navigation or access it directly at https://cks-grafana.coreweave.com. From there, select Dashboards, then select the Slurm Job Metrics dashboard.
This dashboard displays metrics used for debugging and analyzing the performance of specific jobs within your cluster. It provides detailed information about the nodes running a given job, including alerts and node details.To display details about a specific job, including information about the nodes the job ran on, select the cluster and job of interest from the top of the dashboard. For example, the following image displays details on job 48. The Job State Timeline, at the lower left of the Job Info section, shows that the job ran for over one hour.The dashboard also captures the states of the job (PENDING, RUNNING, COMPLETED, and so on) chronologically. This information can be useful for debugging and performance analysis.On the right, you can see two key metrics:
Job Efficiency captures an estimate of GPU usage during the job’s run.
Current FP8 FLOPS shows the compute rate as the job runs. It is common to see a regular pattern of peaks and valleys as the job runs. Typically, areas with less compute usage appear when the job loads data or saves checkpoints.
Below Job Info, the Nodes (Range) table lists the nodes that ran the job. To open the Node Details dashboard for a node, select its Node ID. Select Node Name to open the Pod Inspector dashboard, or slurmd log to open the node’s slurmd logs.
Further down the dashboard, GPU-specific panels help you confirm that the hardware runs as expected during the run.The included GPU metrics display information on the job’s run. At its most abstracted level, the presence of red indicates that the given aspect of the GPU is working hard, whereas the presence of green signifies that the given part of the GPU is working less hard.This example runs a 124M cell GPT2 test model on two L40 nodes, without InfiniBand.Different codes and data stress different parts of the GPU. A quick glance at the graphs is a way to check if the job runs correctly.At a glance, you can see that:
GPU Temperatures Running Jobs shifts from a green average to an orange average while the job runs. This is a clear indication that the GPUs are busy.
GPU Core Utilization Running Jobs is high, while GPU Mem Copy Utilization Running Jobs is lower, an expected outcome for a small model.
Even further down on this same dashboard, VRAM Usage shows the job uses about 175 GB of GPU memory, and GPUs Temperature hovers around 68°C, both indicators that the job is progressing well. You also see the GPUs Power Usage levels.
Storage performance can affect training throughput, so the dashboard also surfaces filesystem activity for the job.Even further down the dashboard is information on the filesystem. Two metrics of importance in the Filesystem section are the NFS Average Response/Request and NFS Total Read/Write rate.
The NFS Average graphs indicate how well the filesystem performs. A slowdown or spike indicates that the storage is slowing down, and that the job may perform better with faster or different storage, such as CoreWeave AI Object Storage.
The NFS Total Read / Write Rate demonstrates the total read and write operations on the filesystem. When a job first begins, it is typical to see a large read spike as the job reads in the model and data. While the job runs, a regular write spike is typical. This indicates when the job writes out checkpoints.
The NCCL Metrics row reports how the GPUs in your job communicate with each other through the NVIDIA Collective Communications Library (NCCL). Scroll past Node Resources to reach it. A job that spends most of its time waiting on collective operations still looks busy in the GPU panels. This row is where a communication bottleneck becomes visible.These panels populate only when GPU Straggler Detection runs on the cluster. If the row is empty, confirm the plugin is enabled and loaded. The job from the previous step runs outside a container, so its batch script also needs export NCCL_PROFILER_PLUGIN=/usr/lib/libnccl-profiler-gpusd.so. For instructions, see Enable GPU straggler detection. The panels sample at one-minute intervals. Jobs that run for less than about two minutes also produce empty or sparse panels.NCCL BusBW and NCCL Latency each appear six times, once per process-group size: 2, 4, 8, 16, 32+, and 512+ GPUs. Training frameworks create a separate process group for each parallelism dimension. The 32+ and 512+ panels include every group at or above that size. For example, a job that uses tensor parallelism across 8 GPUs and data parallelism across 512 would populate the 8-GPU, 32+, and 512+ panels, and the 2, 4, and 16 panels would read “This job does not contain NCCL groups of this size”. BusBW is measured in GB/s and latency in microseconds. Each series is one collective, such as AllReduce or AllGather, on one communicator, averaged across the ranks in that process group. Watch for a series that drops or climbs while the others hold steady, then use the tables below to find the rank behind it.NCCL Message Size graphs the average payload per collective, in bytes. Read the bandwidth panels against it, because small messages are latency-bound and never reach the bandwidth that large messages do.Two tables at the bottom of the row name the specific GPU to look at:
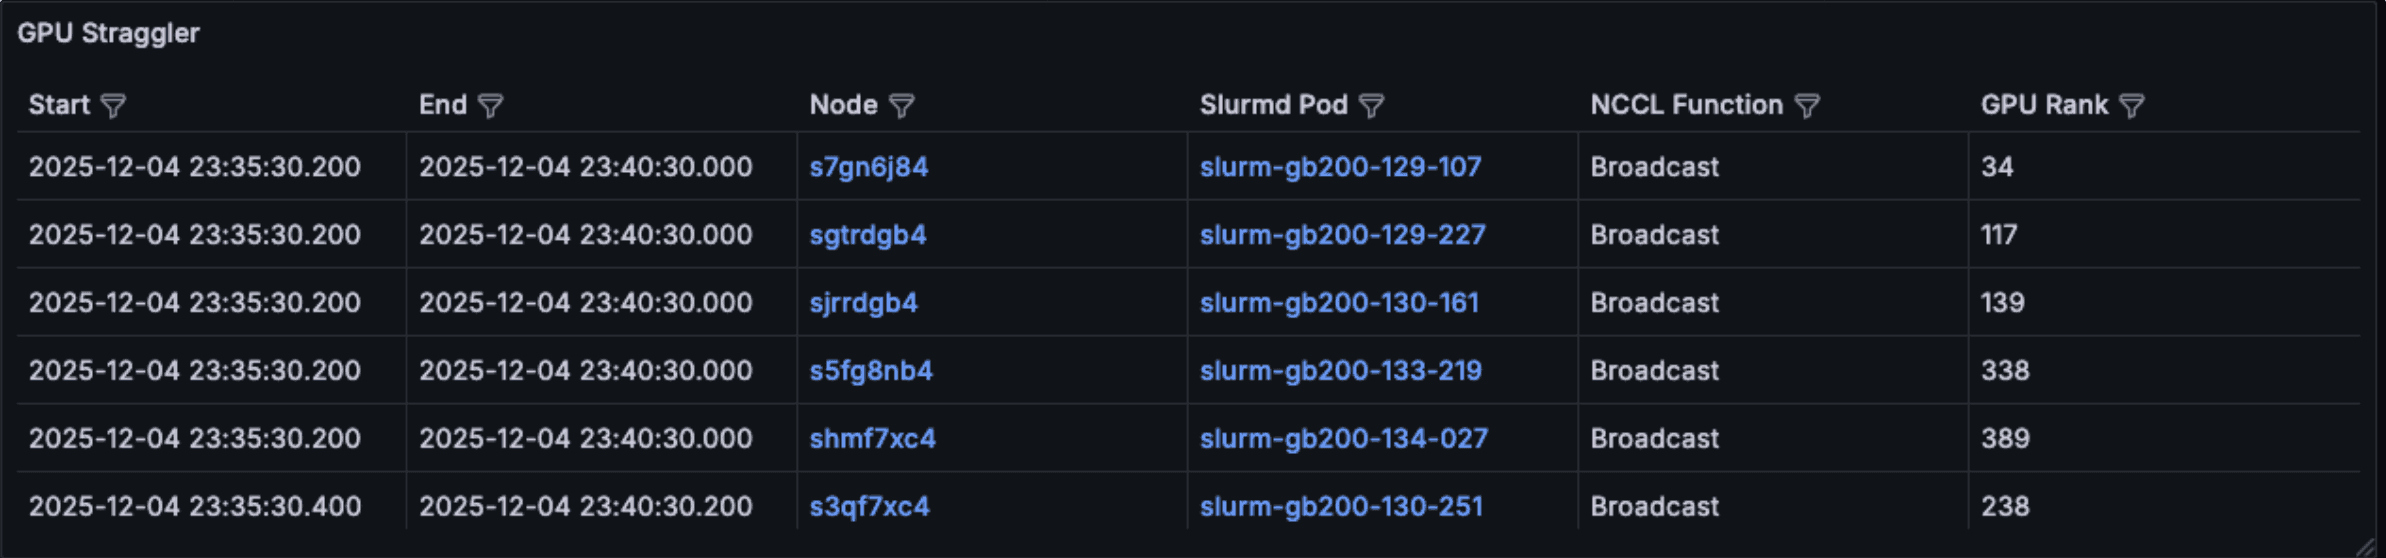
GPU Straggler identifies the rank that fell behind the rest of the job in collective operations, along with the start and end of the interval, the Node, and the slurmd Pod. The detection isolates the single furthest-behind rank, so each detected interval is one row, and a real job rarely shows more than one straggler at once.
Slow NCCL Operations lists ranks whose algorithmic bandwidth (AlgoBW) dropped well below that rank’s own average over the previous 24 hours, and names the NCCL Function that slowed down.
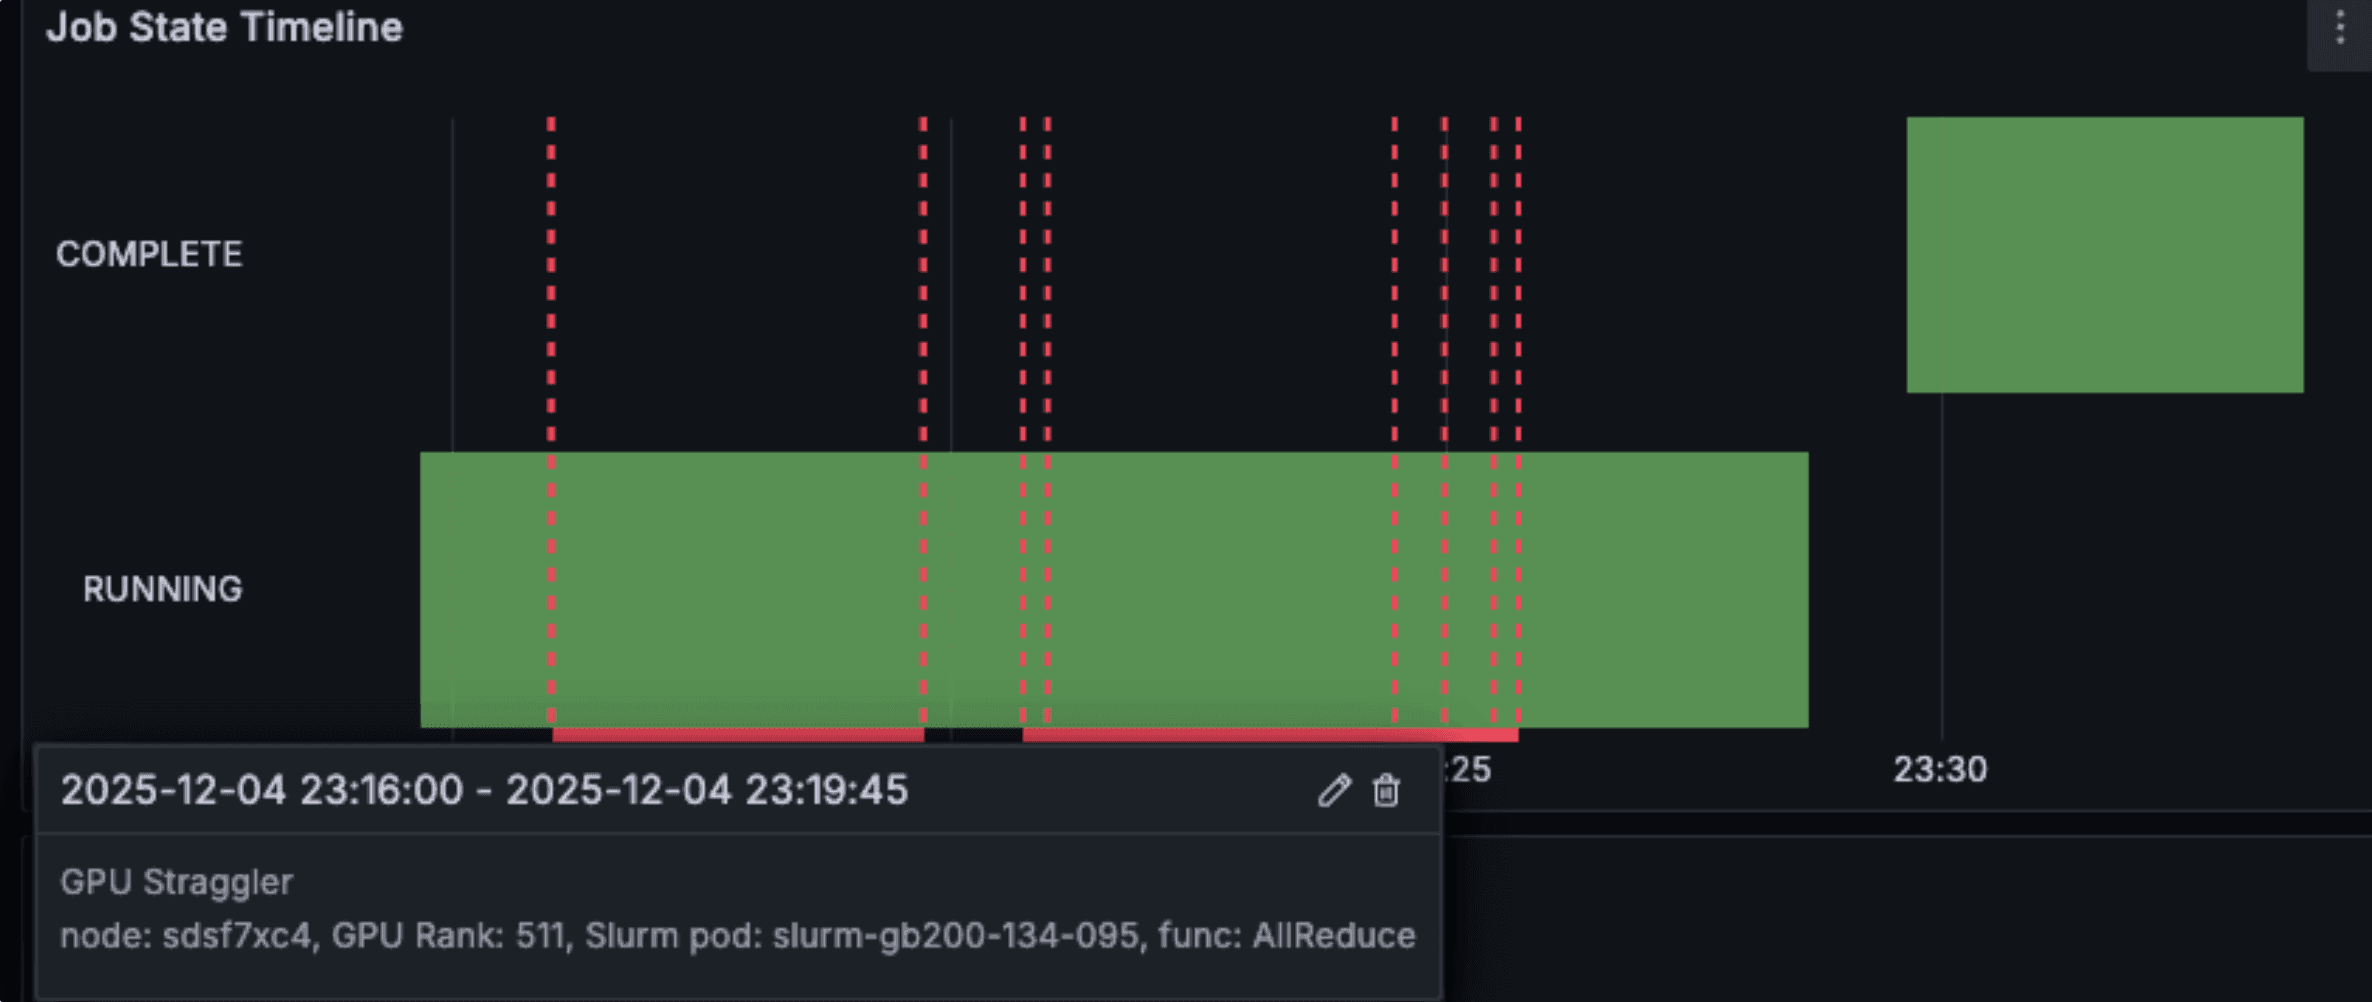
In both tables, the Node and Slurmd Pod values are links. To open the Node Details or Pod Inspector dashboard for that hardware, select the value. The following example comes from an earlier build of the dashboard. It shows more stragglers at once than a real job typically has, and an NCCL Function column that the current table doesn’t include.You don’t have to scroll down to the NCCL row to notice a problem. When CoreWeave flags a straggler, a red annotation appears on the Job State Timeline and Current FP8 FLOPS panels at the top of the dashboard. This aligns a dip in compute with its cause in the same view. Yellow annotations mark slow collectives on the NCCL BusBW panels. Both annotations are toggles at the top of the dashboard and are enabled by default.
For more information about the metrics displayed in this dashboard, see Slurm Job Metrics.
With these dashboards, you now have visibility into how your training job uses GPU, memory, storage, and interconnect resources on the cluster, and you can use that information to validate runs or investigate performance issues in future jobs.