

This documentation describes CoreWeave’s (“CW”) Capacity Finder product (delivered via console or API). Data, content, images, links and other information generated by or accessed in relation to Capacity Finder constitutes CW’s property and confidential information (“Capacity Data”). Do not share such Capacity Data, including without limitation screenshots, exports, API responses, or related links outside your company.To the extent your company’s agreement(s) with CW include confidentiality obligations, the Capacity Data is confidential thereunder; otherwise, you agree to keep it confidential and not disclose it without CW’s prior written consent. The Capacity Data is provided for general informational purposes only, without warranty, and to the maximum extent permitted by law, CW disclaims liability arising from its use, including any reliance on it for capacity planning, purchasing, or other business decisions. Any agreement(s) between your company and CW shall govern in the event of any conflict with this notice.
- Compare GPU and CPU capacity in the same search or search for GPU or CPU instances separately.
- Search every eligible Zone or limit the search to selected Zones.
- Compare multiple instance types at once and size the request by Node count or, for CPU instances, minimum virtual CPUs (vCPUs).
- Continue from a result to provision capacity, create a cluster, or request cluster quota.
Limitations
Before you rely on Capacity Finder results, review the following constraints on what it evaluates and how its data is refreshed.- Capacity Finder only evaluates General Access Zones. Single-tenant or reserved Zones aren’t included in results.
- Capacity Finder does not consider Superchip-powered instance types (for example, GH200, GB200, GB300), which are not supported by Spot Node Pools.
- Capacity Finder uses cached capacity samples that CoreWeave refreshes on a fixed cadence. Results reflect the most recent refresh, not live inventory.
- Capacity Finder is informational. Results don’t guarantee a reservation. Capacity can shift between the query and provisioning, and Spot Node Pools remain preemptible after you create them.
Use Capacity Finder in the Cloud Console
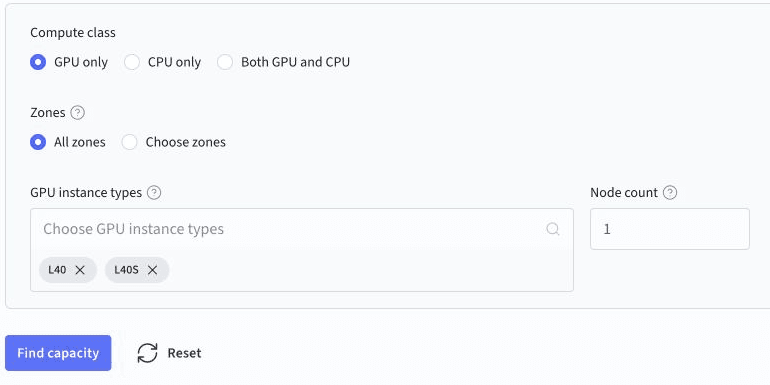
To compare Spot capacity, choose the instance types, requested capacity, and Zones that Capacity Finder evaluates. Capacity Finder evaluates Spot capacity only.- In the Cloud Console, open the Compute page and select the Capacity finder tab.
- Select GPU only, CPU only, or Both GPU and CPU. GPU only is selected by default.
- Under Zones, select one of the following options:
- All zones searches every eligible Zone.
- Choose zones searches one or more Zones that you select.
- Configure the GPU or CPU instance types in the search:
- GPU instance types: Select one or more GPU instance types, then enter the Node count to evaluate for each type.
- CPU instance types: Select one or more CPU instance types, or select Any CPU instance to compare all eligible CPU instance types. Enter the Node count, or click Use minimum vCPUs and enter the minimum number of vCPUs that your workload requires. Click Use node count to switch back.
- Click Find capacity.
Review Capacity Finder results
The results table reports how many Zones match your request. For a combined GPU and CPU search, review the GPU and CPU availability groups in each Zone to compare alternatives. Each row shows:- The Zone name and, when applicable, a Recommended, Cluster required, or Quota required status.
- A Spot GPU column, a Spot CPU column, or both, depending on the selected instance types.
- Instance types grouped by their availability label. When a group contains more instance types than the table initially shows, click its +N control to expand the group.
- An action for the next step in that Zone.

Result ranking
By default, Recommended Zones appear first. A Zone is recommended when you already operate a cluster there and the requested capacity is likely to be available. Select the Zone, Spot GPU, or Spot CPU table heading to change the sort order.Availability labels
Capacity Finder groups instance types under one of five labels derived from a placement score. Use this table to interpret what each label means for your provisioning decision.Act on a Capacity Finder result
The action in each result depends on your cluster and quota access in that Zone:- Provision: You already operate a cluster in the Zone. Open the Provision capacity drawer to configure one or more Spot Node Pools.
- Create cluster: Your organization has cluster quota in the Zone, but you don’t operate a cluster there. Create a cluster, then return to Capacity Finder or use the Node pools tab to provision the Spot Node Pool.
- Request cluster quota: Your organization needs cluster quota in the Zone. Review the pre-filled quota request, enter any additional context, and click Send Request. Some requests are approved automatically without a notification. Refresh the page to check whether the action has changed to Create cluster, which indicates that cluster quota is granted. After approval, create a cluster before you provision the Spot Node Pool.
Provision Spot Node Pools from a result
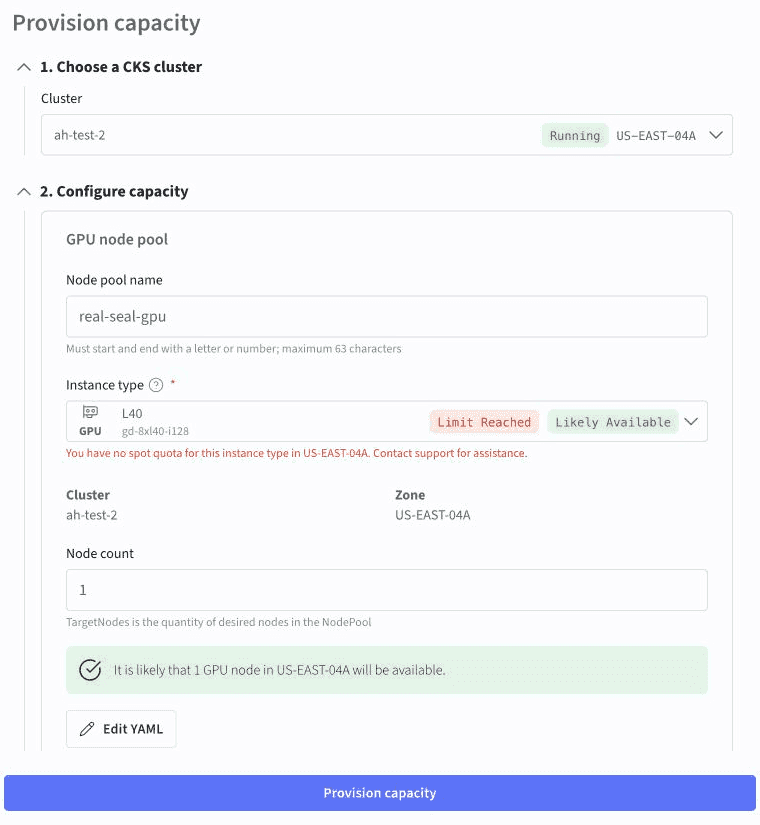
Capacity Finder can pre-fill GPU and CPU Spot Node Pool forms from a result where you already operate a cluster. If your organization has no Spot quota for an instance type in the selected cluster’s Zone, the drawer shows Limit Reached and prompts you to contact Support before provisioning.- In the result row, click Provision.
- In 1. Choose a CKS cluster, select a cluster in the result’s Zone.
- Under 2. Configure capacity, review the Node Pool forms for your search. If you searched for both GPU and CPU instances, Node pools to provision lets you choose to provision either type or both.
- For each Node Pool that you want to provision, configure the fields:
- Node pool name: Enter a name for the Node Pool.
- Instance type: Confirm or change the pre-filled instance type.
- Node count: Confirm or change the request size. For a CPU Node Pool, you can click Use minimum vCPUs to enter a vCPU requirement instead.
- Optional: Click Edit YAML to review or edit the generated Node Pool manifest.
- Click Provision capacity.
Next steps
- Review Spot Node Pools to prepare your workloads for preemption.
- Check Node Pool status to diagnose capacity or quota issues after provisioning.