Windows Images
CoreWeave offers a variety of Operating System base images. These are enhanced to run on the CoreWeave Cloud, and stored in the vd-images namespace. Our Windows OS images allow for fast, scalable deployment without the need for physical hardware.
cloud-init
Windows images on CoreWeave Cloud use Cloudbase-Init, a Windows implementation of Canonical's cloud-init. By default, we enable the following plugins, which are executed sequentially in a user's instance:
Add custom user data
When a user creates a new Virtual Server on CoreWeave Cloud, instance-specific data such as user account information and SSH keys automatically get passed through as cloudInit user data. When deploying a new Virtual Server, users also have the ability to add additional information. There are two ways to do this:
Via kubectl YAML:
cloudInit: |write_files:- encoding: b64content: JFBTVmVyc2lvblRhYmxlIHwgT3V0LUZpbGUgQzpcdGVzdC50eHQ=path: C:\test.ps1permissions: '0644'runcmd:- 'Powershell.exe -File C:\test.ps1'
Via the CoreWeave Apps Web UI
Within the Virtual Server deployment form, switch to the YAML tab:
 (1) (1).669e7b2.250.png)
Towards the bottom of the page, a commented-out cloudInit section will be pre-populated. You can uncomment it to add any custom user data:
 (1).ee1ee7b.474.png)
For more information on what can be added via native cloudInit user data, see the Cloudbase Solutions documentation.
CoreWeave user data features
There are several CoreWeave init scripts included in our base Windows image. These can all be enabled via cloudInit user data.
Add SMB mounts
Samba shares (or any SMB/CIFS-compliant shares) can be added via cloudInit to be mounted to the first available drive letter upon initial logon.
For example, here's a Samba instance hosted via CoreWeave Cloud Apps:
.3ab9bd7.1200.png)
Note that the SMB client's FQDN is fil01.tenant-orgname-namespace-cpierre.coreweave.cloud From this, we can derive that the SMB mount login information is:
- Username:
gaben - Password:
hunter2 - The shares mounted are named
vol01andvol02
Using this information, we can populate the cloudInit key-value pairs as follows:
cloudInit: |SmbMounts:- share: vol01server: fil01.tenant-orgname-namespace.coreweave.cloudusername: gabenpassword: hunter2- share: vol02server: fil01.tenant-orgname-namespace.coreweave.cloudusername: gabenpassword: hunter2
Available drive letters are randomized by default, and the first available letter is selected per share. Drive letters can also be manually specified by adding them, e.g. Drive: Z or Drive: F.
Enroll a Parsec Teams machine
CoreWeave Windows images support Parsec Teams. In order to enroll a Parsec Teams machine, include the following in the cloudInit block when deploying a Virtual Server:
cloudInit: |ParsecTeams:ComputerKey: key_generated_from_parsec_admin_panelTeamId: parsec_team_id# Use EITHER Group ID or EMail or User IDGroupId: parsec_group_idUserId: parsec_user_idEMail: parsec_user_email
If a Parsec machine is assigned to an email that isn't part of the Team, they can access it after they've been invited and accepted the invitation. If GroupId, UserId, or Email are not provided, the machine gets added to the Parsec Team unassigned.
When enrolling a Parsec Teams machine, the Boolean values Parsec: true and EDID: true must also be added to your manifest.
For more information on Parsec Teams and where to obtain your enrollment key, please visit Parsec's documentation.
Install Additional Software
All CoreWeave Windows images are pre-loaded with the Chocolatey package manager. On non-Server editions of Windows, WinGet is included as well. Software specified via cloudInit is installed automatically when a user initially logs on:
cloudInit: |Choco_Install:- googlechrome- firefoxWinGet_Install:- Discord.Discord- Microsoft.VisualStudioCode
Power-off with no interactive input
Windows images include scripts that can detect user activity: things like moving the mouse, clicks, or keyboard inputs. When these scripts are enabled, a user can choose the amount of time they want their Windows image to run if there's no external input. If they have set the desired amount of runtime, after that period passes they get a prompt that informs them they have a five-minute grace period remaining before shutdown.
For example, adding the following script will prompt the user after ten minutes of no activity. It then initiates shutdown automatically after an additional five minutes if the prompt is not acknowledged.
cloudInit: |shutoff_on_idle: 10
This feature should be combined with RunStrategy: RerunOnFailure via vm.Spec to prevent the instance from automatically powering back on after it shuts down. Additionally, the Boolean flag Autologon should be set to true here, as the idle tracker runs within the user context.
Configure Readiness Probe
In order to clearly communicate when start-up procedures have completed, the CoreWeave Cloud UI adds a Readiness Probe to Windows Virtual Servers. Windows images include a simple TCP listener on default port 1337 to communicate with the Kubernetes API.
Learn more about Readiness Probe configuration in Configuration Options: Operating System and Root Disk.
Display requests override
Certain applications in Windows, like Parsec, can disrupt timers set to detect inactivity or idling. This means that—despite setting a lock screen or screensaver timer, as in the previous step—the timer may never engage when a Parsec session or other application is active.
This behavior can be overridden via cloudInit. For most applications a user will need to specify the executable name. For Parsec or Teradici, only the application name is required.
cloudInit: |DisplayRequestsOverride:- Parsec- Teradici- chrome.exe
Boolean user data features
Some user data features can be enabled with Boolean values true or false.
Teradici PCoIP graphics agent for Windows
CoreWeave Cloud supports Teradici PCoIP on both Linux and Windows images.
Adding the following will install the Teradici graphics agent when a user first logs in, pointing the image to our licensing server:
cloudInit: |Teradici: true
Teradici should not be combined with either Parsec or Virtual Display options below. These agents aren't compatible with one another without substantial middleware.
Virtual display
Many applications running on Windows require a connection to a GPU for displays to render. Adding the following value will attach a virtual 4K monitor to all available outputs, disconnecting the built-in VNC display:
cloudInit: |EDID: true
When the Virtual Display is enabled, Windows will only output to the attached GPU. If a user has a GPU attached, the built-in VNC terminal is inaccessible.
Connecting via virtctl vnc will result in one of the blank screens shown below:
For serial console access (Windows Special Admin Console), use virtctl console instead.
Parsec Remote Desktop
CoreWeave strongly recommends Parsec for remote access on Windows GPU instances. Adding the following will install Parsec on initial logon.
cloudInit: |EDID: trueParsec: true
Parsec always requires the use of a Virtual Display, and thus must always be installed alongside EDID: true.
Automatic logon
This flag configures the user account created for automatic logon.
cloudInit: |Autologon: true
Operating System customizations
There are several modifications we've made to a vanilla Windows image in order to optimize it for use on CoreWeave Cloud. Depending on the use case, the following changes may be disabled or modified.
CoreWeave resize disk
By default, when the root disk of a Windows image is expanded, Windows will automatically expand the root disk partition to use all of the available space. Additionally, any new block volumes mounted to a Windows instance will automatically be initialized and partitioned as GPT, and formatted as NTFS.
You can modify the default behavior via the Windows Apps and Features menu:
 (1).4cb33e9.694.png)
Selecting Modify will prompt an action to perform when Windows detects that the root disk can be expanded. The default action ReSize will expand the root disk. NewPartition will create a new partition with the unallocated space, and automatically assign a drive letter. If the user doesn't enter a value, it will disable any automatic action.
.0344d47.1200.png)
After selecting the desired re-size disk option, an additional prompt will appear to set an action for newly detected RAW disks. You can enable or disable this with true or false.
.d7b39eb.1025.png)
CoreWeave auto-shutdown
Whether or not an instance powers off based on interactive user input is configured via cloud-init when an instance is initially deployed. After an instance has first been deployed, this feature is also configurable via Windows Apps and Features.
 (2).2215044.676.png)
Clicking Modify prompts the user to enter an integer value in minutes to configure auto-shutoff. They can also set the value to 0 to disable:
.924f1f8.741.png)
CoreWeave Windows update
In order to ensure system stability and predictability, the native Windows Update manager is disabled by default on CoreWeave instances. Instead, through custom scripts, updates are applied as follows:
- Windows Defender updates are applied daily at 3:00AM UTC, or as soon as possible if missed. These are silent, and do not require reboots.
- On the second Wednesday of the month, one day after Patch Tuesday, at 3:00AM UTC, or as soon as possible if missed:
- The
PSWindowsUpdatemodule is updated - On non-Server OSes,
WinGetis updated, where applicable - All Windows Updates are applied silently, without forcing reboots
- If there is a pending reboot but no user present, the system reboots to finish applying patches
- If there is a pending reboot and a user is logged in, they get a GUI prompt notifying them of any pending system patches requiring a reboot
- The
- Each day at 3:00AM UTC, the system is again checked for pending reboots. If there is a user logged in, they are notified, and asked to reboot. If there is no user logged in, the system will automatically be rebooted.
There are no user-configurable options for CoreWeave Windows Update. To revert to the default Windows Update behavior, open the Windows Update manager and uninstall them from the Windows Apps and Features menu.
 (1).2c6bb22.677.png)
CoreWeave PowerShell profile
When launching a new PowerShell session, users are presented with some helpful system stats.
 (2).c045b0f.566.png)
To disable this functionality on launch, a user can simply delete the profile with the following input:
>rm "$env:SystemRoot\System32\WindowsPowerShell\v1.0\Microsoft.PowerShell_profile.ps1" -Force -Verbose
CoreWeave PowerShell module
CoreWeave Windows Images include a PowerShell module that provides functions for useful tasks and automation. Within each image, some of the cloud-init user data features rely on the CoreWeave PowerShell module.
Using the CoreWeave PowerShell module
The CoreWeave PowerShell Module is a system-wide module. As all Windows Images on CoreWeave Cloud use at minimum PowerShell version 5.1, the module gets automatically imported when any of its functions are called.
To manually import the CoreWeave Module, input the following:
>Import-Module CoreWeave -WarningAction SilentlyContinue
Get-nVidiaDeviceDriverParameters
The function Get-nVidiaDeviceDriverParameters matches and returns properties of the currently attached NVIDIA GPU. If there is no valid driver installed and Windows cannot identify the attached GPU, the system will attempt to match the PCI ID instead. The output from this function is formatted for use in automating NVIDIA driver downloads.
>Get-nVidiaDeviceDriverParametersVERBOSE: After matching, GPU is NVIDIA Quadro RTX 4000, type is Quadro, series is Quadro RTX Series, product is QuadroRTX 4000, OS is Windows Server 2022, Current driver is 516.25Name Value---- -----ProductType QuadroProductSeries Quadro RTX SeriesProduct Quadro RTX 4000OperatingSystem Windows Server 2022RunningDriverVersion 516.25
Download-nVidiaDisplayDriver
This function automates downloading drivers from NVIDIA. This one has several parameters, each of which include argument completers:
Download-nVidiaDisplayDriver [-ProductType] <string> [-ProductSeries] <string> [-Product] <string> [-OperatingSystem] <string> [-Language] <string> [[-DCH] <bool>] [[-RunningDriverVersion] <string>] [-Force ] [<CommonParameters>]
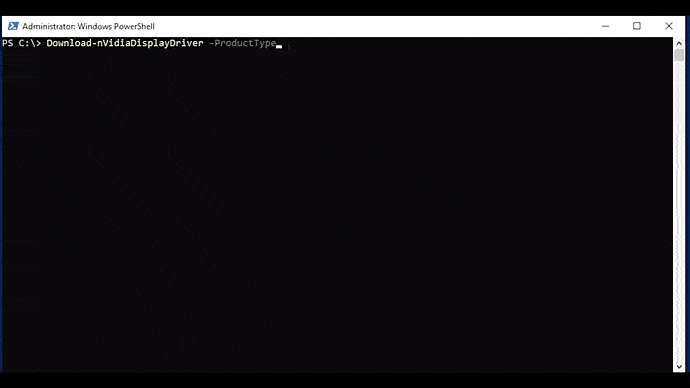
The easiest way to use this function is to combine it with Get-nVidiaDeviceDriverParameters. The returned output will be the location of the downloaded driver file:
>$Parameters = Get-nVidiaDeviceDriverParametersVERBOSE: After matching, GPU is NVIDIA Quadro RTX 4000, type is Quadro, series is Quadro RTX Series, product is Quadro RTX 4000, OS is Windows Server 2019>Download-nVidiaDisplayDriver @Parameters -Language 'English (US)'VERBOSE: Target driver version is 516.25C:\Users\user\AppData\Local\Temp\1\516.25-nvidia-rtx-winserv-2016-2019-2022-64bit-international-dch-whql.exe
Install-nVidiaDisplayDriver
This function installs a downloaded NVIDIA driver file. If the user hasn't provided a path, it will attempt to match and download the correct driver.
Setup runs directly and silently if your machine detects an attached NVIDIA GPU device. If no NVIDIA GPU device is detected, drivers are manually added to the Windows Driver Store via pnputil.
>Install-nVidiaDisplayDriver [[-DriverPath] <string>] [-CleanInstall] [-ForceInstall] [<CommonParameters>]
-ForceInstall will force the installation of the same or older driver version. -CleanInstall will wipe any existing driver configurations.
The easiest way to use this function is to run it directly, allowing auto-match of the attached NVIDIA GPU. If you're already running the latest driver, nothing happens:
>Install-nVidiaDisplayDriverTranscript started, output file is C:\Logs\InstallnVidiaDisplayDriver.LOGVERBOSE: After matching, GPU is NVIDIA Quadro RTX 4000, type is Quadro, series is Quadro RTX Series, product is Quadro RTX 4000, OS is Windows Server 2022, Current driver is 516.25 VERBOSE: Target driver version is 516.25VERBOSE: Target driver 516.25 is less than or equal to running driver 516.25 and Force flag was not passed, we're notgonna download anythingTranscript stopped, output file is C:\Logs\InstallnVidiaDisplayDriver.LOG0
In the event new drivers are installed, a reboot is required, but it won't be enforced by the system. You'll need to reboot before the new drivers will function.
Configure-AutoLogon
This function is called when Autologon: true. The -Action parameter will either enable or disable an automatic logon, with $true or $false respectively.
SynopsisConfigure-AutoLogon [[-InputObject] <pscredential>] [-Action] <bool> [<CommonParameters>]
The easiest way to use this function is to combine it with Get-Credential:
>Configure-AutoLogon -Action:$true -InputObject (Get-Credential)
Enroll-ParsecTeamMachine
This function is called by the Parsec Teams cloudInit feature. If an instance was not enrolled at the time of deployment, a user can complete enrollment silently using this function.
SynopsisEnroll-ParsecTeamMachine [[-APIHost] <string>] [-ComputerKey] <string> [-TeamID] <string> [[-AppRuleID] <string>] [[-GuestAccess] <bool>] [[-UserID] <int>] [[-GroupID] <int>] [[-EMail] <string>] [[-BinPath] <string>] [<CommonParameters>]
Invoke-SilentMSI
This function automates silently installing a provided Windows Installer file.
SynopsisInvoke-SilentMSI [-Action] <string> [[-MSI] <string>] [[-InstallerArgs] <string[]>] [<CommonParameters>]
Here's an example where we're installing PowerShell 7:
>Start-BitsTransfer -Source https://github.com/PowerShell/PowerShell/releases/download/v7.2.4/PowerShell-7.2.4-win-x64.msi -Destination $env:TEMP>Invoke-SilentMSI -Action Install -MSI "$env:TEMP\PowerShell-7.2.4-win-x64.msi" -InstallerArgs @('ADD_FILE_CONTEXT_MENU_RUNPOWERSHELL=1','ADD_EXPLORER_CONTEXT_MENU_OPENPOWERSHELL=1','ENABLE_PSREMOTING=1','REGISTER_MANIFEST=1')Transcript started, output file is C:\Logs\PowerShell7-x647.2.4.0.LOGVERBOSE: Beginning installation of PowerShell 7-x64 7.2.4.0VERBOSE: PowerShell 7-x64 7.2.4.0 has completed with exit code 0: ERROR_SUCCESSTranscript stopped, output file is C:\Logs\PowerShell7-x647.2.4.0.LOG0
A given MSI can also be uninstalled using the same function:
>Invoke-SilentMSI -Action Remove -MSI "$env:TEMP\PowerShell-7.2.4-win-x64.msi"Transcript started, output file is C:\Logs\PowerShell7-x647.2.4.0.LOGVERBOSE: Beginning REMOVAL of PowerShell 7-x64 7.2.4.0VERBOSE: PowerShell 7-x64 7.2.4.0 REMOVAL has completed with exit code 0: ERROR_SUCCESSTranscript stopped, output file is C:\Logs\PowerShell7-x647.2.4.0.LOG0