> ## Documentation Index
> Fetch the complete documentation index at: https://docs.coreweave.com/llms.txt
> Use this file to discover all available pages before exploring further.
> Install Weights & Biases and start tracking, visualizing, and managing machine learning experiments in minutes.
# Weights & Biases Quickstart
export const GitHubLink = ({url, compact = false}) =>
{compact ? "View source" : <>
GitHub source
}
;
export const ColabLink = ({url}) =>
Try in Colab
;
Install Weights & Biases to track, visualize, and manage machine learning experiments of any size.
Are you looking for information on W\&B Weave? See the [Weave Python SDK quickstart](/products/wandb/weave/quickstart) or [Weave TypeScript SDK quickstart](/products/wandb/weave/reference/generated_typescript_docs/intro-notebook).
## Create an account
The first time you sign in, a short setup flow creates your account and connects you to an organization. Which steps you see depends on how you arrive.
Select **Continue with Google**, **Continue with GitHub**, **Continue with Apple**, or **Continue with Microsoft**, or sign up with an email address and password.
If you already have Weights & Biases credentials, they work here. Select **Log in** instead of **Sign up**.
Check the inbox of the email address on your account for a verification link. If it doesn't arrive, check your spam folder or select **Resend email**.
Enter your full name, your organization or institution, and a username. Your username becomes your profile URL, so it must be unique. A username can use only letters, numbers, underscores, and hyphens.
For **How will you use Forge?**, select **Professional** for personal or business projects, or **Academic** for research or education.
To continue, accept the Terms of Service and Privacy Policy.
If your email domain matches an organization whose teams are open to you, you can join one of those teams.
If you arrived through a team invitation or already belong to a team, you don't see this step.
Name your organization. The name becomes part of its URL, as in `forge.coreweave.com/my-organization`.
If you joined a team in the previous step, arrived through a team invitation, or already belong to a team, you don't see this step.
Select one of **Train and fine-tune models**, **Build and evaluate agents**, **Run inference at scale**, or **I'm exploring**. Your choice determines which page you see next, but it doesn't restrict which products you can use.
When you finish the setup flow, your account is ready to use.
## Create an API key
To authenticate your machine, create an API key.
To create an API key, select the **Personal API key** or **Service Account API key** tab for details.
To create a personal API key owned by your user ID:
1. Log in to Forge, then click your user profile icon and select **User settings**.
2. Within **API keys**, select **New key**.
3. Provide a descriptive name for your API key.
4. Click **Create API key**.
5. Copy the displayed API key immediately and store it securely.
To create an API key owned by a service account:
1. In your team or organization settings, go to the **Service Accounts** tab.
2. Find the service account in the list.
3. Click the **action ()** menu, then click **Create API key**.
4. Provide a name for the API key, then click **Create**.
5. Copy the displayed API key immediately and store it securely.
6. Click **Done**.
You can create multiple API keys for a single service account to support different environments or workflows.
W\&B shows the full API key only once, when you create it. After you close the dialog, you cannot view the full API key again. Your settings display only the key ID (the first part of the key). If you lose the full API key, you must create a new one.
For secure storage options, see [Store API keys securely](/products/wandb/platform/app/settings-page/user-settings#store-and-handle-api-keys-securely).
## Install the `wandb` library and log in
1. Set the `WANDB_API_KEY` [environment variable](/products/wandb/track/environment-variables). Replace `YOUR_API_KEY` with the API key you created.
```bash theme={"system"}
export WANDB_API_KEY=YOUR_API_KEY
```
2. Install the `wandb` library and log in:
```shell theme={"system"}
pip install wandb
wandb login
```
1. Install the W\&B Python SDK with `pip`:
```bash theme={"system"}
pip install wandb
```
2. Import the W\&B Python SDK and log in to Weights & Biases from your Python script with `wandb.login()`:
```python theme={"system"}
import wandb
wandb.login()
```
1. Use shell escape (`!`) to install the W\&B Python SDK:
```notebook theme={"system"}
!pip install wandb
```
2. Import the W\&B Python SDK and log in to Weights & Biases from your notebook with `wandb.login()`:
```notebook theme={"system"}
import wandb
wandb.login()
```
## Initialize a run and track hyperparameters
In your Python script or notebook, initialize a W\&B run object with [`wandb.init()`](/products/wandb/ref/python/experiments/run). Use a dictionary for the `config` parameter
to specify hyperparameter names and values. Within the `with` statement, you can log metrics and other information to Weights & Biases.
```python theme={"system"}
import wandb
wandb.login()
# Project that the run is recorded to
project = "my-awesome-project"
# Dictionary with hyperparameters
config = {
'epochs' : 10,
'lr' : 0.01
}
with wandb.init(project=project, config=config) as run:
# Training code here
# Log values to W&B with run.log()
run.log({"accuracy": 0.9, "loss": 0.1})
```
For a complete example that simulates a training run and logs accuracy and loss metrics to Weights & Biases, see [Create a machine learning training experiment](#create-a-machine-learning-training-experiment).
A [run](/products/wandb/runs) is a core element of Weights & Biases. You use runs to [track metrics](/products/wandb/track), [create logs](/products/wandb/track/log), and track artifacts.
## Create a machine learning training experiment
This mock training script logs simulated accuracy and loss metrics to Weights & Biases. Copy and paste the following code into a Python script or notebook cell and run it:
```python theme={"system"}
import wandb
import random
wandb.login()
# Project that the run is recorded to
project = "my-awesome-project"
# Dictionary with hyperparameters
config = {
'epochs' : 10,
'lr' : 0.01
}
with wandb.init(project=project, config=config) as run:
offset = random.random() / 5
print(f"lr: {config['lr']}")
# Simulate a training run
for epoch in range(2, config['epochs']):
acc = 1 - 2**-config['epochs'] - random.random() / config['epochs'] - offset
loss = 2**-config['epochs'] + random.random() / config['epochs'] + offset
print(f"epoch={config['epochs']}, accuracy={acc}, loss={loss}")
run.log({"accuracy": acc, "loss": loss})
```
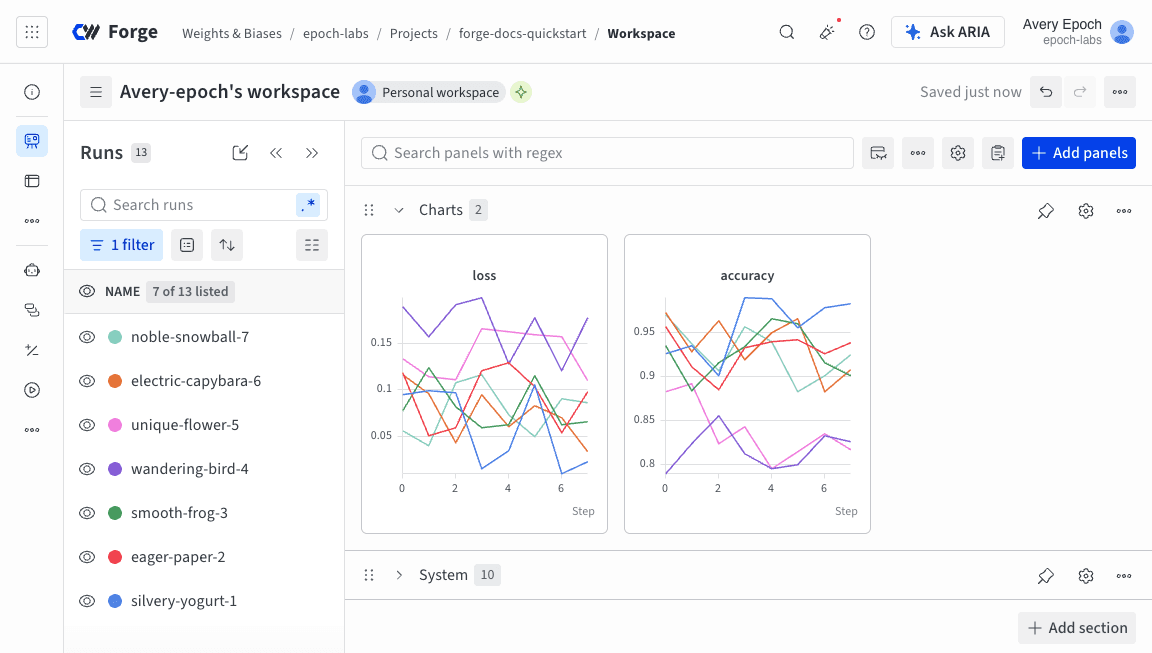
Visit [your Weights & Biases dashboard](https://forge.coreweave.com/wandb) to view recorded metrics such as accuracy and loss, and to see how they change during each training step. The following image shows the loss and accuracy tracked from each run. Each run object appears in the **Runs** column with a generated name.
## Next steps
Explore more Weights & Biases features:
* Learn about and create your first [run](/products/wandb/runs).
* Track models, datasets, and other files with [W\&B Artifacts](/products/wandb/artifacts).
* Automate hyperparameter searches and optimize models with [W\&B Sweeps](/products/wandb/sweeps).
* Share models, prompts, and datasets with [Registry](/products/registry).
* Analyze runs, visualize model predictions, and view artifacts in your project's [dashboard](/products/wandb/track/workspaces).
* Summarize findings and share updates with collaborators with [W\&B Reports](/products/wandb/reports).
* Trace and evaluate LLM applications with [W\&B Weave](/products/wandb/weave/quickstart).
## Related topics
- [Experiments overview](/products/wandb/track.md)
 ## Next steps
Explore more Weights & Biases features:
* Learn about and create your first [run](/products/wandb/runs).
* Track models, datasets, and other files with [W\&B Artifacts](/products/wandb/artifacts).
* Automate hyperparameter searches and optimize models with [W\&B Sweeps](/products/wandb/sweeps).
* Share models, prompts, and datasets with [Registry](/products/registry).
* Analyze runs, visualize model predictions, and view artifacts in your project's [dashboard](/products/wandb/track/workspaces).
* Summarize findings and share updates with collaborators with [W\&B Reports](/products/wandb/reports).
* Trace and evaluate LLM applications with [W\&B Weave](/products/wandb/weave/quickstart).
## Related topics
- [Experiments overview](/products/wandb/track.md)
## Next steps
Explore more Weights & Biases features:
* Learn about and create your first [run](/products/wandb/runs).
* Track models, datasets, and other files with [W\&B Artifacts](/products/wandb/artifacts).
* Automate hyperparameter searches and optimize models with [W\&B Sweeps](/products/wandb/sweeps).
* Share models, prompts, and datasets with [Registry](/products/registry).
* Analyze runs, visualize model predictions, and view artifacts in your project's [dashboard](/products/wandb/track/workspaces).
* Summarize findings and share updates with collaborators with [W\&B Reports](/products/wandb/reports).
* Trace and evaluate LLM applications with [W\&B Weave](/products/wandb/weave/quickstart).
## Related topics
- [Experiments overview](/products/wandb/track.md)