> ## Documentation Index
> Fetch the complete documentation index at: https://docs.coreweave.com/llms.txt
> Use this file to discover all available pages before exploring further.
# Slack OAuth integration
> Connect CoreWeave Alerts to your Enterprise Slack workspace using the OAuth authorization flow
This guide walks Enterprise Slack users through connecting the CoreWeave Mission Control app to a Slack workspace using the OAuth authorization flow.
The Slack OAuth integration lets your team receive real-time alerts about clusters, deployments, and operations. Because the app is in a pre-marketplace state, Enterprise users follow a specific manual authorization flow.
## Prerequisites
* The **Notifications Admin** IAM role, assigned through an [IAM Access Policy](/security/iam/access-policies/manage).
* A Slack Enterprise workspace. A Slack workspace admin must be available to approve the CoreWeave Mission Control app installation request.
## Phase 1: Install and authorize the app
In this phase, you submit an installation request that prompts your Slack workspace admin to approve the CoreWeave Mission Control app. Because the app isn't yet on the Slack Marketplace, this manual approval is required before you can authorize the connection.
1. Log in to the [CoreWeave Cloud Console](https://console.coreweave.com).
2. From the left navigation menu, select **Administration** > **Integrations**, or go directly to the [Integrations](https://console.coreweave.com/organization/integrations) page.
3. Locate the **Slack** section.
4. In the upper right corner, click the **Create Slack** button. A right-side panel opens, prompting you to select the type of Slack integration you want to create. Select the **Slack OAuth** button.
5. Click the **Start Slack authorization** button.
A browser window opens prompting you to authorize the CoreWeave Mission Control app and allow it the following permissions:
* View content and info about channels and conversations
* Perform actions in channels and conversations
Because CoreWeave Mission Control isn't yet listed in the Slack Marketplace, it requires manual approval from your Slack workspace admin before installation.
1. In the Slack workspace selection dropdown, select your Enterprise workspace.
2. Enter a message for your Slack Administrator (such as "Requesting CoreWeave Mission Control for the #devops-alerts channel").
3. In the bottom right corner, click the **Submit Request** button.
Wait for your Slack workspace admin to approve the CoreWeave Mission Control app.
### Approval process
The Slack workspace admin completes the steps in this section, not the requester. The Slack workspace admin receives an alert from Slackbot for the request. The CoreWeave Mission Control app requests the following permissions:
* `channels:read` to view basic information about public channels in a workspace.
* `groups:read` to view basic information about private channels that `@CoreWeave Mission Control` is added to.
* `chat:write` to send messages as `@CoreWeave Mission Control`.
To approve the request, the Slack workspace admin must complete the following steps:
1. Click the **Review and Approve for Workspace** button.
2. In the popup dialog, review the request and click **Approve**.
### Allow the application connection
After your Slack workspace admin approves the request, you receive a notification from **Slackbot** that the request was approved.
This notification has a link and button directing you to the Slack Marketplace to install the app.
**Skip clicking this link** because it results in a `404: There's been a glitch` page. This is expected, because the CoreWeave Mission Control app isn't yet listed in the Slack Marketplace.
Now, restart the connection process a second time:
1. Open the **CoreWeave Cloud Console**.
2. Click the **Create Slack** button. A right-side panel opens, prompting you to select the type of Slack integration you want to create. Select the **Slack OAuth** button.
3. Click the **Start Slack authorization** button. A browser window opens for you to allow the application. Although the dialog looks the same as the first one, this time it prompts you to allow the application to connect to your Slack workspace.
4. Select your Enterprise workspace in the dropdown menu.
5. Review the requested app permissions.
6. Click **Allow**.
After authorizing, your browser redirects back to the CoreWeave Cloud Console Integrations page. You know this step was successful if you see two buttons: **Remove CoreWeave Mission Control from your workspace** and **Create Slack integration**.
With the app installed and authorized, you can now configure the specific Slack channel that receives CoreWeave Alerts.
## Phase 2: Configure the channel
To create a Slack integration, first obtain the Slack channel ID for the channel you want to use for CoreWeave Alerts, and then enter the channel ID into the CoreWeave Cloud Console to configure the integration.
### Obtain the Slack channel ID
Find the channel ID for the Slack channel you want to use for CoreWeave Alerts. To find the ID:
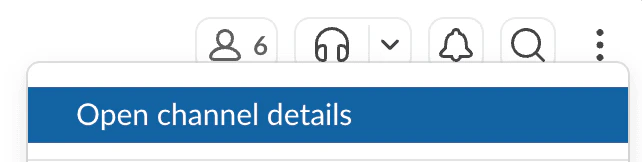
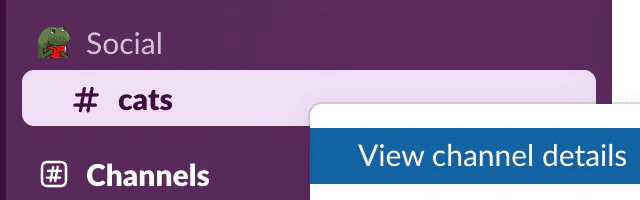
1. Open Slack and open the **Channel Details** for the target channel. You can find this in two ways:
* From the channel page: click the vertical three-dot menu icon in the upper right corner of the channel and select **Open channel details**:
 * From the channel list: hover over the channel name, right click, and select **View channel details**:
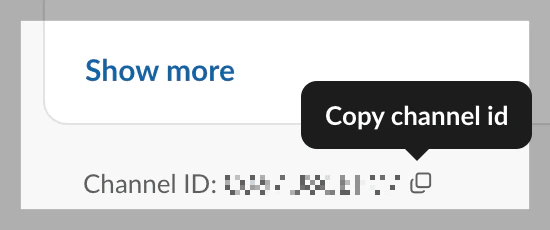
 2. The **Channel Details** page displays as a popup panel. Scroll to the bottom and copy the **Channel ID** (for example, `C01234ABCDE`):
 You need this channel ID in the next step to complete the Slack integration configuration.
### Complete the Slack integration configuration
Go back to the CoreWeave Cloud Console Integrations page.
1. In the Slack section of the Integrations page, click the **Create Slack** button. A right-side panel opens, prompting you to select the type of Slack integration you want to create. Select the **Slack OAuth** button.
2. In the **Display Name** field, enter a recognizable name (for example, `Cluster-Notifications`).
3. In the **Slack Channel ID** field, enter the channel ID you copied in the previous step.
4. Click the **Create** button. The right-side panel closes, bringing you back to the Cloud Console Integrations page, which displays a success message briefly in the bottom right corner.
The new Slack integration is now listed in the Slack section of the Integrations page.
## Phase 3: Activate the bot
In this phase, you add the CoreWeave Mission Control bot to your target Slack channel so it can post alerts. The bot can't post until it's a member of the channel, and testing and verifying notifications fail until you complete this step.
1. Go back to Slack and navigate to the Slack channel you used in Phase 2.
2. In the message box, type `@CoreWeave Mission Control` and press **Enter**.
3. When prompted, click the **Add to Channel** button.
## Phase 4: Test and verify the integration
In this final phase, you confirm that the integration works end-to-end by sending a test notification and verifying it arrives in Slack and in your alert history.
1. Go back to the CoreWeave Cloud Console Integrations page and find your Slack integration in the list.
2. Click **Send test**. In the lower right corner of the Cloud Console, a success message appears confirming that the test notification was sent.
3. In Slack, verify that the `Test Notification` message appears in your Slack channel.
4. Open the [Alert history](https://console.coreweave.com/account/notifications) page. Confirm that the test alert appears with the correct subject, a **Delivered** status, the **Slack OAuth** integration type, and a recent timestamp.
## Remove CoreWeave Mission Control
This section describes how to disconnect a single Slack channel from CoreWeave Alerts or remove the CoreWeave Mission Control app from your workspace entirely.
### Disconnect a specific channel
1. Navigate to the Cloud Console [Integrations](https://console.coreweave.com/organization/integrations) page.
2. Locate the channel integration under the Slack section.
3. Click the **Delete** button next to the specific integration.
### Completely remove the app
To remove the app from the CoreWeave Cloud Console:
* In the CoreWeave Cloud Console, click the **Remove CoreWeave Mission Control from your workspace** button (located in the top-right of the Slack integration section).
Alternatively, to remove the app from Slack:
1. In Slack, navigate to **Settings & Administration** > **Manage Apps**.
2. Find **CoreWeave Mission Control**, go to the **Configuration** tab, and select **Remove App**.
## Troubleshooting summary
| Step | Issue | Resolution |
| :---------------- | :------------------------------------------------ | :------------------------------------------------------------------------------------------------------------------ |
| **Access** | Integrations page shows a permissions error. | Assign the Notifications Admin role using an [IAM Access Policy](/security/iam/access-policies/manage). |
| **Authorization** | `404` page after admin approval. | Return to the CoreWeave Console and click **Create Slack** > **Slack OAuth** > **Start Slack authorization** again. |
| **Testing** | `Test notification failed` (`slack_post_failed`). | Manually invite `@CoreWeave Mission Control` to the channel. |
| **Testing** | No message received. | Verify the **Channel ID** matches the ID in the **About** section of your Slack channel. |
You need this channel ID in the next step to complete the Slack integration configuration.
### Complete the Slack integration configuration
Go back to the CoreWeave Cloud Console Integrations page.
1. In the Slack section of the Integrations page, click the **Create Slack** button. A right-side panel opens, prompting you to select the type of Slack integration you want to create. Select the **Slack OAuth** button.
2. In the **Display Name** field, enter a recognizable name (for example, `Cluster-Notifications`).
3. In the **Slack Channel ID** field, enter the channel ID you copied in the previous step.
4. Click the **Create** button. The right-side panel closes, bringing you back to the Cloud Console Integrations page, which displays a success message briefly in the bottom right corner.
The new Slack integration is now listed in the Slack section of the Integrations page.
## Phase 3: Activate the bot
In this phase, you add the CoreWeave Mission Control bot to your target Slack channel so it can post alerts. The bot can't post until it's a member of the channel, and testing and verifying notifications fail until you complete this step.
1. Go back to Slack and navigate to the Slack channel you used in Phase 2.
2. In the message box, type `@CoreWeave Mission Control` and press **Enter**.
3. When prompted, click the **Add to Channel** button.
## Phase 4: Test and verify the integration
In this final phase, you confirm that the integration works end-to-end by sending a test notification and verifying it arrives in Slack and in your alert history.
1. Go back to the CoreWeave Cloud Console Integrations page and find your Slack integration in the list.
2. Click **Send test**. In the lower right corner of the Cloud Console, a success message appears confirming that the test notification was sent.
3. In Slack, verify that the `Test Notification` message appears in your Slack channel.
4. Open the [Alert history](https://console.coreweave.com/account/notifications) page. Confirm that the test alert appears with the correct subject, a **Delivered** status, the **Slack OAuth** integration type, and a recent timestamp.
## Remove CoreWeave Mission Control
This section describes how to disconnect a single Slack channel from CoreWeave Alerts or remove the CoreWeave Mission Control app from your workspace entirely.
### Disconnect a specific channel
1. Navigate to the Cloud Console [Integrations](https://console.coreweave.com/organization/integrations) page.
2. Locate the channel integration under the Slack section.
3. Click the **Delete** button next to the specific integration.
### Completely remove the app
To remove the app from the CoreWeave Cloud Console:
* In the CoreWeave Cloud Console, click the **Remove CoreWeave Mission Control from your workspace** button (located in the top-right of the Slack integration section).
Alternatively, to remove the app from Slack:
1. In Slack, navigate to **Settings & Administration** > **Manage Apps**.
2. Find **CoreWeave Mission Control**, go to the **Configuration** tab, and select **Remove App**.
## Troubleshooting summary
| Step | Issue | Resolution |
| :---------------- | :------------------------------------------------ | :------------------------------------------------------------------------------------------------------------------ |
| **Access** | Integrations page shows a permissions error. | Assign the Notifications Admin role using an [IAM Access Policy](/security/iam/access-policies/manage). |
| **Authorization** | `404` page after admin approval. | Return to the CoreWeave Console and click **Create Slack** > **Slack OAuth** > **Start Slack authorization** again. |
| **Testing** | `Test notification failed` (`slack_post_failed`). | Manually invite `@CoreWeave Mission Control` to the channel. |
| **Testing** | No message received. | Verify the **Channel ID** matches the ID in the **About** section of your Slack channel. |