> ## Documentation Index
> Fetch the complete documentation index at: https://docs.coreweave.com/llms.txt
> Use this file to discover all available pages before exploring further.
# 트레이스 표시 보기 및 사용자 지정
> UI에서 Call을 확인하고 트레이스 데이터의 표시 방식을 사용자 지정합니다
W\&B Weave에서 Call을 생성한 후에는 단일 Call을 열어 입력, 출력, 메타데이터를 확인해야 하는 경우가 많습니다. 이 페이지에서는 UI 또는 SDK에서 Call을 확인하는 방법과 `weave.Markdown`을 사용하여 Weave가 UI에 트레이스 데이터를 렌더링하는 방식을 사용자 지정하는 방법을 설명합니다. 아래 탭에서 워크플로에 맞는 인터페이스를 선택하세요.
UI에서 Call을 확인하려면 다음 단계를 따르세요.
1. [Forge](https://forge.coreweave.com/wandb)로 이동하여 프로젝트를 선택하세요.
2. Weave 프로젝트 사이드바에서 **Traces**를 클릭하세요.
3. table에서 확인하려는 Call을 찾으세요.
4. Call을 클릭하여 세부 정보 페이지를 여세요.
Trace 뷰에 대한 자세한 내용은 [Weave Trace 뷰 탐색](/ko/products/wandb/weave/guides/tracking/trace-tree)을 참조하세요.
W\&B Weave Python SDK로 Call을 확인하려면 [`get_call`](/ko/products/wandb/weave/reference/python-sdk/trace/weave_client#method-get_call) 메서드를 사용하세요.
```python lines theme={"system"}
import weave
# 클라이언트 초기화
client = weave.init("your-project-name")
# ID로 특정 Call 조회
call = client.get_call("call-uuid-here")
print(call)
```
```typescript twoslash lines theme={"system"}
// @noErrors
import * as weave from 'weave'
// 클라이언트 초기화
const client = await weave.init('intro-example')
// ID로 특정 Call 조회
const call = await client.getCall('call-uuid-here')
console.log(call)
```
Service API로 Call을 확인하려면 [`/call/read`](/ko/products/wandb/weave/reference/service-api/calls/call-read) 엔드포인트에 요청을 보내세요.
```bash theme={"system"}
curl -L 'https://trace.wandb.ai/call/read' \
-H 'Content-Type: application/json' \
-H 'Accept: application/json' \
-d '{
"project_id": "string",
"id": "string",
}'
```
`weave.Markdown`으로 트레이스 렌더링 사용자 지정하기
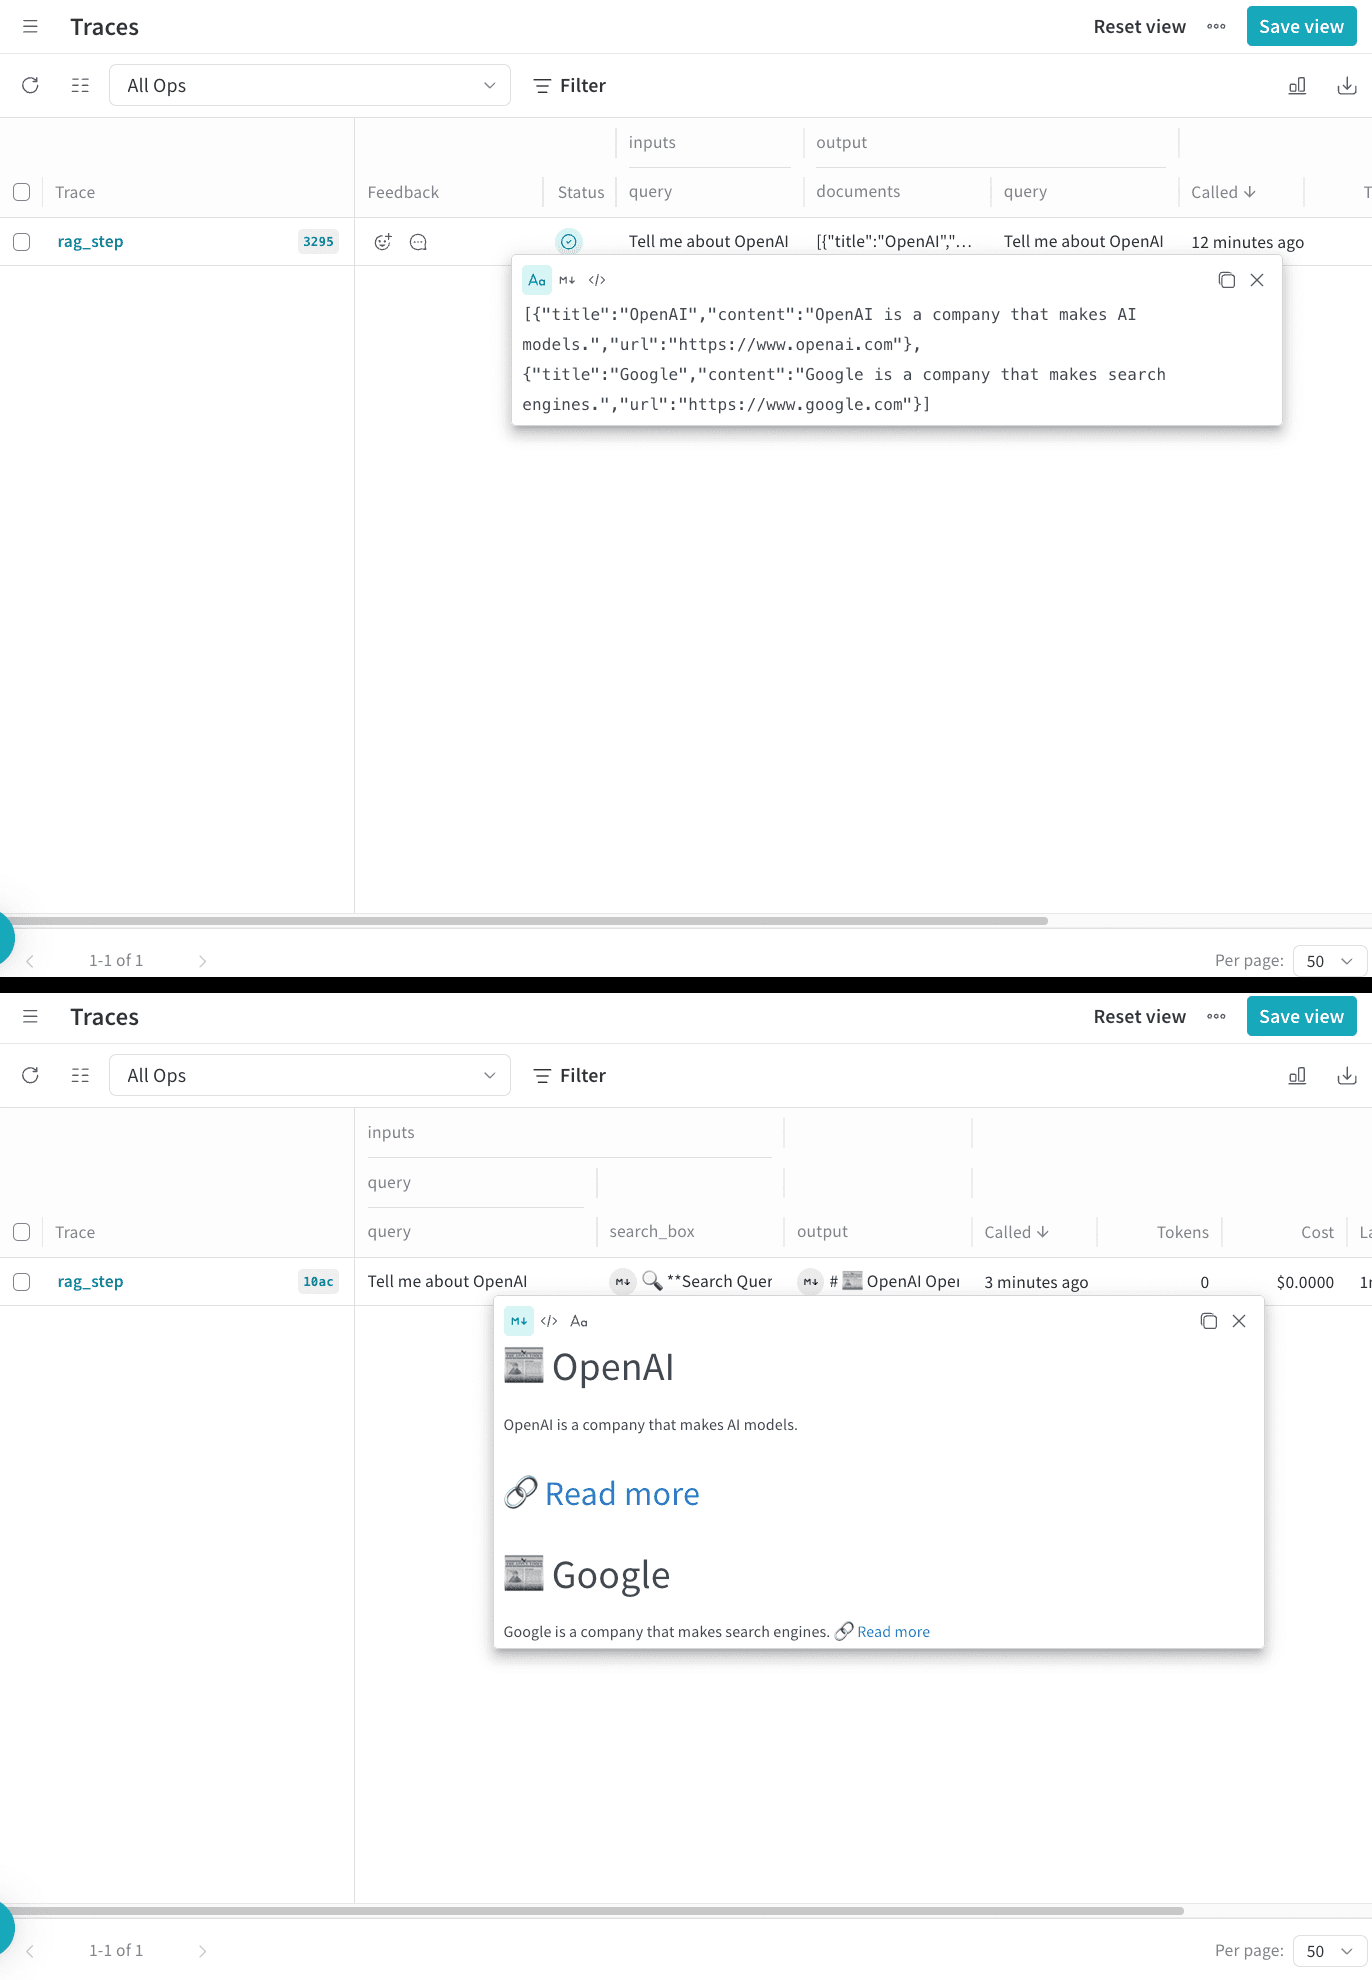
Call을 확인할 수 있게 되면, 해당 Call의 입력과 출력이 UI에 표시되는 방식을 직접 제어하고 싶을 수 있습니다. `weave.Markdown`을 사용하면 원본 데이터를 잃지 않고도 Weave가 트레이스 정보를 표시하는 방식을 사용자 지정할 수 있습니다. 기본 데이터 구조는 그대로 유지하면서 입력과 출력을 읽기 쉽게 서식이 지정된 콘텐츠 블록으로 렌더링할 수 있습니다.
`@weave.op` 데코레이터에 `postprocess_inputs` 및 `postprocess_output` 함수를 지정하여 트레이스 데이터의 서식을 지정하세요. 다음 코드 샘플은 후처리기를 사용하여 Weave에서 call을 더 읽기 쉬운 서식으로 렌더링합니다.
```python lines theme={"system"}
import weave
def postprocess_inputs(query) -> weave.Markdown:
search_box = f"""
**Search Query:**
``+`
{query}
``+`
"""
return {"search_box": weave.Markdown(search_box),
"query": query}
def postprocess_output(docs) -> weave.Markdown:
formatted_docs = f"""
# {docs[0]["title"]}
{docs[0]["content"]}
[Read more]({docs[0]["url"]})
---
# {docs[1]["title"]}
{docs[1]["content"]}
[Read more]({docs[1]["url"]})
"""
return weave.Markdown(formatted_docs)
@weave.op(
postprocess_inputs=postprocess_inputs,
postprocess_output=postprocess_output,
)
def rag_step(query):
# S&P 500 기업에 관한 예시 신문 기사
docs = [
{
"title": "OpenAI",
"content": "OpenAI is a company that makes AI models.",
"url": "https://www.openai.com",
},
{
"title": "Google",
"content": "Google is a company that makes search engines.",
"url": "https://www.google.com",
},
]
return docs
if __name__ == "__main__":
weave.init('markdown_renderers')
rag_step("Tell me about OpenAI")
```
```plaintext theme={"system"}
이 기능은 아직 TypeScript SDK에서 사용할 수 없습니다.
```
op를 실행하면 Weave는 Call의 세부 정보 페이지에 서식이 지정된 Markdown을 원본 데이터와 함께 렌더링합니다. 다음 스크린샷은 서식 적용 전과 후의 출력을 나란히 보여 줍니다.
 ## Related topics
- [트레이스 플롯 사용하기](/ko/products/wandb/weave/guides/tracking/trace-plots.md)
## Related topics
- [트레이스 플롯 사용하기](/ko/products/wandb/weave/guides/tracking/trace-plots.md)