> ## Documentation Index
> Fetch the complete documentation index at: https://docs.coreweave.com/llms.txt
> Use this file to discover all available pages before exploring further.
# 스레드 트레이스
> 스레드를 사용하여 LLM 애플리케이션의 멀티턴 대화를 트레이스하고 분석합니다.
W\&B Weave \_Threads\_를 사용하면 LLM 애플리케이션의 멀티턴 대화를 추적하고 분석할 수 있습니다. Threads는 관련된 Call을 공통 `thread_id`로 묶어 주므로, 전체 세션을 시각화하고 여러 턴에 걸쳐 대화 수준의 메트릭을 추적할 수 있습니다. 스레드는 코드로 생성할 수 있으며, Weights & Biases UI에서 시각화할 수 있습니다.
Threads를 시작하려면 다음 단계를 따르세요.
1. Threads의 기본 개념을 익히세요.
* [사용 사례](#use-cases)
* [정의](#definitions)
* [UI 환경](#ui-overview)
* [API 사양](#api-specification)
2. 일반적인 사용 패턴과 실제 사용 사례를 보여 주는 코드 샘플을 사용해 보세요.
* [기본 사용 예시](#basic-thread-creation)
* [고급 사용 예시](#manual-agent-loop-implementation)
사용 사례
스레드는 다음과 같은 항목을 구성하고 분석할 때 유용합니다.
* 멀티턴 대화
* 세션 기반 워크플로
* 서로 관련된 일련의 오퍼레이션
스레드를 사용하면 컨텍스트별로 Call을 그룹화할 수 있으므로, 시스템이 여러 단계에 걸쳐 어떻게 응답하는지 더 쉽게 파악할 수 있습니다. 예를 들어 단일 사용자 세션, 에이전트의 연쇄적인 의사 결정, 또는 인프라 계층과 비즈니스 로직 계층에 걸친 복잡한 요청을 추적할 수 있습니다.
스레드와 턴으로 애플리케이션을 구성하면 Weights & Biases UI에서 더 깔끔한 메트릭을 얻고 가시성도 높일 수 있습니다. 모든 하위 수준 Op를 일일이 확인할 필요 없이 중요한 상위 수준 단계에 집중할 수 있습니다.
정의
스레드
\_스레드\_는 공통 대화 컨텍스트를 공유하는 관련 Call을 논리적으로 묶은 그룹입니다. 스레드의 특징은 다음과 같습니다.
* 고유한 `thread_id`를 가집니다.
* 하나 이상의 \_턴\_으로 구성됩니다.
* 여러 Call에 걸쳐 컨텍스트를 유지합니다.
* 하나의 완전한 사용자 세션 또는 상호작용 흐름을 나타냅니다.
턴
\_턴\_은 스레드 내의 상위 수준 오퍼레이션으로, UI의 스레드 뷰에서 개별 행으로 표시됩니다. 각 턴의 특징은 다음과 같습니다.
* 대화 또는 워크플로의 논리적 단계 하나를 나타냅니다.
* 스레드 컨텍스트의 직계 자식이며, 중첩된 하위 수준 Call을 포함할 수 있습니다(이러한 Call은 스레드 수준 통계에 표시되지 않음).
Call
\_Call\_은 애플리케이션에서 `@weave.op` 데코레이터가 적용된 함수가 실행되는 각각의 경우를 말합니다.
* \_턴 Call\_은 새 턴을 시작하는 최상위 오퍼레이션입니다.
* \_Nested Call\_은 턴 안에서 실행되는 하위 수준 오퍼레이션입니다.
트레이스
\_트레이스\_는 단일 오퍼레이션의 전체 호출 스택을 캡처합니다. 스레드는 동일한 논리적 대화 또는 세션에 속한 트레이스를 하나로 묶습니다. 즉, 스레드는 여러 턴으로 이루어지며, 각 턴은 대화의 한 부분에 해당합니다. 트레이스에 대한 자세한 내용은 [트레이싱 개요](/ko/products/wandb/weave/guides/tracking/tracing)를 참조하세요.
UI 개요
Weave 프로젝트 사이드바에서 **Threads**를 선택하면 [Threads list view](#threads-list-view)에 액세스할 수 있습니다.
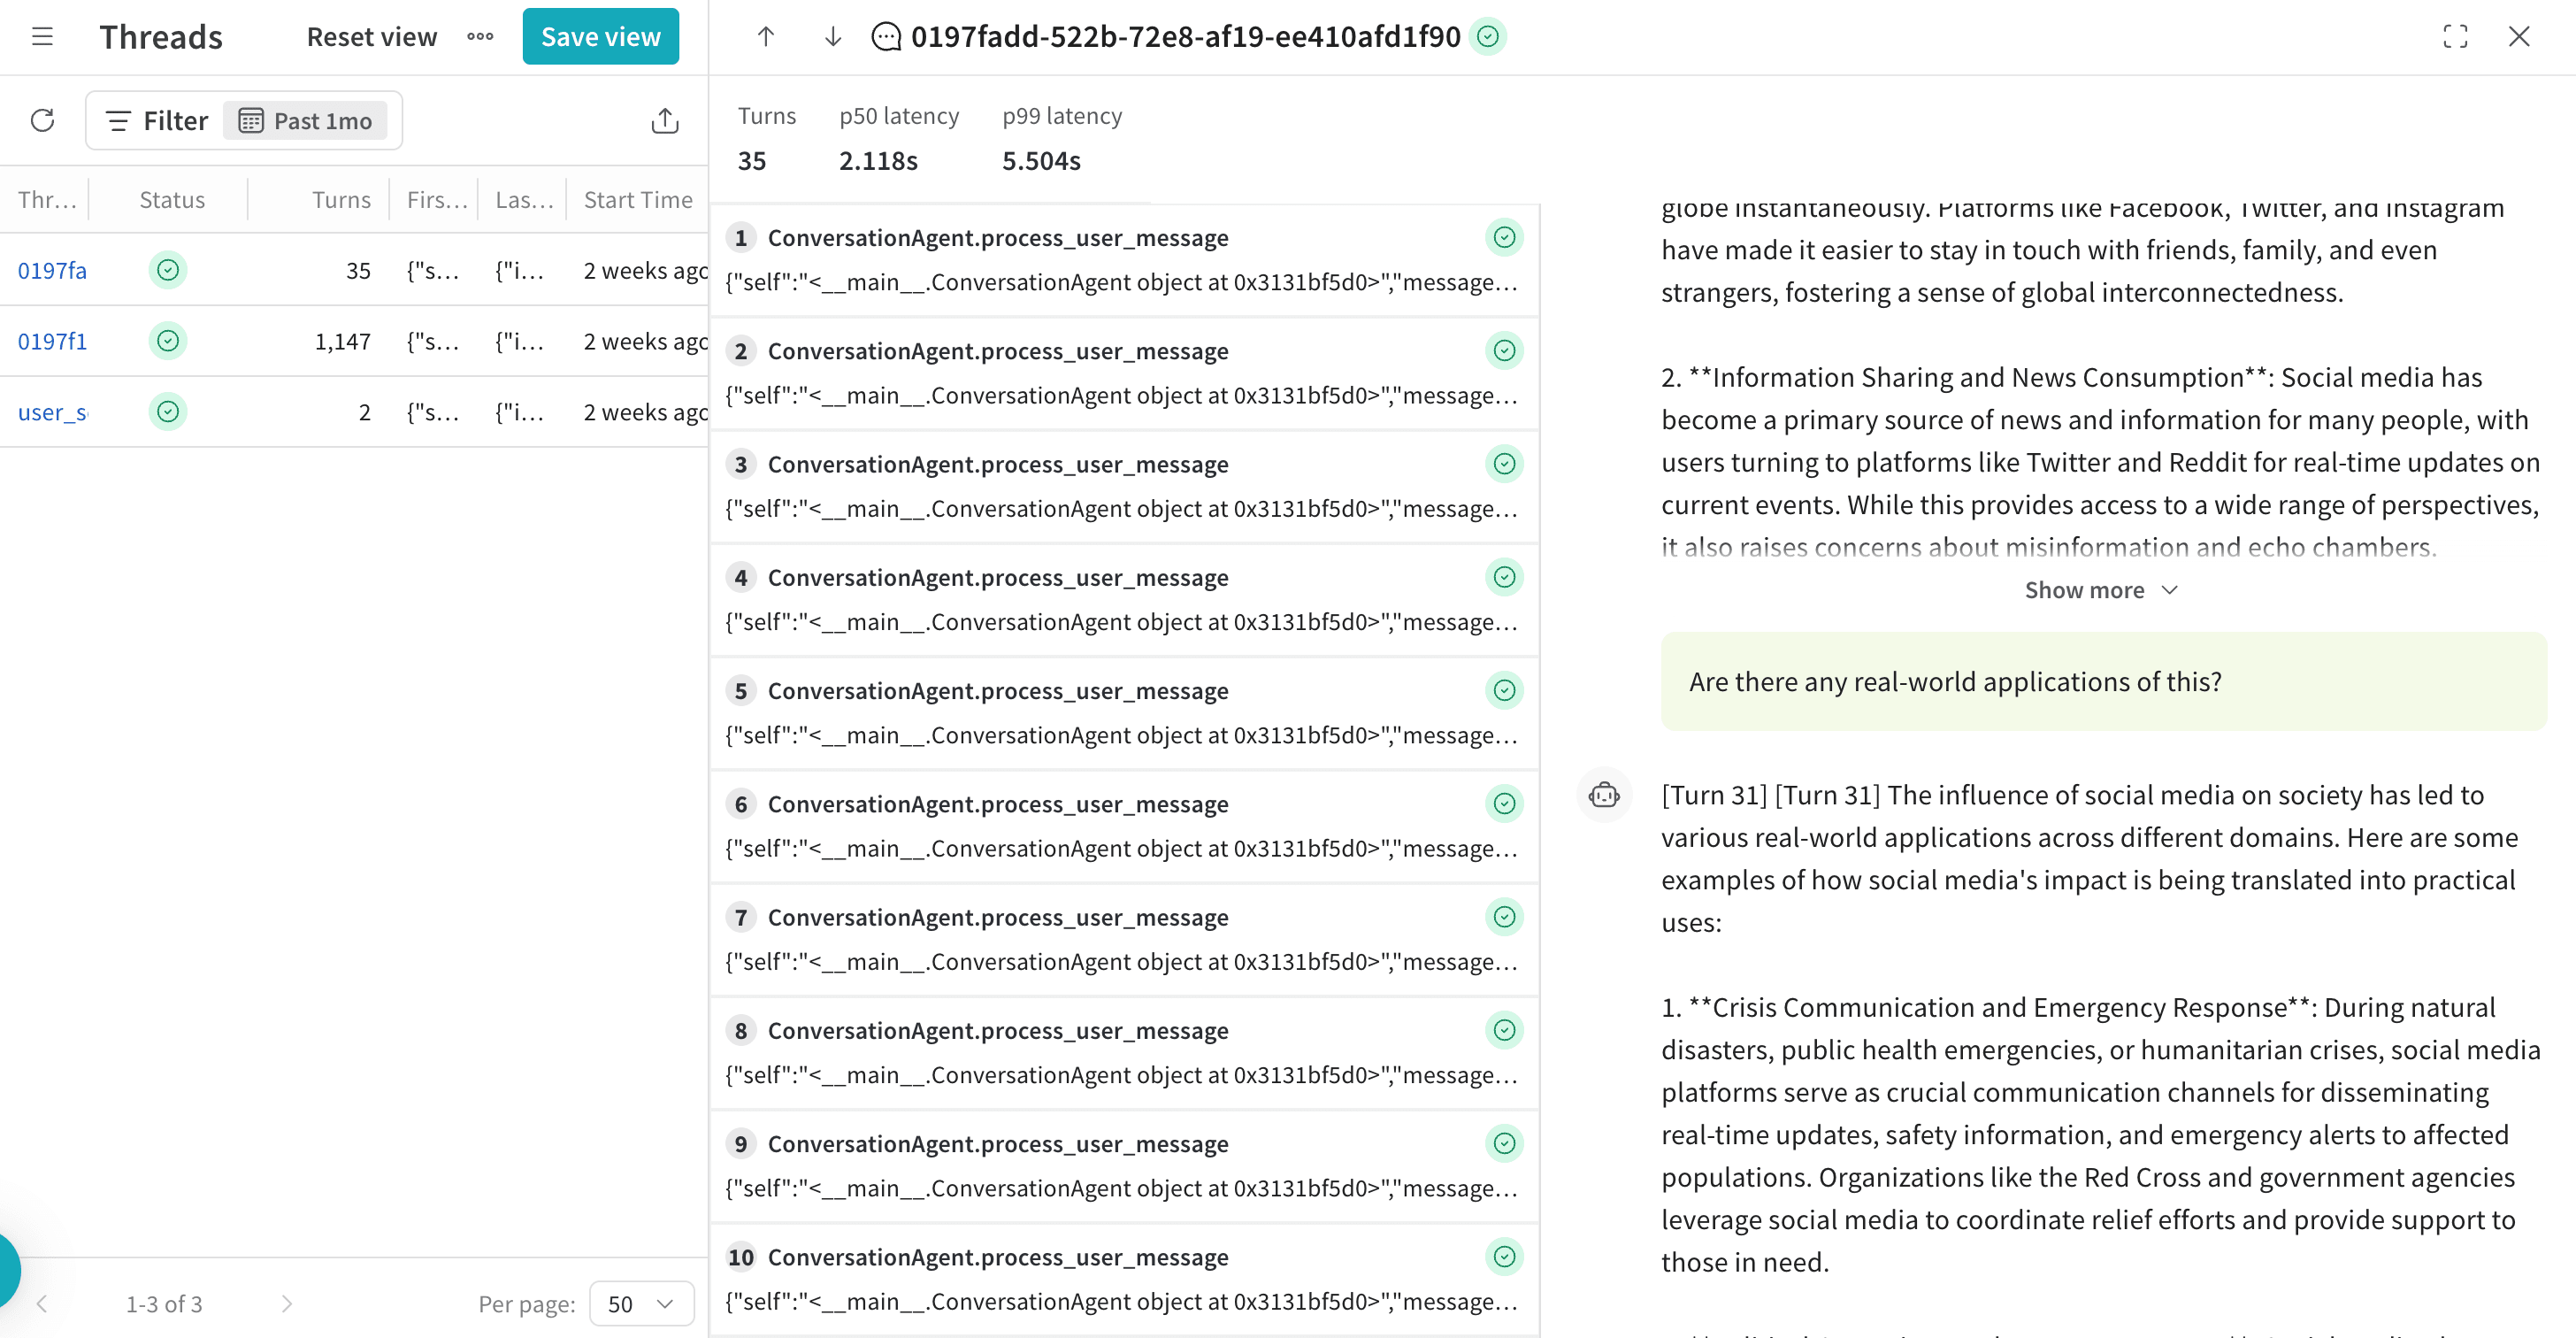
Threads list view
* 프로젝트의 최근 스레드 목록을 표시합니다.
* 열에는 턴 수, 시작 시간, 마지막 업데이트 시간이 있습니다.
* 행을 클릭하면 해당 스레드의 [세부 정보 드로어](#threads-detail-drawer)가 열립니다.

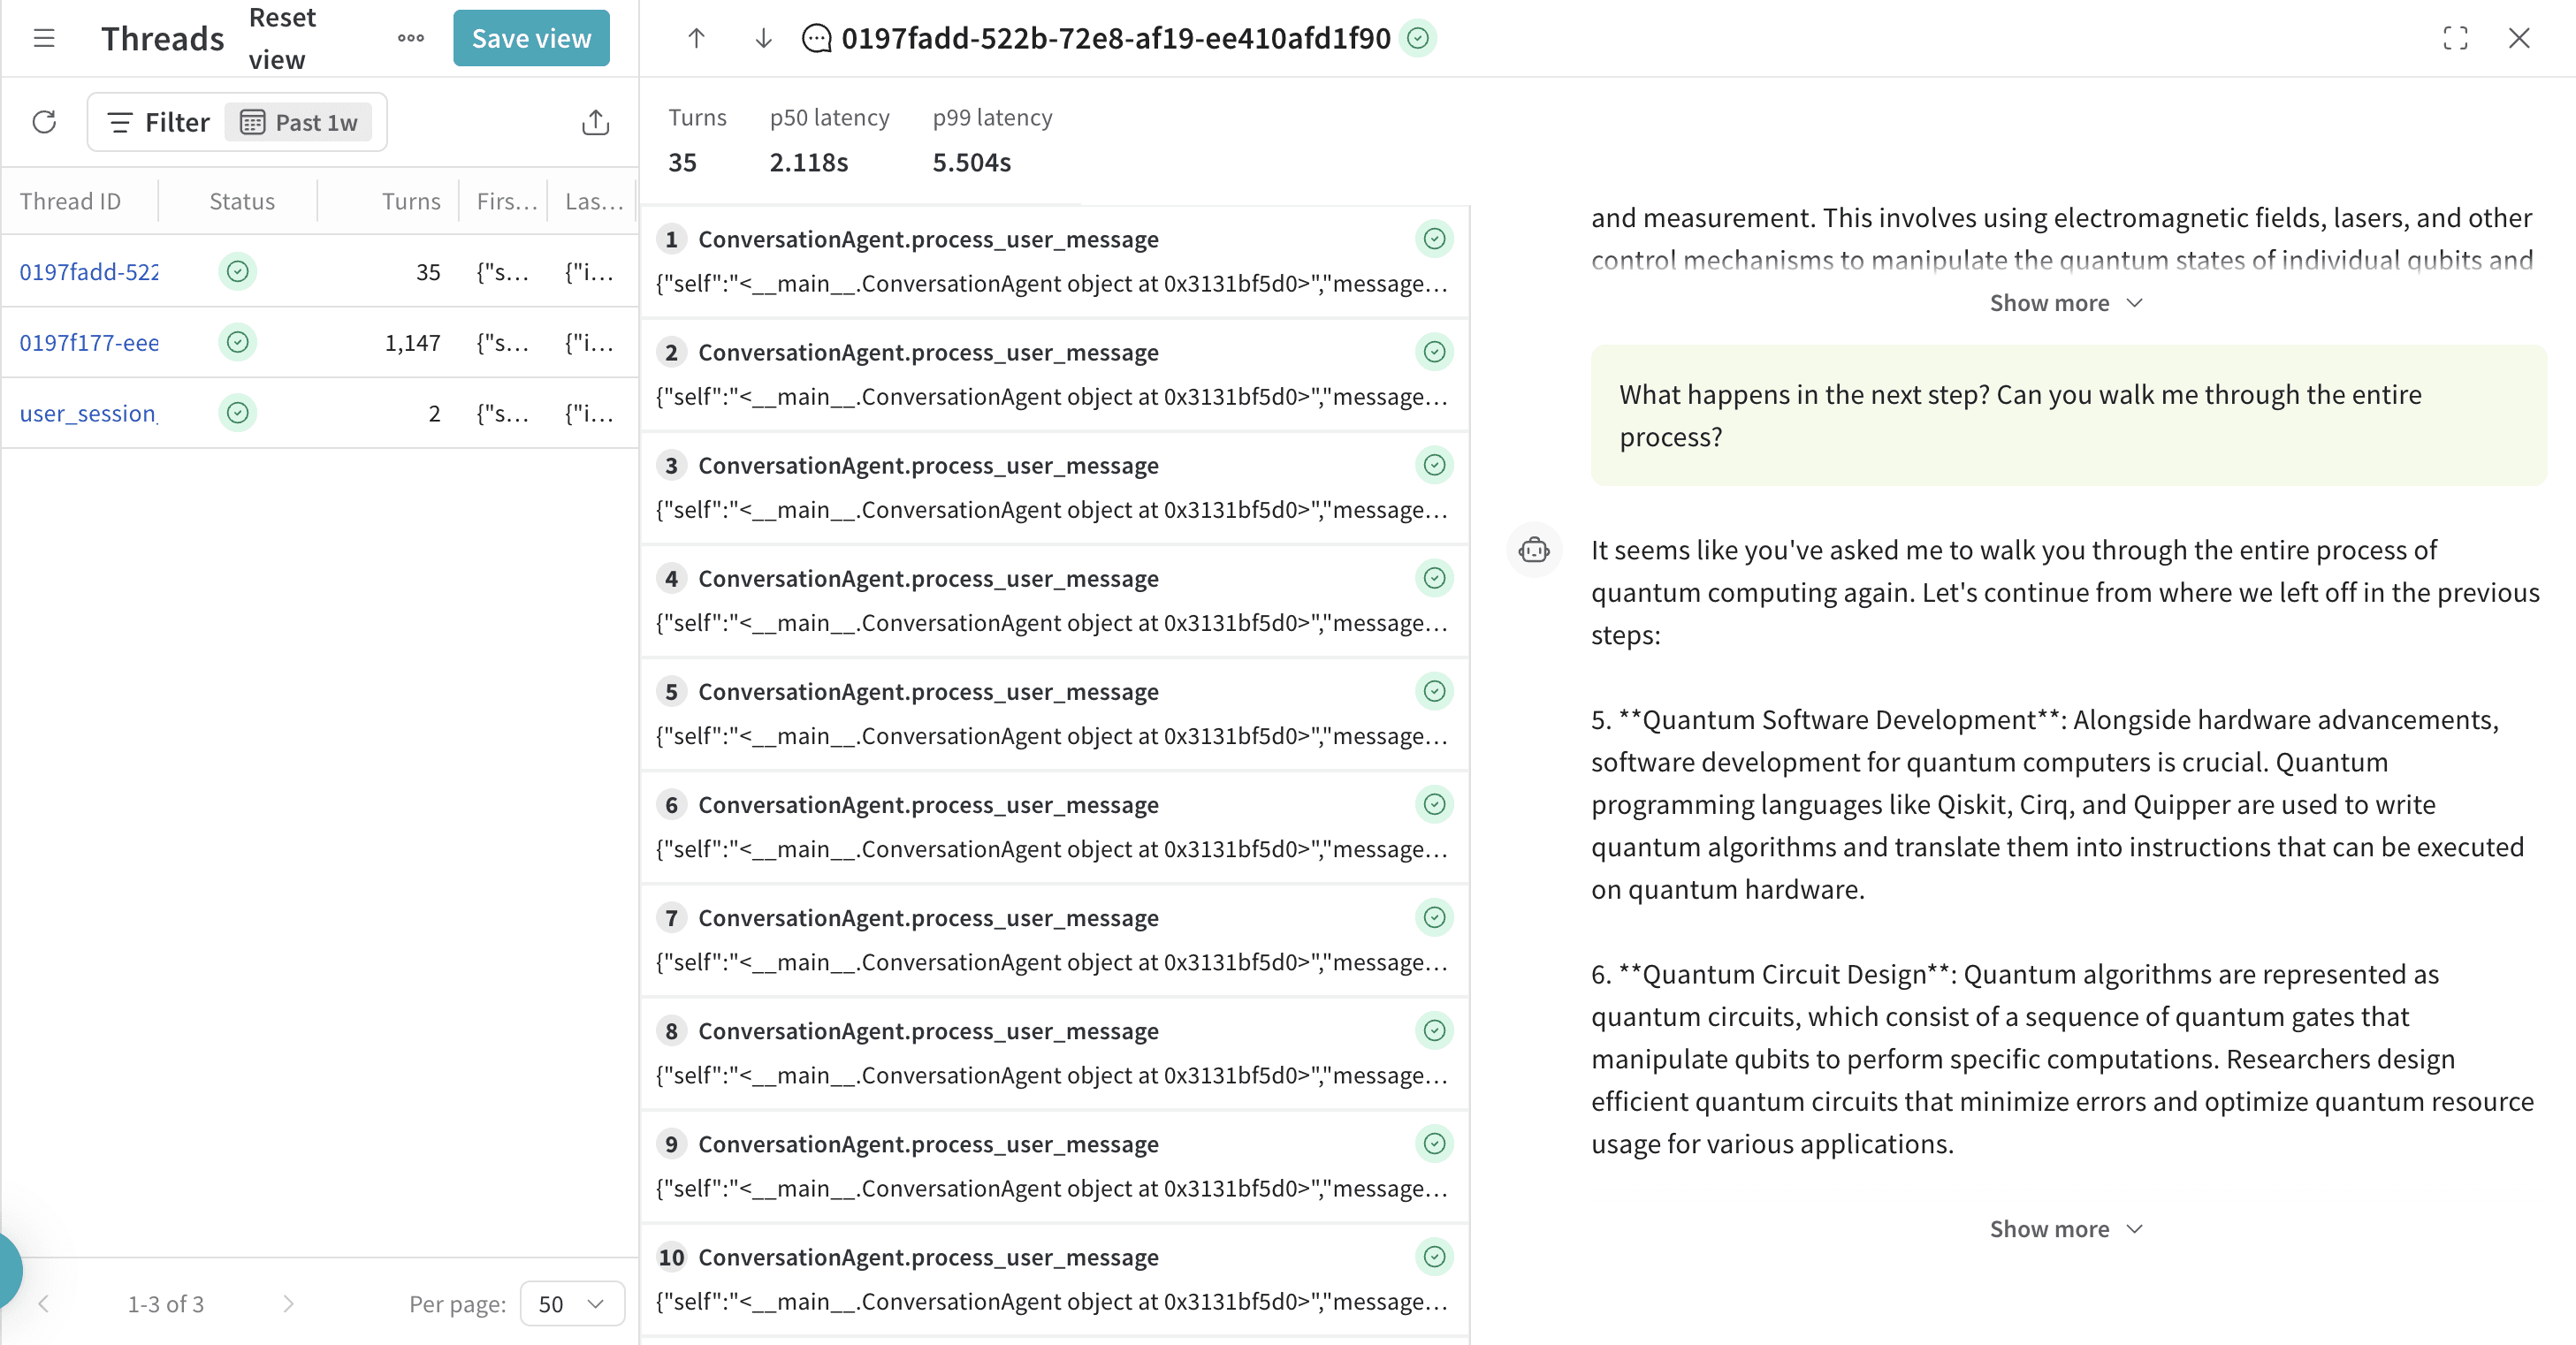
Threads 세부 정보 드로어
* 행을 클릭하면 해당 행의 세부 정보 드로어가 열립니다.
* 스레드에 속한 모든 턴을 표시합니다.
* 턴은 시작된 순서대로 나열됩니다(소요 시간이나 종료 시간이 아닌 시작 시간 기준).
* Call 수준의 메타데이터(지연 시간, 입력, 출력)가 포함됩니다.
* 메시지 콘텐츠나 구조화된 데이터가 로깅된 경우 이를 함께 표시할 수 있습니다.
* 스레드 세부 정보 드로어에서 턴을 열면 해당 턴의 전체 실행을 확인할 수 있습니다. 이를 통해 해당 턴에서 발생한 모든 중첩 오퍼레이션을 자세히 살펴볼 수 있습니다.
* 턴에 LLM Call에서 추출된 메시지가 있으면 채팅 패널에 표시됩니다. 이러한 메시지는 대개 지원되는 인테그레이션(예: `openai.ChatCompletion.create`)이 수행한 Call에서 생성되며, 표시되려면 특정 조건을 충족해야 합니다. 자세한 내용은 [채팅 뷰 동작](#chat-view-behavior)을 참조하세요.
채팅 뷰 동작
채팅 패널에는 각 턴에서 발생한 LLM Call에서 추출한 구조화된 메시지 데이터가 표시됩니다. 이 뷰에서는 상호작용이 대화 형식으로 렌더링됩니다.
메시지로 간주되는 항목
Weave는 턴 내의 Call 중 LLM 공급자와 직접 상호작용하는 Call(예: 프롬프트를 보내고 응답을 받는 Call)에서 메시지를 추출합니다. 다른 Call 안에 중첩되지 않은 Call만 메시지로 표시됩니다. 이를 통해 중간 단계나 집계된 내부 로직이 중복으로 표시되지 않도록 합니다.
일반적으로 자동으로 패치되는 서드파티 SDK가 메시지를 생성합니다. 예를 들면 다음과 같습니다.
* `openai.ChatCompletion.create`
* `anthropic.Anthropic.completion`
메시지가 없는 경우
턴에서 메시지를 내보내지 않으면 채팅 패널에 해당 턴의 메시지 섹션이 빈 상태로 표시됩니다. 이 경우에도 채팅 패널에는 같은 스레드에 속한 다른 턴의 메시지가 표시될 수 있습니다.
턴과 채팅 간 상호 작용
* 턴을 클릭하면 채팅 패널이 해당 턴의 메시지 위치로 스크롤됩니다(고정 동작).
* 채팅 패널을 스크롤하면 턴 목록에서 해당하는 턴이 강조 표시됩니다.
트레이스 뷰로 이동하고 돌아오기
턴을 클릭하면 해당 턴의 전체 트레이스를 열 수 있습니다.
왼쪽 상단에 뒤로 가기 버튼이 표시되며, 이 버튼을 클릭하면 스레드 세부 정보 뷰로 돌아갈 수 있습니다. 화면이 전환될 때 Weave는 UI 상태(예: 스크롤 위치)를 유지하지 않습니다.
SDK 사용
다음 섹션에서는 Weave SDK를 사용하여 프로그래밍 방식으로 스레드를 생성하고 관리하는 방법을 설명합니다. 각 예시는 애플리케이션에서 턴과 스레드를 구성하는 서로 다른 전략을 보여줍니다. 대부분의 예시에서는 스텁 함수 안에 사용자의 LLM Call 또는 시스템 동작을 직접 구현해야 합니다.
* 세션이나 대화를 추적하려면 `weave.thread()` 컨텍스트 매니저를 사용하세요.
* 논리적 오퍼레이션을 턴 또는 중첩된 Call로 추적하려면 해당 오퍼레이션에 `@weave.op` 데코레이터를 적용하세요.
* `thread_id`를 전달하면 Weave는 이 ID를 사용하여 해당 블록의 모든 오퍼레이션을 같은 스레드로 그룹화합니다. `thread_id`를 생략하면 Weave가 고유한 ID를 자동으로 생성합니다.
`weave.thread()`는 `thread_id` 속성을 가진 `ThreadContext` 객체를 반환합니다. 이 ID는 로깅하거나 재사용하거나 다른 시스템에 전달할 수 있습니다.
중첩된 `weave.thread()` 컨텍스트는 같은 `thread_id`를 재사용하지 않는 한 항상 새 스레드를 시작합니다. 자식 컨텍스트가 종료되어도 부모 컨텍스트는 중단되거나 덮어써지지 않습니다. 따라서 앱 로직에 따라 분기된 스레드 구조나 계층형 스레드 오케스트레이션을 구성할 수 있습니다.
기본 스레드 생성
다음 코드 샘플은 `weave.thread()`를 사용하여 하나 이상의 오퍼레이션을 공통 `thread_id`로 묶는 방법을 보여줍니다. 애플리케이션에서 Threads를 가장 간단하게 시작하는 방법입니다.
```python lines theme={"system"}
import weave
@weave.op
def say_hello(name: str) -> str:
return f"Hello, {name}!"
# 새 스레드 컨텍스트 시작
with weave.thread() as thread_ctx:
print(f"Thread ID: {thread_ctx.thread_id}")
say_hello("Bill Nye the Science Guy")
```
에이전트 루프 수동 구현
이 예제는 `@weave.op` 데코레이터와 `weave.thread()` 컨텍스트 관리를 사용하여 대화형 에이전트를 수동으로 정의하는 방법을 보여 줍니다. `process_user_message`를 호출할 때마다 스레드에 새 턴이 생성됩니다. 에이전트 루프를 직접 구축하면서 컨텍스트와 중첩 처리 방식을 전체적으로 제어하고 싶을 때 이 패턴을 사용하세요.
수명이 짧은 상호 작용에는 자동 생성된 스레드 ID를 사용하고, 여러 세션에 걸쳐 스레드 컨텍스트를 유지하려면 맞춤형 세션 ID(예: `user_session_123`)를 전달하세요.
```python lines theme={"system"}
import weave
class ConversationAgent:
@weave.op
def process_user_message(self, message: str) -> str:
"""
TURN-LEVEL OPERATION: This represents one conversation turn.
Only this function will be counted in thread statistics.
"""
# 사용자 메시지 저장
# 중첩 Call을 통해 AI 응답 생성
response = self._generate_response(message)
# assistant 응답 저장
return response
@weave.op
def _generate_response(self, message: str) -> str:
"""NESTED CALL: Implementation details, not counted in thread stats."""
context = self._retrieve_context(message) # 또 다른 중첩 Call
intent = self._classify_intent(message) # 또 다른 중첩 Call
response = self._call_llm(message, context) # LLM Call (중첩)
return self._format_response(response) # 마지막 중첩 Call
@weave.op
def _retrieve_context(self, message: str) -> str:
# 벡터 DB 조회, 지식 베이스 쿼리 등
return "retrieved_context"
@weave.op
def _classify_intent(self, message: str) -> str:
# 의도 분류 로직
return "general_inquiry"
@weave.op
def _call_llm(self, message: str, context: str) -> str:
# OpenAI, Anthropic 등의 API 호출
return "llm_response"
@weave.op
def _format_response(self, response: str) -> str:
# 응답 포맷팅 로직
return f"Formatted: {response}"
# 사용 예: 스레드 컨텍스트가 자동으로 설정됨
agent = ConversationAgent()
# 스레드 컨텍스트 설정 - process_user_message Call 하나가 턴 하나가 됨
with weave.thread() as thread_ctx: # thread_id 자동 생성
print(f"Thread ID: {thread_ctx.thread_id}")
# process_user_message를 호출할 때마다 턴 1개와 여러 중첩 Call이 생성됨
agent.process_user_message("Hello, help with setup") # 턴 1
agent.process_user_message("What languages do you recommend?") # 턴 2
agent.process_user_message("Explain Python vs JavaScript") # 턴 3
# 결과: 턴 3개와 총 15~20개 내외의 Call(중첩 포함)로 구성된 스레드
# 대안: 세션 추적용으로 thread_id를 명시적으로 지정
session_id = "user_session_123"
with weave.thread(session_id) as thread_ctx:
print(f"Session Thread ID: {thread_ctx.thread_id}") # "user_session_123"
agent.process_user_message("Continue our previous conversation") # 이 세션의 턴 1
agent.process_user_message("Can you summarize what we discussed?") # 이 세션의 턴 2
```
호출 깊이가 불균형한 수동 에이전트
이 예제는 스레드 컨텍스트를 적용하는 방식에 따라 호출 스택의 서로 다른 깊이에서 턴을 정의할 수 있음을 보여 줍니다. 이 샘플은 두 공급자(OpenAI와 Anthropic)를 사용하며, 공급자마다 턴 경계에 도달하기까지의 호출 깊이가 다릅니다.
모든 턴은 동일한 `thread_id`를 공유하지만, 턴 경계가 나타나는 스택 수준은 공급자 로직에 따라 달라집니다. 이 방식은 백엔드마다 Call을 다르게 트레이스하면서도 이를 같은 스레드로 묶어야 할 때 유용합니다.
```python lines theme={"system"}
import weave
import random
import asyncio
class OpenAIProvider:
"""OpenAI branch: 2 levels deep call chain to turn boundary"""
@weave.op
def route_to_openai(self, user_input: str, thread_id: str) -> str:
"""Level 1: Route and prepare OpenAI request"""
# 입력 검증, 라우팅 로직, 기본 전처리
print(f" L1: Routing to OpenAI for: {user_input}")
# 여기가 턴 경계입니다. 스레드 컨텍스트로 래핑합니다
with weave.thread(thread_id):
# Level 2를 직접 호출합니다. 이렇게 하면 호출 체인에 깊이가 생깁니다
return self.execute_openai_call(user_input)
@weave.op
def execute_openai_call(self, user_input: str) -> str:
"""Level 2: TURN BOUNDARY - Execute OpenAI API call"""
print(f" L2: Executing OpenAI API call")
response = f"OpenAI GPT-4 response: {user_input}"
return response
class AnthropicProvider:
"""Anthropic branch: 3 levels deep call chain to turn boundary"""
@weave.op
def route_to_anthropic(self, user_input: str, thread_id: str) -> str:
"""Level 1: Route and prepare Anthropic request"""
# 입력 검증, 라우팅 로직, 공급자 선택
print(f" L1: Routing to Anthropic for: {user_input}")
# Level 2를 호출합니다. 이렇게 하면 호출 체인에 깊이가 생깁니다
return self.authenticate_anthropic(user_input, thread_id)
@weave.op
def authenticate_anthropic(self, user_input: str, thread_id: str) -> str:
"""Level 2: Handle Anthropic authentication and setup"""
print(f" L2: Authenticating with Anthropic")
# 인증, 요청 속도 제한, 세션 관리
auth_token = "anthropic_key_xyz_authenticated"
# 여기가 턴 경계입니다. Level 3에서 스레드 컨텍스트로 래핑합니다
with weave.thread(thread_id):
# Level 3를 호출합니다. 호출 체인이 한 단계 더 중첩됩니다
return self.execute_anthropic_call(user_input, auth_token)
@weave.op
def execute_anthropic_call(self, user_input: str, auth_token: str) -> str:
"""Level 3: TURN BOUNDARY - Execute Anthropic API call"""
print(f" L3: Executing Anthropic API call with auth")
response = f"Anthropic Claude response (auth: {auth_token[:15]}...): {user_input}"
return response
class MultiProviderAgent:
"""Main agent that routes between providers with different call chain depths"""
def __init__(self):
self.openai_provider = OpenAIProvider()
self.anthropic_provider = AnthropicProvider()
def handle_conversation_turn(self, user_input: str, thread_id: str) -> str:
"""
Route to different providers with imbalanced call chain depths.
Thread context is applied at different nesting levels in each chain.
"""
# 시연을 위해 공급자를 무작위로 선택합니다
use_openai = random.choice([True, False])
if use_openai:
print(f"Choosing OpenAI (2-level call chain)")
# OpenAI: Level 1 → Level 2 (턴 경계)
response = self.openai_provider.route_to_openai(user_input, thread_id)
return f"[OpenAI Branch] {response}"
else:
print(f"Choosing Anthropic (3-level call chain)")
# Anthropic: Level 1 → Level 2 → Level 3 (턴 경계)
response = self.anthropic_provider.route_to_anthropic(user_input, thread_id)
return f"[Anthropic Branch] {response}"
async def main():
agent = MultiProviderAgent()
conversation_id = "nested_depth_conversation_999"
# 호출 체인 깊이가 서로 다른 멀티턴 대화
conversation_turns = [
"What's deep learning?",
"Explain neural network backpropagation",
"How do attention mechanisms work?",
"What's the transformer architecture?",
"Compare CNNs vs RNNs"
]
print(f"Starting conversation: {conversation_id}")
for i, user_input in enumerate(conversation_turns, 1):
print(f"\\n--- Turn {i} ---")
print(f"User: {user_input}")
# 호출 체인 깊이가 달라도 동일한 thread_id를 사용합니다
response = agent.handle_conversation_turn(user_input, conversation_id)
print(f"Agent: {response}")
if __name__ == "__main__":
asyncio.run(main())
# 예상 결과: 턴 5개로 구성된 단일 스레드
# - OpenAI 턴: 호출 체인의 Level 2에서 스레드 컨텍스트 적용
# 호출 스택: route_to_openai() → execute_openai_call() ← 여기서 스레드 컨텍스트 적용
# - Anthropic 턴: 호출 체인의 Level 3에서 스레드 컨텍스트 적용
# 호출 스택: route_to_anthropic() → authenticate_anthropic() → execute_anthropic_call() ← 여기서 스레드 컨텍스트 적용
# - 모든 턴이 동일한 thread_id 공유: "nested_depth_conversation_999"
# - 턴 경계는 서로 다른 호출 스택 깊이에서 지정됨
# - 호출 체인의 보조 오퍼레이션은 턴이 아닌 중첩 Call로 추적됨
```
이전 세션 재개
이전에 시작한 세션을 재개하여 같은 스레드에 Call을 계속 추가해야 할 때가 있습니다. 반대로 기존 세션을 재개할 수 없어 새 스레드를 시작해야 할 때도 있습니다.
스레드 재개를 선택적으로 구현할 때는 `thread_id` 매개변수를 `None`으로 두지 마세요. 스레드 그룹화가 비활성화됩니다. 대신 항상 유효한 스레드 ID를 제공하세요. 새 스레드를 만들려면 `generate_id()`와 같은 함수로 고유 식별자를 생성하세요.
`thread_id`를 지정하지 않으면 Weave 내부 구현에서 임의의 UUID v7을 자동으로 생성합니다. 직접 작성한 `generate_id()` 함수에서 이 동작을 그대로 구현하거나, 원하는 고유 문자열 값을 사용해도 됩니다.
```python lines theme={"system"}
import weave
import uuidv7
import argparse
def generate_id():
"""Generate a unique thread ID using UUID v7."""
return str(uuidv7.uuidv7())
@weave.op
def load_history(session_id):
"""Load conversation history for the given session."""
# 여기에 구현 코드를 작성하세요
return []
# 세션 재개에 사용할 명령줄 인수 파싱
parser = argparse.ArgumentParser()
parser.add_argument("--session-id", help="Existing session ID to resume")
args = parser.parse_args()
# 스레드 ID 확인: 기존 세션을 재개하거나 새 세션을 생성
if args.session_id:
thread_id = args.session_id
print(f"Resuming session: {thread_id}")
else:
thread_id = generate_id()
print(f"Starting new session: {thread_id}")
# Call을 추적할 스레드 컨텍스트 설정
with weave.thread(thread_id) as thread_ctx:
# 대화 이력을 로드하거나 초기화
history = load_history(thread_id)
print(f"Active thread ID: {thread_ctx.thread_id}")
# 여기에 애플리케이션 로직을 작성하세요.
```
중첩 스레드
이 예제에서는 서로 연계된 여러 스레드를 사용하여 복잡한 애플리케이션을 구성하는 방법을 보여줍니다.
각 계층은 자체 스레드 컨텍스트에서 실행되므로 관심사를 깔끔하게 분리할 수 있습니다. 상위 애플리케이션 스레드는 공유 `ThreadContext`로 스레드 ID를 설정하여 이러한 계층을 조율합니다. 시스템의 여러 부분을 하나의 공유 세션에 연결해 두면서도 각 부분을 독립적으로 분석하거나 모니터링하려면 이 패턴을 사용하세요.
```python lines theme={"system"}
import weave
from contextlib import contextmanager
from typing import Dict
# 중첩 스레드를 조율하는 전역 스레드 컨텍스트
class ThreadContext:
def __init__(self):
self.app_thread_id = None
self.infra_thread_id = None
self.logic_thread_id = None
def setup_for_request(self, request_id: str):
self.app_thread_id = f"app_{request_id}"
self.infra_thread_id = f"{self.app_thread_id}_infra"
self.logic_thread_id = f"{self.app_thread_id}_logic"
# 전역 인스턴스
thread_ctx = ThreadContext()
class InfrastructureLayer:
"""Handles all infrastructure operations in a dedicated thread"""
@weave.op
def authenticate_user(self, user_id: str) -> Dict:
# 인증 로직...
return {"user_id": user_id, "authenticated": True}
@weave.op
def call_payment_gateway(self, amount: float) -> Dict:
# 결제 처리...
return {"status": "approved", "amount": amount}
@weave.op
def update_inventory(self, product_id: str, quantity: int) -> Dict:
# 재고 관리...
return {"product_id": product_id, "updated": True}
def execute_operations(self, user_id: str, order_data: Dict) -> Dict:
"""Execute all infrastructure operations in dedicated thread context"""
with weave.thread(thread_ctx.infra_thread_id):
auth_result = self.authenticate_user(user_id)
payment_result = self.call_payment_gateway(order_data["amount"])
inventory_result = self.update_inventory(order_data["product_id"], order_data["quantity"])
return {
"auth": auth_result,
"payment": payment_result,
"inventory": inventory_result
}
class BusinessLogicLayer:
"""Handles business logic in a dedicated thread"""
@weave.op
def validate_order(self, order_data: Dict) -> Dict:
# 검증 로직...
return {"valid": True}
@weave.op
def calculate_pricing(self, order_data: Dict) -> Dict:
# 가격 계산...
return {"total": order_data["amount"], "tax": order_data["amount"] * 0.08}
@weave.op
def apply_business_rules(self, order_data: Dict) -> Dict:
# 비즈니스 규칙...
return {"rules_applied": ["standard_processing"], "priority": "normal"}
def execute_logic(self, order_data: Dict) -> Dict:
"""Execute all business logic in dedicated thread context"""
with weave.thread(thread_ctx.logic_thread_id):
validation = self.validate_order(order_data)
pricing = self.calculate_pricing(order_data)
rules = self.apply_business_rules(order_data)
return {"validation": validation, "pricing": pricing, "rules": rules}
class OrderProcessingApp:
"""Main application orchestrator"""
def __init__(self):
self.infra = InfrastructureLayer()
self.business = BusinessLogicLayer()
@weave.op
def process_order(self, user_id: str, order_data: Dict) -> Dict:
"""Main order processing - becomes a turn in the app thread"""
# 중첩된 오퍼레이션을 각자의 전용 스레드에서 실행
infra_results = self.infra.execute_operations(user_id, order_data)
logic_results = self.business.execute_logic(order_data)
# 최종 오케스트레이션
return {
"order_id": f"order_12345",
"status": "completed",
"infra_results": infra_results,
"logic_results": logic_results
}
# 전역 스레드 컨텍스트로 조율하는 사용 예
def handle_order_request(request_id: str, user_id: str, order_data: Dict):
# 이 요청의 스레드 컨텍스트 설정
thread_ctx.setup_for_request(request_id)
# 앱 스레드 컨텍스트에서 실행
with weave.thread(thread_ctx.app_thread_id):
app = OrderProcessingApp()
result = app.process_order(user_id, order_data)
return result
# 사용 예시
order_result = handle_order_request(
request_id="req_789",
user_id="user_001",
order_data={"product_id": "laptop", "quantity": 1, "amount": 1299.99}
)
# 예상 스레드 구조:
#
# App Thread: app_req_789
# └── Turn: process_order() ← 메인 오케스트레이션
#
# Infra Thread: app_req_789_infra
# ├── Turn: authenticate_user() ← 인프라 오퍼레이션 1
# ├── Turn: call_payment_gateway() ← 인프라 오퍼레이션 2
# └── Turn: update_inventory() ← 인프라 오퍼레이션 3
#
# Logic Thread: app_req_789_logic
# ├── Turn: validate_order() ← 비즈니스 로직 오퍼레이션 1
# ├── Turn: calculate_pricing() ← 비즈니스 로직 오퍼레이션 2
# └── Turn: apply_business_rules() ← 비즈니스 로직 오퍼레이션 3
#
# 장점:
# - 스레드별로 관심사를 명확하게 분리
# - 스레드 ID를 매개변수로 일일이 전달할 필요 없음
# - 앱/인프라/로직 계층을 각각 독립적으로 모니터링
# - 스레드 컨텍스트를 통한 전역 조율
```
API 사양
다음 섹션에서는 Threads 쿼리 엔드포인트와 해당 요청 및 응답 스키마, 그리고 프로그래밍 방식으로 스레드 데이터를 조회할 때 사용할 수 있는 일반적인 쿼리 패턴을 설명합니다.
엔드포인트
엔드포인트: `POST /threads/query`
요청 스키마
```python lines theme={"system"}
class ThreadsQueryReq:
project_id: str
limit: Optional[int] = None
offset: Optional[int] = None
sort_by: Optional[list[SortBy]] = None # 지원되는 필드: thread_id, turn_count, start_time, last_updated
sortable_datetime_after: Optional[datetime] = None # 그래뉼 최적화로 스레드 필터링
sortable_datetime_before: Optional[datetime] = None # 그래뉼 최적화로 스레드 필터링
```
응답 스키마
```python lines theme={"system"}
class ThreadSchema:
thread_id: str # 스레드의 고유 식별자
turn_count: int # 이 스레드에 속한 turn Call 수
start_time: datetime # 이 스레드에 속한 turn Call 중 가장 이른 시작 시간
last_updated: datetime # 이 스레드에 속한 turn Call 중 가장 늦은 종료 시간
class ThreadsQueryRes:
threads: List[ThreadSchema]
```
최근 활성 스레드 쿼리
이 예제는 가장 최근에 업데이트된 스레드 50개를 가져옵니다. `my-project`를 실제 프로젝트 ID로 바꾸세요.
```python lines theme={"system"}
# 가장 최근에 활동한 스레드 조회
response = client.threads_query(ThreadsQueryReq(
project_id="my-project",
sort_by=[SortBy(field="last_updated", direction="desc")],
limit=50
))
for thread in response.threads:
print(f"Thread {thread.thread_id}: {thread.turn_count} turns, last active {thread.last_updated}")
```
활동 수준별 스레드 쿼리
이 예제는 턴 수를 기준으로 정렬하여 가장 활발한 스레드 20개를 조회합니다.
```python lines theme={"system"}
# 활동이 가장 많은 스레드 조회(턴 수 기준)
response = client.threads_query(ThreadsQueryReq(
project_id="my-project",
sort_by=[SortBy(field="turn_count", direction="desc")],
limit=20
))
```
최근 스레드만 쿼리하기
이 예제는 최근 24시간 이내에 시작된 스레드를 반환합니다. `timedelta`의 `days` 값을 조정하여 시간 윈도우를 변경할 수 있습니다.
```python lines theme={"system"}
from datetime import datetime, timedelta
# 최근 24시간 이내에 시작된 스레드 조회
yesterday = datetime.now() - timedelta(days=1)
response = client.threads_query(ThreadsQueryReq(
project_id="my-project",
sortable_datetime_after=yesterday,
sort_by=[SortBy(field="start_time", direction="desc")]
))
```
## Related topics
- [Op, Call, 트레이스 이해하기](/ko/products/wandb/weave/guides/tracking/tracing.md)