> ## Documentation Index
> Fetch the complete documentation index at: https://docs.coreweave.com/llms.txt
> Use this file to discover all available pages before exploring further.
# Instructor
> Weave의 Instructor 인테그레이션으로 LLM의 구조화된 데이터 추출을 트레이스하고, Pydantic 검증과 재시도 로직을 캡처하세요.
 [Instructor](https://python.useinstructor.com/)는 LLM에서 JSON 등의 구조화된 데이터를 가져오는 경량 라이브러리입니다. 이 가이드에서는 Weave로 Instructor Call을 트레이스하여 구조화된 추출 과정을 디버그하고, Pydantic 검증을 캡처하고, 재시도 로직을 살펴보는 방법을 알아봅니다.
트레이싱
개발 단계와 프로덕션 환경 모두에서 언어 모델 애플리케이션의 트레이스를 한곳에 모아 저장하는 것이 중요합니다. 이러한 트레이스는 디버깅에 유용할 뿐 아니라, 애플리케이션 개선에 도움이 되는 데이터셋으로도 활용할 수 있습니다.
Weave는 [Instructor](https://python.useinstructor.com/)의 트레이스를 자동으로 캡처합니다. 추적을 시작하려면 `weave.init(project_name="[YOUR-WANDB-PROJECT-NAME]")`를 호출한 다음 평소처럼 라이브러리를 사용하세요.
```python lines theme={"system"}
import instructor
import weave
from pydantic import BaseModel
from openai import OpenAI
# 원하는 출력 구조 정의
class UserInfo(BaseModel):
user_name: str
age: int
# Weave 초기화
weave.init(project_name="instructor-test")
# OpenAI 클라이언트 패치
client = instructor.from_openai(OpenAI())
# 자연어 텍스트에서 구조화된 데이터 추출
user_info = client.chat.completions.create(
model="gpt-3.5-turbo",
response_model=UserInfo,
messages=[{"role": "user", "content": "John Doe is 30 years old."}],
)
```
|  |
| - |
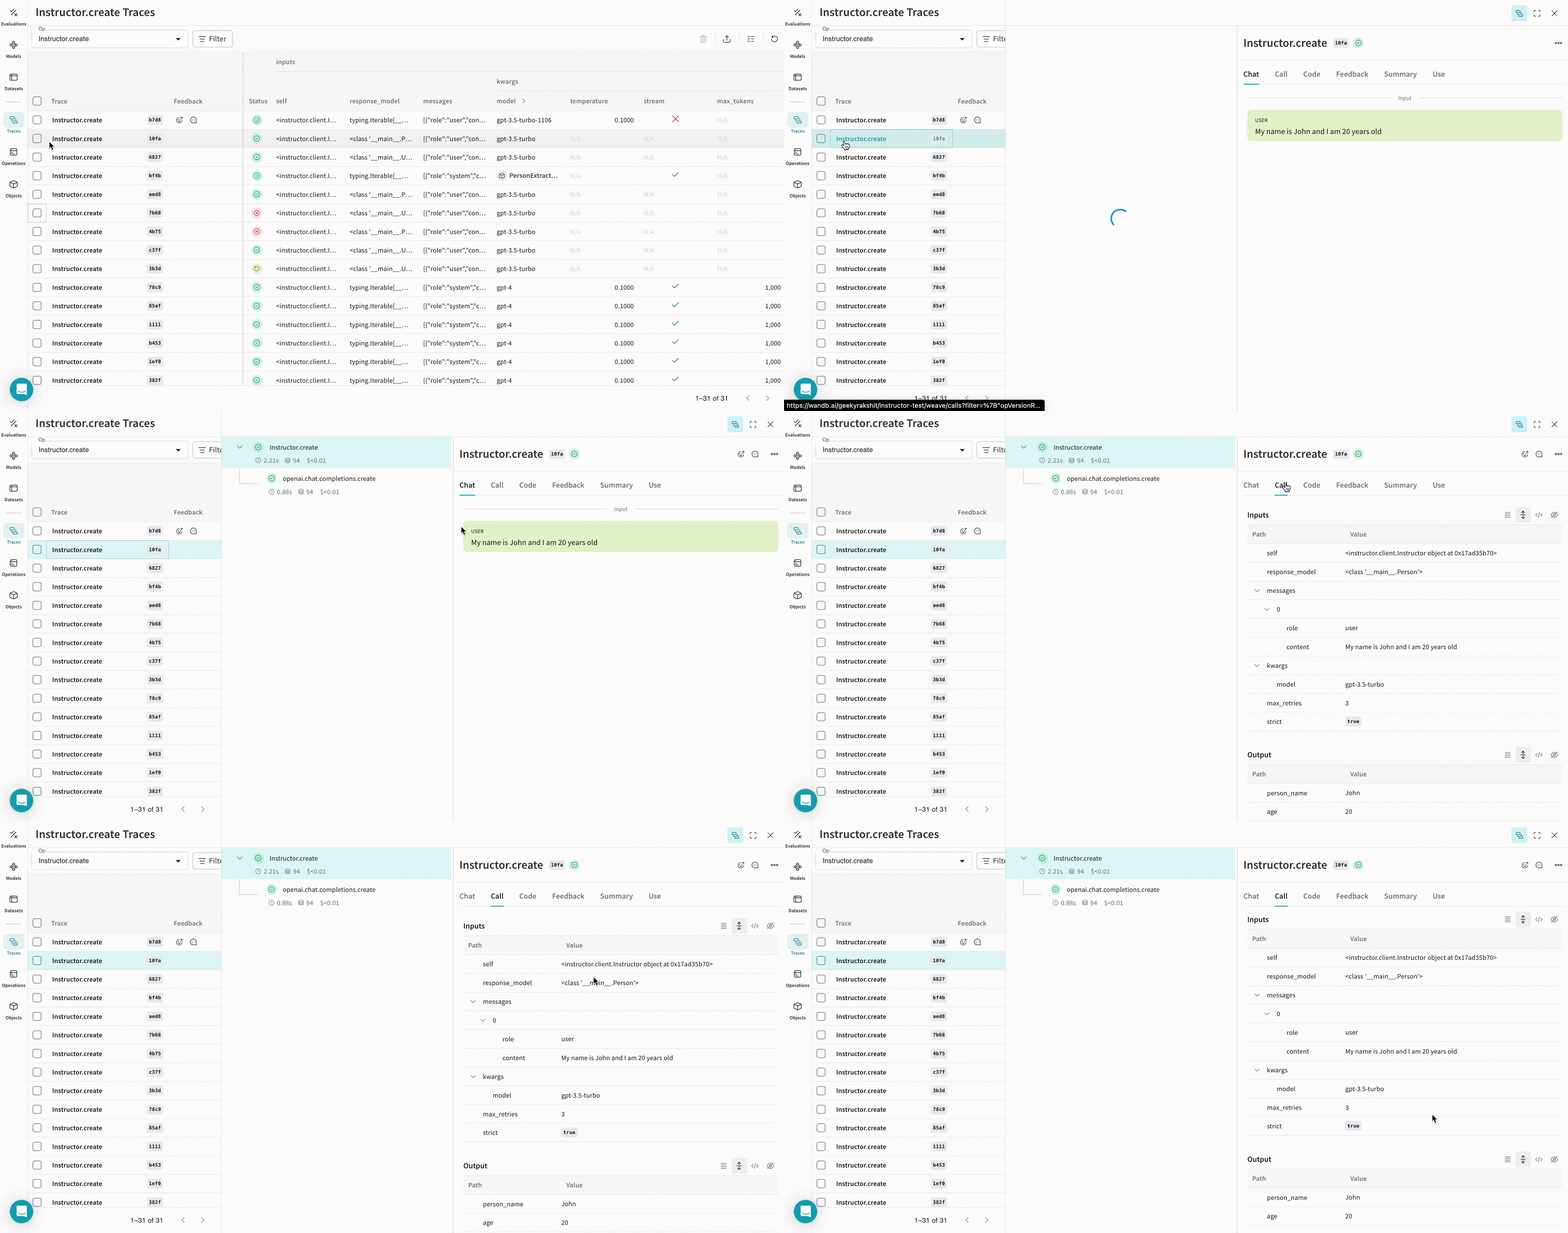
| Weave는 Instructor로 수행한 모든 LLM Call을 추적하고 로깅합니다. 트레이스는 Weave 웹 인터페이스에서 확인할 수 있습니다. |
|
| - |
| Weave는 Instructor로 수행한 모든 LLM Call을 추적하고 로깅합니다. 트레이스는 Weave 웹 인터페이스에서 확인할 수 있습니다. |
직접 만든 Op 추적하기
함수를 `@weave.op`로 래핑하면 입력, 출력, 앱 로직이 캡처되기 시작하므로 앱에서 데이터가 어떻게 흐르는지 디버그할 수 있습니다. Op을 깊게 중첩해 추적하려는 함수의 트리를 구축할 수도 있습니다. 또한 실험하는 동안 코드 버전 관리가 자동으로 시작되어, 아직 Git에 커밋하지 않은 임시 변경 사항도 캡처됩니다.
[`@weave.op`](/ko/products/wandb/weave/guides/tracking/ops)로 데코레이트한 함수를 만드세요.
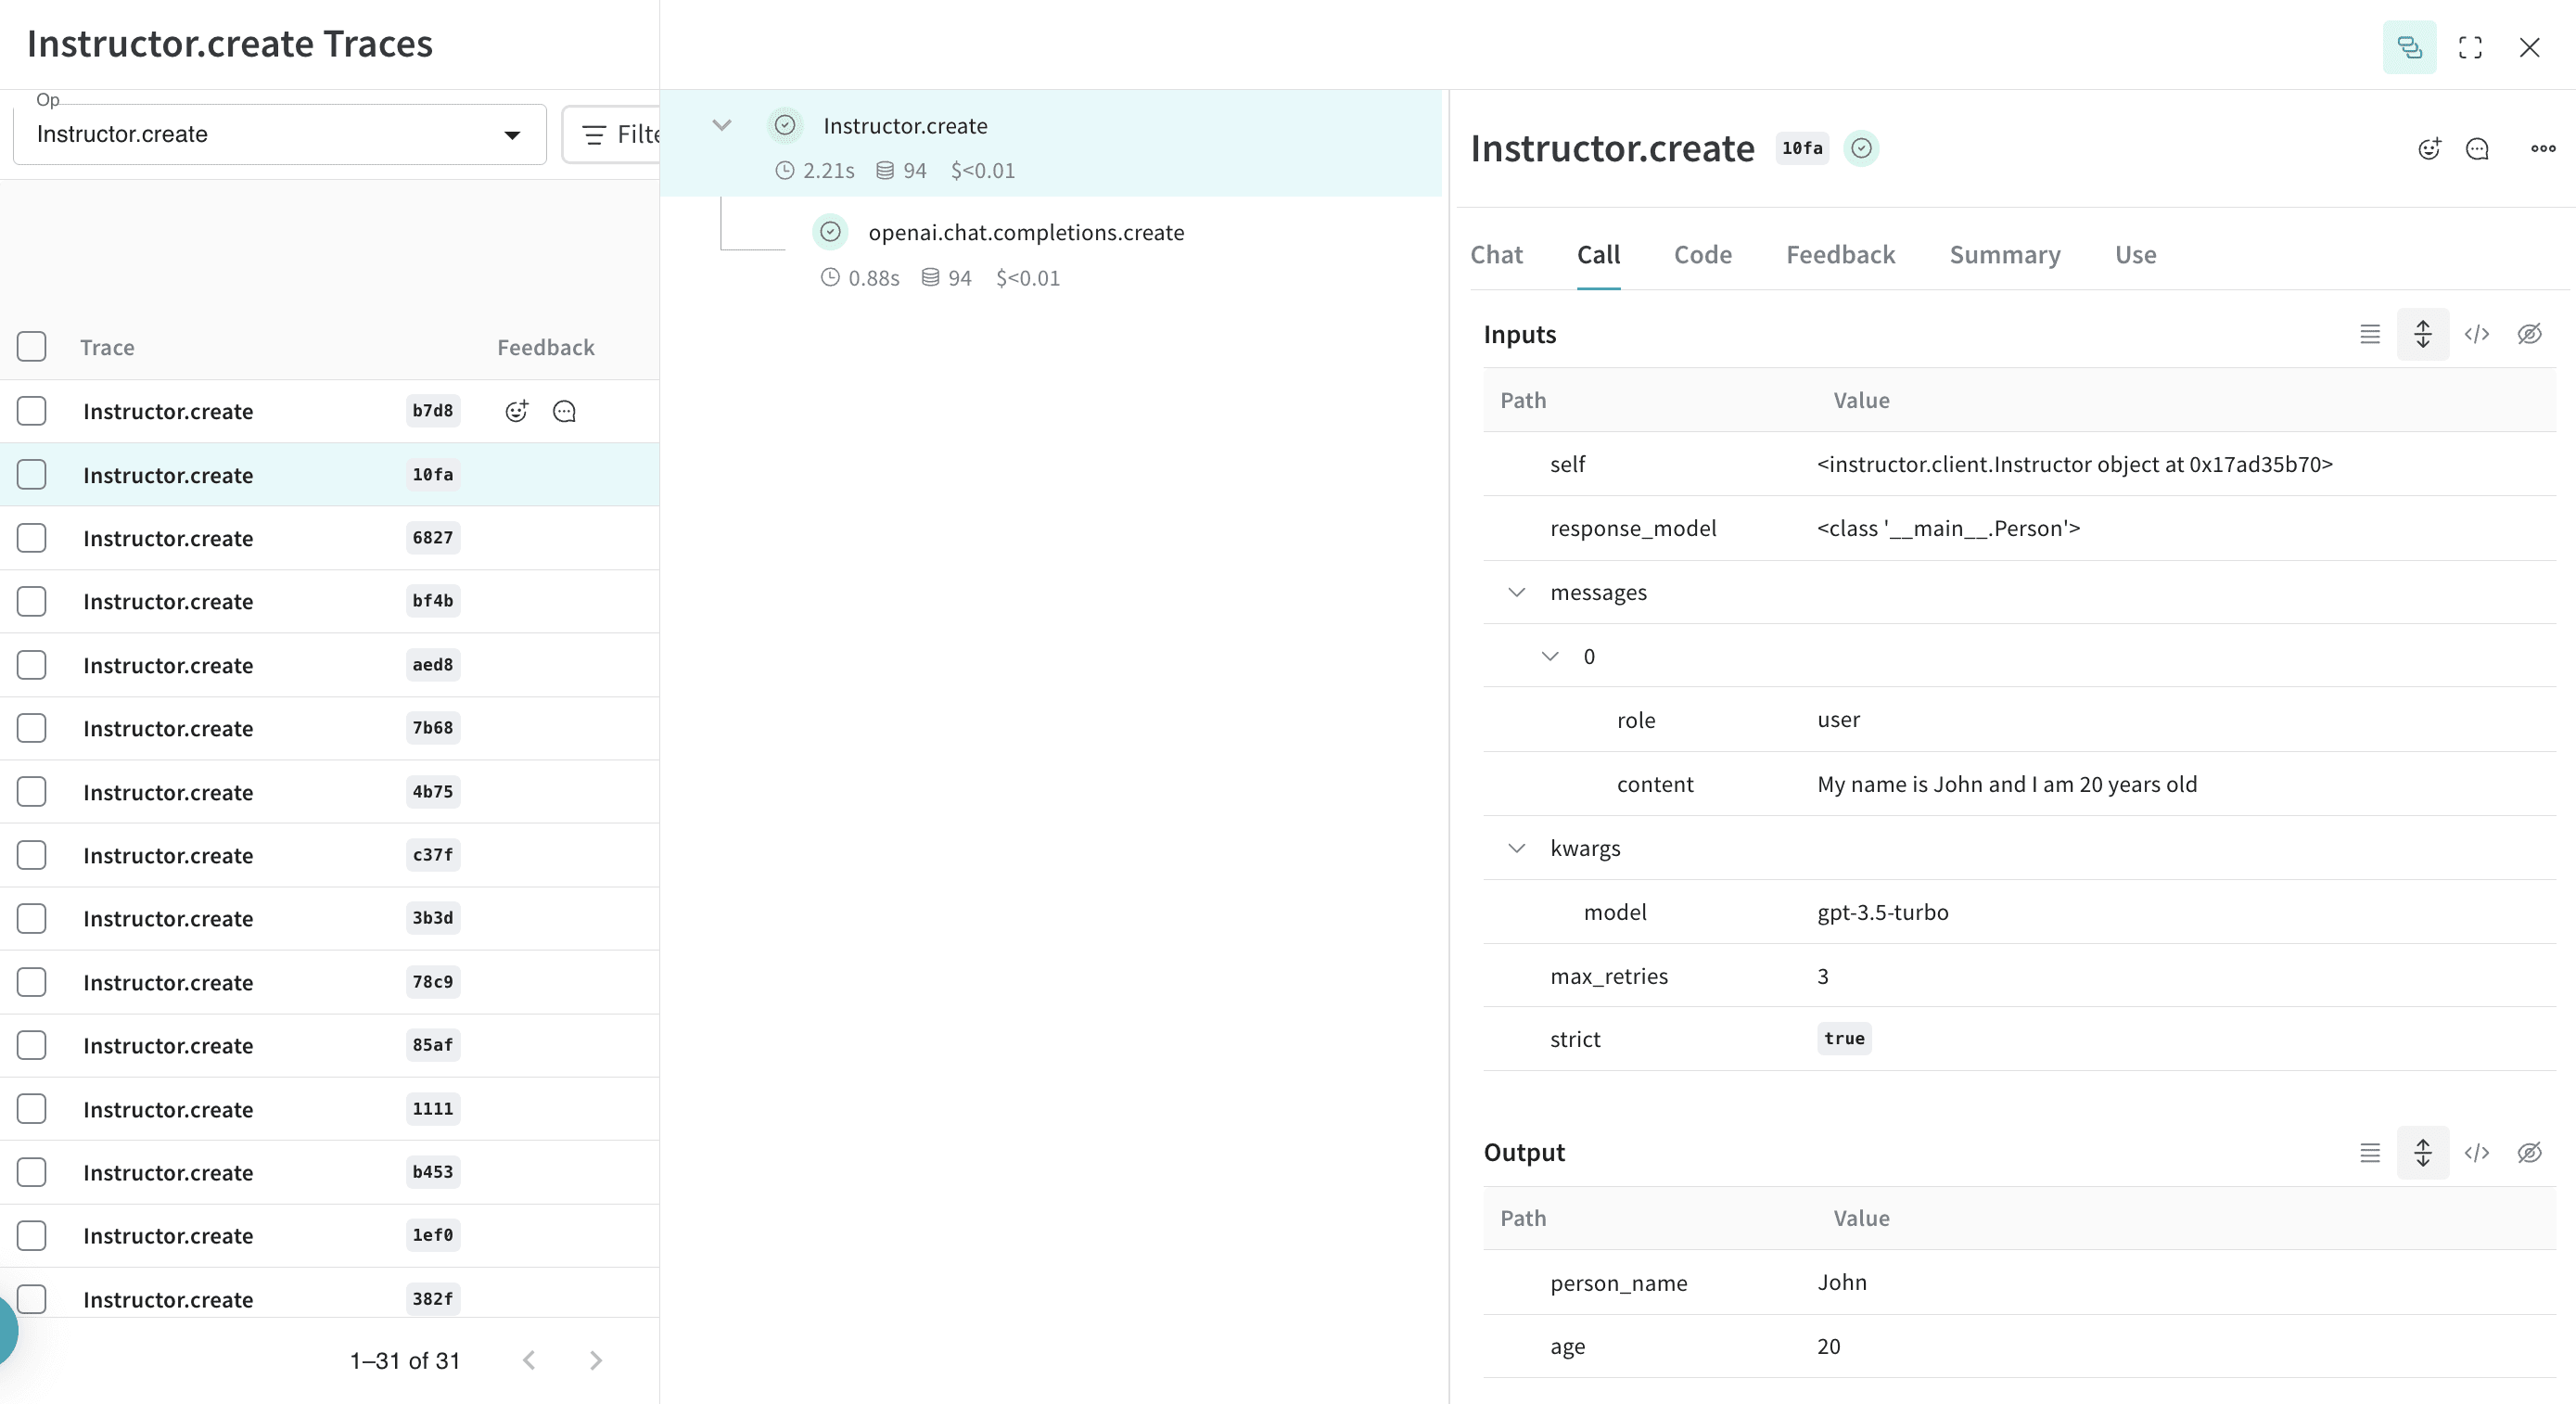
다음 예시에서 `extract_person` 함수는 `@weave.op`로 래핑한 메트릭 함수입니다. 이렇게 하면 OpenAI Chat Completion 호출과 같은 중간 단계를 확인할 수 있습니다.
```python lines theme={"system"}
import instructor
import weave
from openai import OpenAI
from pydantic import BaseModel
# 원하는 출력 구조를 정의합니다
class Person(BaseModel):
person_name: str
age: int
# Weave를 초기화합니다
weave.init(project_name="instructor-test")
# OpenAI 클라이언트를 패치합니다
lm_client = instructor.from_openai(OpenAI())
# 자연어 텍스트에서 구조화된 데이터를 추출합니다
@weave.op()
def extract_person(text: str) -> Person:
return lm_client.chat.completions.create(
model="gpt-3.5-turbo",
messages=[
{"role": "user", "content": text},
],
response_model=Person,
)
person = extract_person("My name is John and I am 20 years old")
```
|  |
| - |
| `extract_person` 함수에 `@weave.op` 데코레이터를 적용하면 함수의 입력과 출력, 그리고 함수 내부에서 이루어지는 모든 LM Call이 트레이스됩니다. 또한 Weave는 Instructor가 생성한 구조화된 객체를 자동으로 추적하고 버전을 관리합니다. |
|
| - |
| `extract_person` 함수에 `@weave.op` 데코레이터를 적용하면 함수의 입력과 출력, 그리고 함수 내부에서 이루어지는 모든 LM Call이 트레이스됩니다. 또한 Weave는 Instructor가 생성한 구조화된 객체를 자동으로 추적하고 버전을 관리합니다. |
더 쉽게 실험할 수 있도록 `Model` 만들기
구성 요소가 많으면 실험을 체계적으로 관리하기 어렵습니다. [`Model`](/ko/products/wandb/weave/guides/core-types/models) 클래스를 사용하면 system 프롬프트나 사용 중인 모델 같은 앱의 실험 세부 정보를 캡처하고 정리할 수 있습니다. 이를 통해 앱의 여러 반복 버전을 정리하고 비교할 수 있습니다.
[`Model`](/ko/products/wandb/weave/guides/core-types/models)은 코드 버전 관리와 입력 및 출력 캡처뿐만 아니라 애플리케이션의 동작을 제어하는 구조화된 매개변수도 캡처하므로, 어떤 매개변수가 가장 효과적이었는지 확인할 수 있습니다. Weave Model은 [`serve`](#serve-a-weave-model) 및 [`Evaluation`](/ko/products/wandb/weave/guides/core-types/evaluations)과 함께 사용할 수도 있습니다.
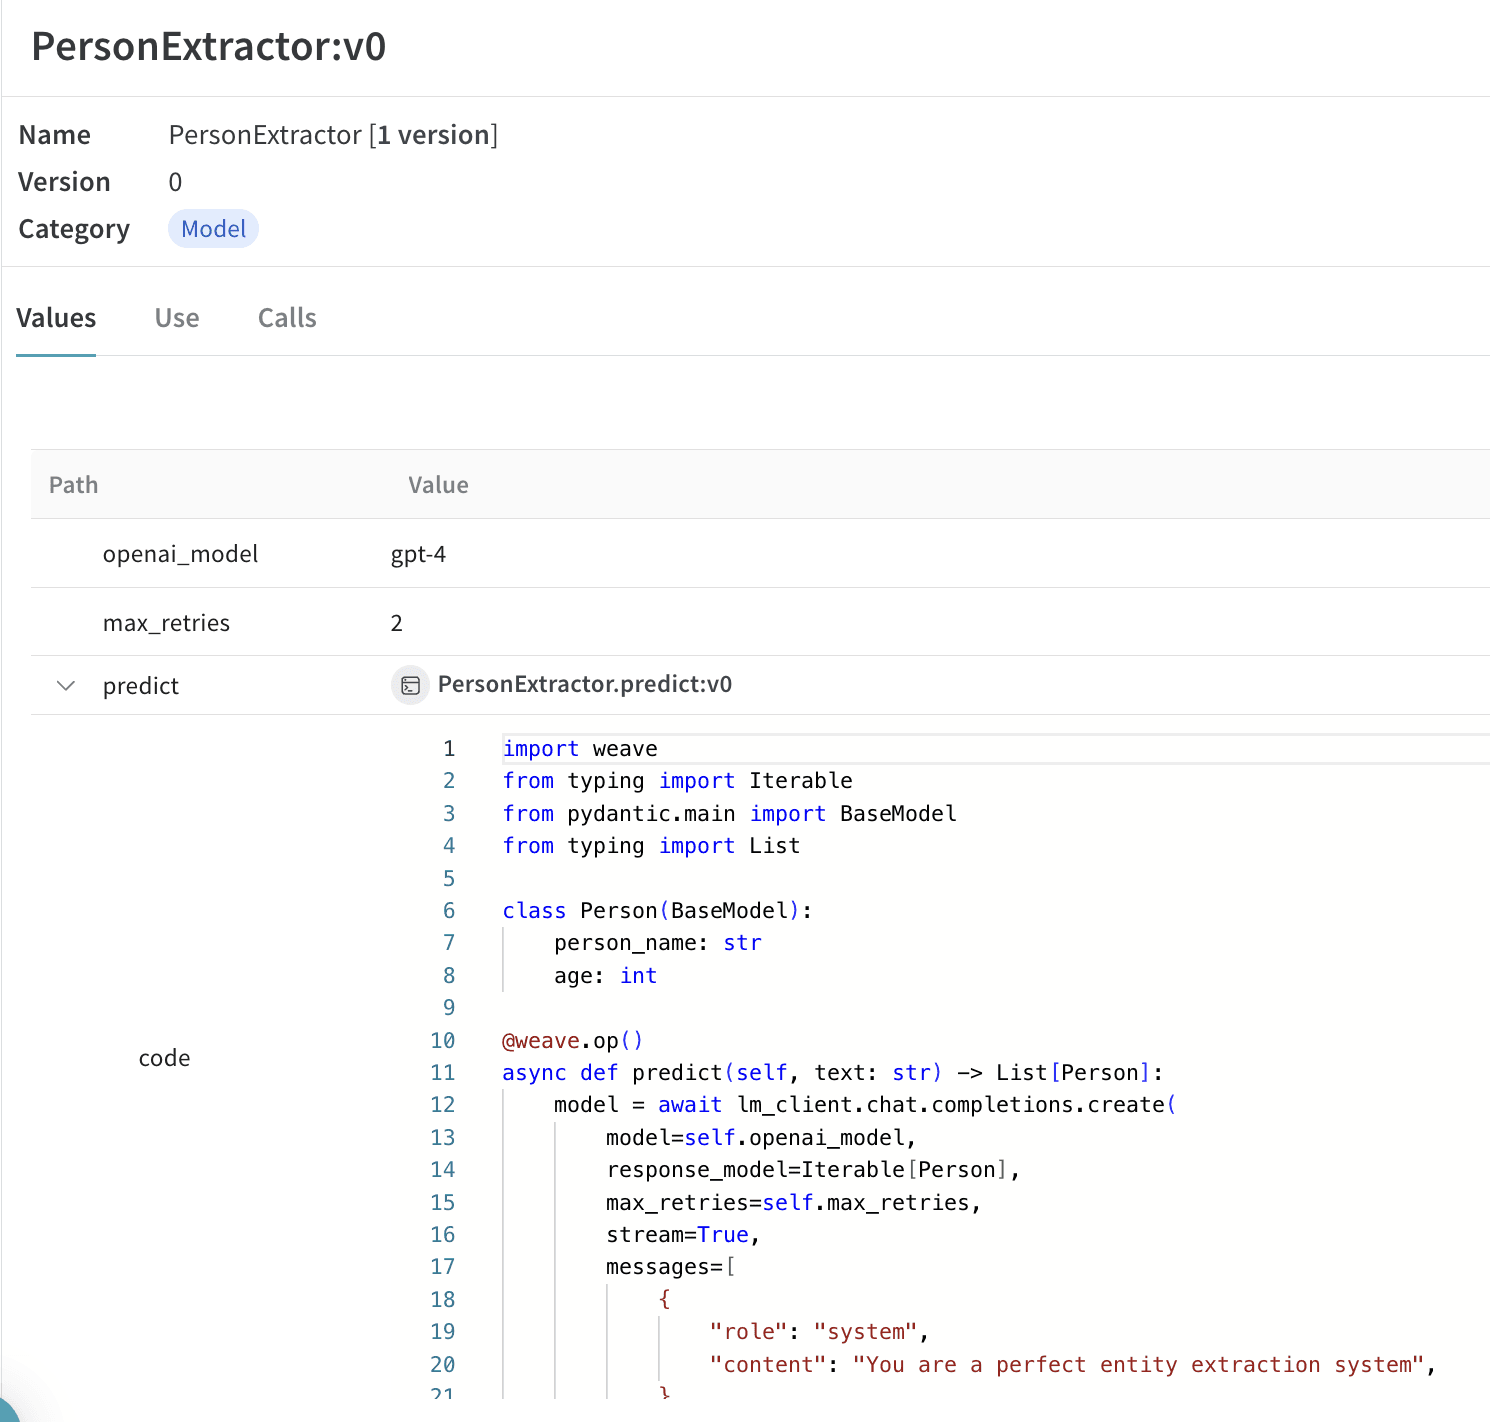
다음 예시에서는 `PersonExtractor`로 실험할 수 있습니다. 이 중 하나를 변경할 때마다 `PersonExtractor`의 새 *버전*이 생성됩니다.
```python lines theme={"system"}
import asyncio
from typing import List, Iterable
import instructor
import weave
from openai import AsyncOpenAI
from pydantic import BaseModel
# 원하는 출력 구조를 정의합니다
class Person(BaseModel):
person_name: str
age: int
# Weave를 초기화합니다
weave.init(project_name="instructor-test")
# OpenAI 클라이언트를 패치합니다
lm_client = instructor.from_openai(AsyncOpenAI())
class PersonExtractor(weave.Model):
openai_model: str
max_retries: int
@weave.op()
async def predict(self, text: str) -> List[Person]:
model = await lm_client.chat.completions.create(
model=self.openai_model,
response_model=Iterable[Person],
max_retries=self.max_retries,
stream=True,
messages=[
{
"role": "system",
"content": "You are a perfect entity extraction system",
},
{
"role": "user",
"content": f"Extract `{text}`",
},
],
)
return [m async for m in model]
model = PersonExtractor(openai_model="gpt-4", max_retries=2)
asyncio.run(model.predict("John is 30 years old"))
```
|  |
| - |
| [`Model`](/ko/products/wandb/weave/guides/core-types/models)을 사용하여 Call 트레이싱 및 버전 관리하기 |
|
| - |
| [`Model`](/ko/products/wandb/weave/guides/core-types/models)을 사용하여 Call 트레이싱 및 버전 관리하기 |
Weave Model 서빙하기
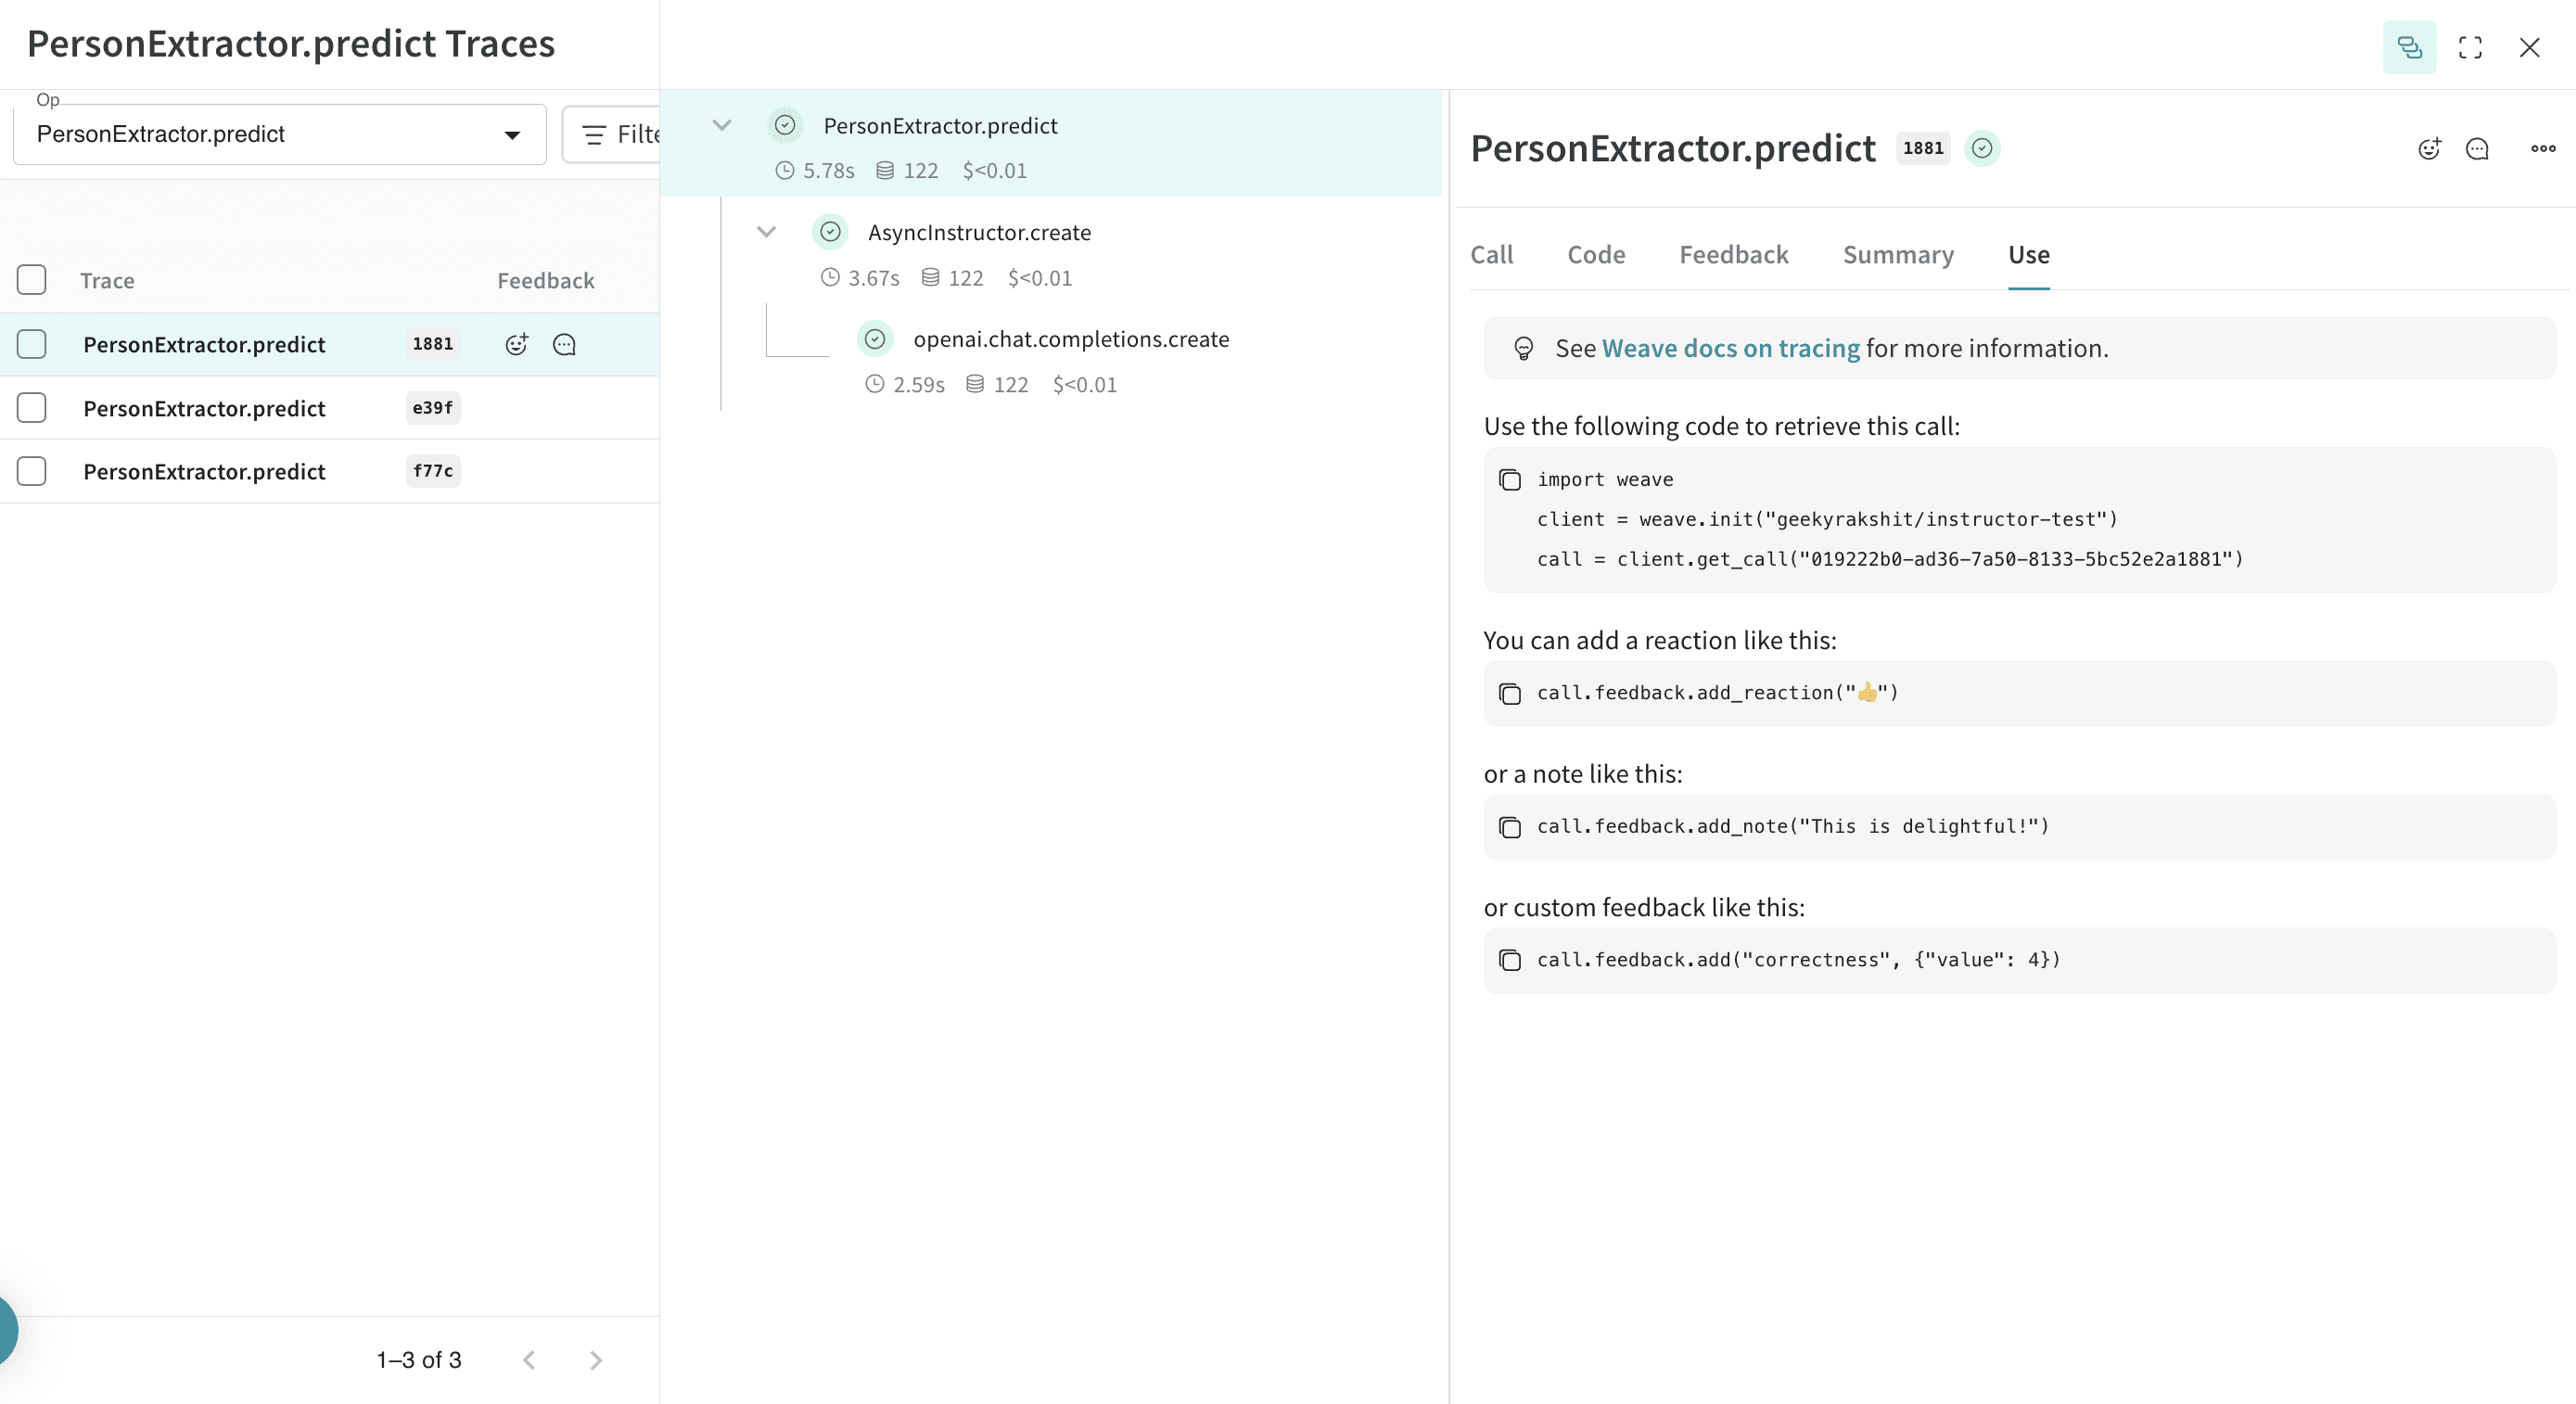
`weave.Model`을 저장한 후에는 FastAPI 엔드포인트로 서빙하여 노트북 외부에서 테스트하거나 다른 애플리케이션과 통합할 수 있습니다. `weave.Model` 객체의 Weave 레퍼런스만 있으면 FastAPI 서버를 시작하고 모델을 [`serve`](/ko/products/wandb/weave/guides/tools/serve)할 수 있습니다.
| [ ](https://forge.coreweave.com/wandb/geekyrakshit/instructor-test/weave/objects/PersonExtractor/versions/xXpMsJvaiTOjKafz1TnHC8wMgH5ZAAwYOaBMvHuLArI) |
| - |
| 모든 `weave.Model`의 Weave 레퍼런스는 UI에서 해당 모델로 이동한 뒤 복사할 수 있습니다. |
모델을 서빙하려면 터미널에서 다음 명령을 실행하세요.
```bash theme={"system"}
weave serve weave://your_entity/project-name/YourModel:[HASH]
```
## Related topics
- [예시 코드 및 노트북](/ko/products/wandb/examples.md)
](https://forge.coreweave.com/wandb/geekyrakshit/instructor-test/weave/objects/PersonExtractor/versions/xXpMsJvaiTOjKafz1TnHC8wMgH5ZAAwYOaBMvHuLArI) |
| - |
| 모든 `weave.Model`의 Weave 레퍼런스는 UI에서 해당 모델로 이동한 뒤 복사할 수 있습니다. |
모델을 서빙하려면 터미널에서 다음 명령을 실행하세요.
```bash theme={"system"}
weave serve weave://your_entity/project-name/YourModel:[HASH]
```
## Related topics
- [예시 코드 및 노트북](/ko/products/wandb/examples.md)