> ## Documentation Index
> Fetch the complete documentation index at: https://docs.coreweave.com/llms.txt
> Use this file to discover all available pages before exploring further.
# Log evaluation data from your code
> Flexible, incremental way to log evaluation data from Python and TypeScript code
이 가이드에서는 `EvaluationLogger`를 사용해 기존 Python 또는 TypeScript 코드에서 예측과 점수를 로깅하는 방법을 설명합니다. 이 방법을 사용하면 전체 데이터셋과 Scorer 모음을 미리 정의하지 않아도 Weave에서 모델 성능을 평가할 수 있습니다. 데이터셋이나 Scorer가 사전에 정의되어 있지 않거나, 워크플로 실행 중에 평가 데이터를 점진적으로 로깅해야 할 때 이 방법을 사용하세요.
사전 정의된 `Dataset`과 `Scorer` 객체 목록이 필요한 표준 `Evaluation` 객체와 달리, `EvaluationLogger`를 사용하면 개별 예측과 해당 점수가 나오는 대로 점진적으로 로깅할 수 있습니다.
**보다 구조화된 평가가 필요하신가요?**
사전 정의된 데이터셋과 Scorer를 사용하는 보다 정형화된 평가 프레임워크를 원한다면 [표준 Evaluation 프레임워크](/ko/products/wandb/weave/guides/core-types/evaluations)를 참조하세요.
`EvaluationLogger`는 유연성을, 표준 프레임워크는 체계적인 구조와 가이드를 제공합니다.
기본 워크플로
다음 단계를 따르면 예측별 점수와 집계된 요약을 포함한 전체 평가가 Weave에 기록되며, Weights & Biases UI에서 이를 검토할 수 있습니다.
1. *로거 초기화:* `EvaluationLogger` 인스턴스를 생성하세요. 선택적으로 `model` 및 `dataset`에 대한 메타데이터를 함께 제공할 수 있습니다. 생략하면 Weave가 기본값을 사용합니다.
LLM Call(예: OpenAI)의 토큰 사용량과 비용을 캡처하려면 LLM을 호출하기 전에 `EvaluationLogger`를 초기화하세요.
LLM을 먼저 호출하고 나중에 예측을 로깅하면 Weave가 토큰 및 비용 데이터를 캡처하지 않습니다.
2. *예측 로깅:* 시스템의 각 입력-출력 쌍에 대해 `log_prediction()`을 호출하세요.
3. *점수 로깅:* 반환된 `ScoreLogger`로 해당 예측에 대해 `log_score()`를 호출하세요. 예측 하나에 여러 점수를 로깅할 수 있습니다.
4. *예측 종료:* 예측의 점수를 로깅한 후에는 반드시 `finish()`를 호출하여 예측을 확정하세요.
5. *요약 로깅:* 모든 예측을 처리한 후 `log_summary()`를 호출하여 점수를 집계하고, 선택 커스텀 메트릭을 추가하세요.
예측에 대해 `finish()`를 호출한 후에는 해당 예측에 더 이상 점수를 로깅할 수 없습니다.
이 워크플로를 보여 주는 Python 예시는 [기본 예시](#basic-example)를 참조하세요. 출력과 모든 점수를 한 번에 사용 가능하다면, Python 사용자는 [`log_example()`](#simplified-logging-with-log_example)을 사용하여 2\~4단계를 단일 Call로 처리할 수 있습니다.
기본 예시
다음 예시는 `EvaluationLogger`를 사용해 기존 코드 안에서 인라인으로 예측과 점수를 로깅하는 방법을 보여 줍니다. `[YOUR-TEAM]/[YOUR-PROJECT]`를 사용자의 W\&B entity와 프로젝트로 바꾸세요.
`user_model` 함수를 정의하고 입력 목록에 적용합니다. 각 예시에서는 다음을 수행합니다:
* `log_prediction`을 사용하여 입력과 출력을 로깅합니다.
* `log_score`를 통해 정확성 점수(`correctness_score`)를 로깅합니다.
* `finish()`가 해당 예측의 로깅을 마무리합니다.
마지막으로, `log_summary`가 집계 메트릭을 기록하고 Weave에서 자동 점수 요약을 트리거합니다.
```python lines theme={"system"}
import weave
from openai import OpenAI
from weave import EvaluationLogger
weave.init('[YOUR-TEAM]/[YOUR-PROJECT]')
# 토큰이 제대로 추적되도록 모델을 호출하기 전에 EvaluationLogger를 초기화하세요
eval_logger = EvaluationLogger(
model="my_model",
dataset="my_dataset"
)
# 입력 데이터 예시(원하는 데이터 구조를 자유롭게 사용할 수 있습니다)
eval_samples = [
{'inputs': {'a': 1, 'b': 2}, 'expected': 3},
{'inputs': {'a': 2, 'b': 3}, 'expected': 5},
{'inputs': {'a': 3, 'b': 4}, 'expected': 7},
]
# OpenAI를 사용하는 모델 로직 예시
@weave.op
def user_model(a: int, b: int) -> int:
oai = OpenAI()
response = oai.chat.completions.create(
messages=[{"role": "user", "content": f"What is {a}+{b}?"}],
model="gpt-4o-mini"
)
# 응답을 필요에 맞게 활용합니다(여기서는 간단히 a + b를 반환합니다)
return a + b
# 예시를 순회하면서 예측하고 로깅합니다
for sample in eval_samples:
inputs = sample["inputs"]
model_output = user_model(**inputs) # 입력을 kwargs로 전달합니다
# 예측의 입력과 출력을 로깅합니다
prediction = eval_logger.log_prediction(
inputs=inputs,
output=model_output
)
# 이 예측의 점수를 계산하고 로깅합니다
expected = sample["expected"]
correctness_score = model_output == expected
prediction.log_score(
scorer="correctness", # Scorer를 가리키는 단순한 문자열 이름
score=correctness_score
)
# 이 예측에 대한 로깅을 종료합니다
prediction.finish()
# 전체 평가의 최종 요약을 로깅합니다.
# Weave는 위에서 로깅한 'correctness' 점수를 자동으로 집계합니다.
summary_stats = {"subjective_overall_score": 0.8}
eval_logger.log_summary(summary_stats)
print("Evaluation logging complete. View results in the Weave UI.")
```
TypeScript SDK는 두 가지 API 패턴을 제공합니다:
* **Fire-and-forget API(대부분의 경우 권장)**: `await` 없이 `logPrediction()`을 사용하여 동기식으로 실행을 차단하지 않고 로깅하세요.
* **대기 가능한 API**: 다음 단계로 진행하기 전에 오퍼레이션이 완료되었는지 확인해야 할 때는 `await`와 함께 `logPredictionAsync()`을 사용하세요.
다음과 같은 경우에는 fire-and-forget을 사용하세요:
* **높은 처리량**: 각 로깅 오퍼레이션을 기다리지 않고 여러 예측을 병렬로 처리합니다.
* **최소한의 코드 변경**: 기존 async/await 흐름을 재구성하지 않고 평가 로깅을 추가합니다.
* **간결성**: 대부분의 평가 시나리오에서 상용구 코드가 줄어들고 구문이 더 깔끔해집니다.
`logSummary()`가 결과를 집계하기 전에 대기 중인 모든 오퍼레이션이 완료될 때까지 자동으로 기다리므로 fire-and-forget 패턴은 안전합니다.
다음 예시는 fire-and-forget 패턴으로 모델 예측을 평가합니다. 평가 로거를 설정하고, 세 개의 테스트 샘플에 대해 모델을 실행한 다음, await를 사용하지 않고 예측을 로깅합니다:
```typescript twoslash lines {36,50} theme={"system"}
// @noErrors
import weave, {EvaluationLogger} from 'weave';
import OpenAI from 'openai';
await weave.init('[YOUR-TEAM]/[YOUR-PROJECT]');
// 토큰 추적을 보장하도록 모델을 호출하기 전에 EvaluationLogger를 초기화하세요
const evalLogger = new EvaluationLogger({
name: 'my-eval',
model: 'my_model',
dataset: 'my_dataset'
});
// 입력 데이터 예시
const evalSamples = [
{inputs: {a: 1, b: 2}, expected: 3},
{inputs: {a: 2, b: 3}, expected: 5},
{inputs: {a: 3, b: 4}, expected: 7},
];
// OpenAI를 사용하는 모델 로직 예시
const userModel = weave.op(async function userModel(a: number, b: number): Promise {
const oai = new OpenAI();
const response = await oai.chat.completions.create({
messages: [{role: 'user', content: `What is ${a}+${b}?`}],
model: 'gpt-4o-mini'
});
return a + b;
});
// 예시를 순회하며 예측하고 fire-and-forget 패턴으로 로깅하세요
for (const sample of evalSamples) {
const {inputs} = sample;
const modelOutput = await userModel(inputs.a, inputs.b);
// Fire-and-forget: logPrediction에 await가 필요하지 않습니다
const prediction = evalLogger.logPrediction(inputs, modelOutput);
// 이 예측의 점수를 계산하고 로깅하세요
const correctnessScore = modelOutput === sample.expected;
// Fire-and-forget: logScore에 await가 필요하지 않습니다
prediction.logScore('correctness', correctnessScore);
// Fire-and-forget: finish에 await가 필요하지 않습니다
prediction.finish();
}
// logSummary는 내부적으로 대기 중인 모든 오퍼레이션이 완료될 때까지 기다립니다
const summaryStats = {subjective_overall_score: 0.8};
await evalLogger.logSummary(summaryStats);
console.log('Evaluation logging complete. View results in the Weave UI.');
```
오류 처리나 순차적 의존성 관리처럼 다음 단계로 넘어가기 전에 각 오퍼레이션이 완료되었는지 확인해야 하는 경우에는 awaitable API를 사용하세요.
다음 예시에서는 `logPrediction()`을 `await` 없이 호출하는 대신 `logPredictionAsync()`를 `await`와 함께 사용하여, 각 오퍼레이션이 완료된 후에 다음 오퍼레이션으로 넘어가도록 합니다.
```typescript twoslash lines theme={"system"}
// @noErrors
// logPrediction 대신 logPredictionAsync를 사용하세요
const prediction = await evalLogger.logPredictionAsync(inputs, modelOutput);
// 각 오퍼레이션이 완료될 때까지 기다리세요
await prediction.logScore('correctness', correctnessScore);
await prediction.finish();
```
`log_example()`으로 간소화된 로깅
`log_example()`을 사용하면 단일 Call로 입력, 출력, 점수를 로깅할 수 있습니다. 이 편의 방법은 `log_prediction()`, `log_score()`, `finish()`를 하나의 단계로 결합하며, 배치 또는 오프라인 평가처럼 입력, 모델 출력, 점수를 이미 로깅할 준비가 된 경우에 유용합니다.
```python lines theme={"system"}
import weave
from weave import EvaluationLogger
weave.init('[YOUR-TEAM]/[YOUR-PROJECT]')
eval_logger = EvaluationLogger(
model="my_model",
dataset="my_dataset"
)
eval_samples = [
{'inputs': {'a': 1, 'b': 2}, 'expected': 3},
{'inputs': {'a': 2, 'b': 3}, 'expected': 5},
{'inputs': {'a': 3, 'b': 4}, 'expected': 7},
]
for sample in eval_samples:
inputs = sample['inputs']
output = inputs['a'] + inputs['b']
eval_logger.log_example(
inputs=inputs,
output=output,
scores={"correctness": output == sample['expected']}
)
eval_logger.log_summary({"avg_score": 1.0})
```
앞의 `log_example()` 호출은 다음 코드와 동일합니다.
```python lines theme={"system"}
prediction = eval_logger.log_prediction(inputs=inputs, output=output)
prediction.log_score(scorer="correctness", score=output == sample['expected'])
prediction.finish()
```
Weave TypeScript SDK에서는 `log_example()`을 사용할 수 없습니다. TypeScript 사용자는 [기본 예시](#basic-example)에 나온 `logPrediction()` 및 `logScore()` 패턴을 사용하세요.
고급 사용
`EvaluationLogger`는 기본 워크플로를 넘어 더 복잡한 평가 시나리오를 수용할 수 있는 유연한 패턴을 제공합니다. 다음 섹션에서는 컨텍스트 매니저를 사용한 자동 리소스 관리, 에이전트 트레이스를 평가 행에 연결하기, 모델 실행과 로깅 분리, 리치 미디어 데이터 작업, 여러 모델 평가를 나란히 비교하는 등의 고급 기법을 설명합니다.
컨텍스트 매니저 사용
`EvaluationLogger`는 예측과 점수 모두에 컨텍스트 매니저(`with` 문)를 지원합니다. 컨텍스트 매니저를 사용하면 코드가 더 깔끔해지고, 리소스가 자동으로 정리되며, LLM 평가자 Call과 같은 중첩된 오퍼레이션을 더 정확하게 추적할 수 있습니다.
이때 `with` 문을 사용하면 다음과 같은 이점이 있습니다.
* 컨텍스트를 벗어날 때 `finish()`가 자동으로 호출됩니다.
* 중첩된 LLM Call의 토큰 및 비용을 더 정확하게 추적합니다.
* 예측 컨텍스트 안에서 모델을 실행한 후 출력을 설정할 수 있습니다.
```python lines {16,24,31,40} theme={"system"}
import openai
import weave
weave.init("nested-evaluation-example")
oai = openai.OpenAI()
# 로거 초기화
ev = weave.EvaluationLogger(
model="gpt-4o-mini",
dataset="joke_dataset"
)
user_prompt = "Tell me a joke"
# 예측에 컨텍스트 매니저 사용 - finish()를 호출할 필요 없음
with ev.log_prediction(inputs={"user_prompt": user_prompt}) as prediction:
# 컨텍스트 안에서 모델 Call 수행
result = oai.chat.completions.create(
model="gpt-4o-mini",
messages=[{"role": "user", "content": user_prompt}],
)
# 모델 Call 이후 출력 설정
prediction.output = result.choices[0].message.content
# 단순한 점수 로깅
prediction.log_score("correctness", 1.0)
prediction.log_score("ambiguity", 0.3)
# LLM Call이 필요한 점수에는 중첩된 컨텍스트 매니저 사용
with prediction.log_score("llm_judge") as score:
judge_result = oai.chat.completions.create(
model="gpt-4o-mini",
messages=[
{"role": "system", "content": "Rate how funny the joke is from 1-5"},
{"role": "user", "content": prediction.output},
],
)
# 계산 후 점수 값 설정
score.value = judge_result.choices[0].message.content
# 'with' 블록을 벗어날 때 finish()가 자동으로 호출됨
ev.log_summary({"avg_score": 1.0})
```
이 패턴을 사용하면 모든 중첩된 오퍼레이션이 추적되어 상위 예측에 귀속되므로, Weights & Biases UI에서 정확한 토큰 사용량과 비용 데이터를 확인할 수 있습니다.
TypeScript에는 Python의 `with` 문과 같은 컨텍스트 매니저 패턴이 없습니다. 대신 fire-and-forget 패턴을 사용하고 `finish()`를 명시적으로 호출하세요.
다음 예시는 예측을 로깅하고, 점수와 LLM 평가자 점수를 추가한 다음, `finish()`로 예측을 마무리합니다.
```typescript twoslash lines {43} theme={"system"}
// @noErrors
import weave from 'weave';
import OpenAI from 'openai';
import {EvaluationLogger} from 'weave/evaluationLogger';
await weave.init('[YOUR-TEAM]/[YOUR-PROJECT]');
const oai = new OpenAI();
// 로거 초기화
const ev = new EvaluationLogger({
name: 'joke-eval',
model: 'gpt-4o-mini',
dataset: 'joke_dataset',
});
const userPrompt = 'Tell me a joke';
// 모델 출력 조회
const result = await oai.chat.completions.create({
model: 'gpt-4o-mini',
messages: [{role: 'user', content: userPrompt}],
});
const modelOutput = result.choices[0].message.content;
// 출력과 함께 예측 로깅
const prediction = ev.logPrediction({user_prompt: userPrompt}, modelOutput);
// 단순한 점수 로깅
prediction.logScore('correctness', 1.0);
prediction.logScore('ambiguity', 0.3);
// LLM 평가자 점수는 Call을 수행한 후 결과를 로깅
const judgeResult = await oai.chat.completions.create({
model: 'gpt-4o-mini',
messages: [
{role: 'system', content: 'Rate how funny the joke is from 1-5'},
{role: 'user', content: modelOutput || ''},
],
});
prediction.logScore('llm_judge', judgeResult.choices[0].message.content);
// 점수화가 끝나면 finish를 명시적으로 호출
prediction.finish();
await ev.logSummary({avg_score: 1.0});
```
TypeScript에서는 컨텍스트 매니저를 통한 자동 정리가 지원되지 않지만, `logSummary()`는 결과를 집계하기 전에 아직 종료되지 않은 예측을 모두 자동으로 종료합니다. `finish()`를 직접 호출하고 싶지 않다면 이 동작을 활용하면 됩니다.
에이전트 트레이스를 평가에 연결하기
Python에서는 트레이싱되는 각 에이전트 호출을 해당 `log_prediction()` 컨텍스트 안에 유지하세요. `EvaluationLogger`는 이 컨텍스트에서 생성된 span에 평가 run, 예시, trial 메타데이터를 설정하고, Weave는 이 메타데이터를 사용하여 트레이스를 평가 결과에 연결합니다.
평가와 에이전트 span의 자동 연결은 Python에서만 사용할 수 있습니다. TypeScript의 `EvaluationLogger`와 `Evaluation.evaluate()`는 모두 에이전트 span을 연결하는 활성 평가 범위를 생성하지 않습니다. TypeScript에서는 이 섹션에서 설명하는 OTel 속성을 직접 설정해야만 span을 연결할 수 있으며, 두 Call ID가 모두 이미 사용 가능한 경우에만 가능합니다.
다음 예시는 [OpenAI Agents SDK](/ko/products/wandb/weave/guides/integrations/agents/openai-agents-sdk)를 사용합니다. 동일한 패턴은 Weave가 트레이싱하는 다른 에이전트 프레임워크에도 적용됩니다. `[YOUR-TEAM]/[YOUR-PROJECT]`를 W\&B entity와 프로젝트로 바꾸세요.
```python lines {18-28} theme={"system"}
import weave
from agents import Agent, Runner
from weave import EvaluationLogger
weave.init("[YOUR-TEAM]/[YOUR-PROJECT]")
agent = Agent(
name="Support agent",
instructions="Answer with only the city name.",
)
eval_logger = EvaluationLogger(
name="support-agent-eval",
model="support-agent",
dataset="support-prompts",
)
question = "What is the capital of France?"
with eval_logger.log_prediction(
inputs={"prompt": question},
example_id="capital-of-france",
) as prediction:
result = Runner.run_sync(agent, question)
output = str(result.final_output or "")
prediction.output = output
prediction.log_score(
scorer="contains_expected_answer",
score="paris" in output.lower(),
)
eval_logger.log_summary()
```
이 기능은 TypeScript에서 사용할 수 없습니다.
예측 컨텍스트가 시작되기 전이나 종료된 후에 에이전트가 실행되면 Weave는 트레이스를 기록하지만 평가 결과에 연결하지 않습니다.
앞의 코드 예시처럼 에이전트가 `log_prediction()` 컨텍스트 안에서 실행되고 Weave 인테그레이션이 이를 트레이싱하면 Weave는 트레이스를 평가 결과에 자동으로 연결합니다. 그렇지 않으면 에이전트 span에 두 연결 ID를 직접 설정해야 합니다. 설정 방법은 span이 생성되는 위치에 따라 달라집니다.
* **동일한 프로세스에서 직접 계측하는 경우:** 각 span에 속성을 직접 설정하세요.
* **별도의 서비스인 경우:** 두 ID를 해당 서비스에 전송한 다음, 서비스가 생성하는 span에 설정하세요.
직접 계측한 span 연결하기
`log_prediction()` 컨텍스트 안에서 생성된 span에는 `EvaluationLogger`가 모든 속성을 자동으로 설정합니다. 하지만 자체 OpenTelemetry(OTel) 계측으로 span을 전송하는 경우에는 연결하려는 각 span에 속성을 직접 설정해야 합니다. 평가와 관련해 설정할 수 있는 속성은 다음과 같습니다.
| 속성 | 유형 | 설명 |
| - | - | - |
| `weave.eval.run_id` | string | (필수) 평가 run(`Evaluation.evaluate`)의 Call ID입니다. 평가 수준의 **View spans** 결과에 span을 포함하려면 이 값이 필요합니다. |
| `weave.eval.predict_and_score_call_id` | string | (필수) 특정 결과 및 trial에 해당하는 `Evaluation.predict_and_score` 오퍼레이션의 Call ID입니다. `weave.eval.run_id`와 함께 설정하면 span이 해당 결과에 연결됩니다. |
| `weave.eval.kind` | string | (선택) 평가 범주입니다. Weave는 에이전트 평가에는 `agent`를, 표준 평가에는 `standard`를 사용합니다. |
| `weave.eval.row_digest` | string | (선택) 평가된 데이터셋 행을 식별하는 고정 다이제스트입니다. 값을 직접 제공하지 않으면 `EvaluationLogger`가 예측 입력으로부터 이 값을 도출합니다. |
| `weave.eval.example_id` | string | (선택) 호출자가 제공하는, 평가된 예시의 식별자입니다. |
| `weave.eval.trial_index` | integer | (선택) 데이터셋 행의 trial 번호로, 0부터 시작합니다. |
| `weave.eval.evaluation_name` | string | (선택) 사람이 읽을 수 있는 형태의 평가 이름입니다. |
| `weave.eval.project_id` | string | (선택) Weave SDK가 설정하는 프로젝트 컨텍스트입니다. 이 속성은 span을 라우팅하거나 연결하지 않으므로, 대상 프로젝트는 OTel 리소스에서 설정하세요. |
span은 `/agents/otel/v1/traces` 엔드포인트를 통해 평가와 동일한 Weave 프로젝트로 전송하세요. OTel span 속성은 부모 span에서 자식 span으로 전파되지 않으므로, 연결하려는 모든 span에 각각 속성을 설정해야 합니다.
엔드포인트에 대한 자세한 내용은 다음을 참조하세요.
* 기존 OTel 파이프라인에서 span을 전송하려면 [Send OpenTelemetry spans to the Agents view](/ko/products/wandb/weave/guides/tracking/trace-agents-otel)를 참조하세요.
* 엔드포인트 사양은 [Export a GenAI trace](/ko/products/wandb/weave/reference/service-api/agents/export-genai-trace)를 참조하세요.
평가 및 결과와의 연결은 `weave.eval.run_id`와 `weave.eval.predict_and_score_call_id`로만 이루어집니다. 행 다이제스트, 예시 ID, trial 인덱스, kind, 평가 이름은 컨텍스트를 더하고 필터링에 활용되지만, 그 자체로는 연결을 만들지 않습니다. 두 연결 속성에는 OTel 트레이스 ID나 span ID가 아닌 Weave Call ID를 사용하세요.
두 ID는 모두 [평가 결과 쿼리 API](/ko/products/wandb/weave/reference/service-api/eval-results/eval-results-query)에서 획득할 수 있습니다. 응답에 포함된 각 평가에는 `evaluation_call_id`가, 각 trial에는 `predict_and_score_call_id`가 있습니다.
다음 예시에서는 `span`이 에이전트 오퍼레이션의 OTel span이라고 가정합니다. 대괄호로 묶인 각 값을 해당 span이 속한 평가 run 및 결과의 메타데이터로 바꾸세요.
TypeScript 예시는 예측 범위에 의존하지 않고 OTel 속성을 직접 설정하므로 정상적으로 동작합니다. 단, 두 Call ID를 이미 모두 확보한 경우에만 사용하세요.
```python lines theme={"system"}
span.set_attributes(
{
"weave.eval.run_id": "[EVALUATION-RUN-CALL-ID]",
"weave.eval.predict_and_score_call_id": "[PREDICT-AND-SCORE-CALL-ID]",
"weave.eval.kind": "agent",
"weave.eval.row_digest": "[ROW-DIGEST]",
"weave.eval.example_id": "[EXAMPLE-ID]",
"weave.eval.trial_index": 0,
"weave.eval.evaluation_name": "[EVALUATION-NAME]",
}
)
```
```typescript lines theme={"system"}
span.setAttributes({
'weave.eval.run_id': '[EVALUATION-RUN-CALL-ID]',
'weave.eval.predict_and_score_call_id': '[PREDICT-AND-SCORE-CALL-ID]',
'weave.eval.kind': 'agent',
'weave.eval.row_digest': '[ROW-DIGEST]',
'weave.eval.example_id': '[EXAMPLE-ID]',
'weave.eval.trial_index': 0,
'weave.eval.evaluation_name': '[EVALUATION-NAME]',
});
```
별도의 서비스에서 실행되는 에이전트 연결
에이전트가 별도의 서비스로 실행되면 평가 프로세스와 에이전트가 메모리를 공유하지 않습니다. Weave는 연결 속성을 자동으로 설정할 수 없으며, 에이전트의 span 객체에 직접 접근할 수도 없습니다. 대신 평가 프로세스에서 두 Call ID를 모두 가져와 서비스로 전송한 다음, 해당 서비스에서 생성된 span에 설정하세요. 이 분산 `EvaluationLogger` 패턴은 Python 전용입니다.
`log_prediction()` 컨텍스트에 진입하면 컨텍스트 본문이 실행되기 전에 `Evaluation.predict_and_score` call이 생성됩니다. 컨텍스트는 `ScoreLogger`를 반환하며(다음 예시에서는 `prediction`에 바인딩), 이 객체는 두 Call ID를 모두 노출합니다. 서비스가 반환될 때까지 컨텍스트를 열어 두어 동일한 평가 결과에 출력과 점수를 로깅할 수 있도록 하세요.
평가 프로세스에서 `[AGENT-SERVICE-URL]`을 에이전트가 실행되는 엔드포인트로 교체하고, `[YOUR-TEAM]/[YOUR-PROJECT]`도 교체하세요:
```python lines {16-37} theme={"system"}
import requests
import weave
from weave import EvaluationLogger
weave.init("[YOUR-TEAM]/[YOUR-PROJECT]")
eval_logger = EvaluationLogger(
name="support-agent-eval",
model="support-agent",
dataset="support-prompts",
)
question = "What is the capital of France?"
example_id = "capital-of-france"
trial_index = 0
with eval_logger.log_prediction(
inputs={"prompt": question},
example_id=example_id,
trial_index=trial_index,
) as prediction:
eval_context = {
"weave.eval.run_id": prediction.evaluate_call.id,
"weave.eval.predict_and_score_call_id": (
prediction.predict_and_score_call.id
),
"weave.eval.kind": "agent",
"weave.eval.example_id": example_id,
"weave.eval.trial_index": trial_index,
"weave.eval.evaluation_name": "support-agent-eval",
}
response = requests.post(
"[AGENT-SERVICE-URL]",
json={"prompt": question, "eval_context": eval_context},
timeout=60,
)
response.raise_for_status()
prediction.output = response.json()["output"]
eval_logger.log_summary()
```
에이전트 서비스에서는 수신한 속성을 평가 결과와 연결하려는 모든 에이전트 span에 복사하세요. 다음 함수는 raw OTel span을 사용하여 수신 측을 보여줍니다. 서비스가 평가와 동일한 `[YOUR-TEAM]/[YOUR-PROJECT]`로 span을 내보내도록 설정하세요.
```python lines {16,22} theme={"system"}
from typing import Any
import weave
from agents import Agent, Runner
from opentelemetry import trace
weave.init("[YOUR-TEAM]/[YOUR-PROJECT]")
tracer = trace.get_tracer(__name__)
agent = Agent(
name="Support agent",
instructions="Answer with only the city name.",
)
def run_agent(request_body: dict[str, Any]) -> dict[str, str]:
eval_context = request_body["eval_context"]
with tracer.start_as_current_span(
"invoke_agent Support agent",
attributes={
"gen_ai.operation.name": "invoke_agent",
"gen_ai.agent.name": "Support agent",
**eval_context,
},
):
result = Runner.run_sync(agent, request_body["prompt"])
return {"output": str(result.final_output or "")}
```
이 예제의 래퍼 span은 평가 결과에 연결됩니다. 에이전트 프레임워크가 추가 span을 생성하는 경우, 해당 span에도 `eval_context`를 복사하세요. OTel은 래퍼에서 span 속성을 상속하지 않습니다.
이 기능은 TypeScript에서 사용할 수 없습니다.
평가에 연결된 에이전트 span 보기
Weights & Biases UI에서 연결된 span을 확인하려면 다음 단계를 따르세요.
1. [Forge](https://forge.coreweave.com/wandb)로 이동하세요.
2. Weave 사이드바 메뉴에서 **Evals**를 클릭하세요.
3. 평가 run을 선택하세요.
4. 평가 세부 정보 패널이 열리면 **Evaluation** 탭에서 **View spans**를 클릭하세요. **Agents** 페이지가 열리고, **Spans** 탭에는 해당 평가에 대한 span만 필터링되어 표시됩니다.
기존 데이터셋에 연결
`inputs`로 raw 데이터셋을 `log_prediction`에 전달하면, Weave는 모든 평가 run마다 데이터를 다시 임포트합니다. 이로 인해 데이터가 중복 저장되며, 데이터셋이 크거나 여러 평가가 이를 재사용하는 경우 공간이 낭비될 수 있습니다.
이러한 중복을 방지하려면 평가를 실행하기 전에 데이터셋을 Weave에 게시한 다음, 게시된 데이터셋의 행을 `inputs`로 전달하세요. Weave는 데이터를 다시 임포트하는 대신 내부 레퍼런스를 사용하여 게시된 행에 대한 레퍼런스를 해결합니다. 이 기법을 사용하면 각 예측이 Weights & Biases UI의 특정 데이터셋 행에 다시 연결되는 표준 Evaluation 프레임워크와 동일한 linked 환경을 얻을 수 있습니다.
다음 예시는 데이터셋을 게시하고, `EvaluationLogger`에 연결한 다음, 다른 데이터셋처럼 조회하여 반복 처리하는 방법을 보여줍니다.
```python lines theme={"system"}
import weave
from weave import EvaluationLogger
weave.init("[YOUR-TEAM]/[YOUR-PROJECT]")
# 데이터셋 게시 (한 번만 수행하면 됨)
dataset = weave.Dataset(
name="my_eval_dataset",
rows=[
{"question": "What is the capital of France?", "expected": "Paris"},
{"question": "What U.S. state is Seattle in?", "expected": "Washington"},
{"question": "In which country is Mount Fuji?", "expected": "Japan"},
],
)
weave.publish(dataset)
# 게시된 데이터셋 조회
dataset = weave.ref("my_eval_dataset").get()
```
```typescript twoslash lines theme={"system"}
// @noErrors
import weave, {EvaluationLogger, Dataset} from 'weave';
await weave.init('[YOUR-TEAM]/[YOUR-PROJECT]');
// 데이터셋 게시 (한 번만 수행하면 됨)
const dataset = new Dataset({
name: 'my_eval_dataset',
rows: [
{"question": "What is the capital of France?", "expected": "Paris"},
{"question": "What U.S. state is Seattle in?", "expected": "Washington"},
{"question": "In which country is Mount Fuji?", "expected": "Japan"},
],
});
const datasetRef = await dataset.save();
// 게시된 데이터셋 조회
const published = await datasetRef.get();
```
로깅 전에 출력 조회하기
먼저 모델 출력을 계산한 다음, 예측과 점수를 따로 로깅할 수 있습니다. 이렇게 하면 평가 로직과 로깅 로직이 분리되므로, 시스템의 각기 다른 부분에서 예측 생성과 점수화를 담당하는 경우 코드를 테스트하고 유지 관리하기가 더 쉬워집니다.
```python lines theme={"system"}
# 토큰 추적을 보장하려면 모델을 호출하기 전에 EvaluationLogger를 초기화하세요
ev = EvaluationLogger(
model="example_model",
dataset="example_dataset"
)
# 토큰 추적을 위해 모델 출력(예: OpenAI Call)은 logger 초기화 이후에 생성해야 합니다
outputs = [your_output_generator(**inputs) for inputs in your_dataset]
predictions = [ev.log_prediction(inputs, output) for inputs, output in zip(your_dataset, outputs)]
for prediction, output in zip(predictions, outputs):
prediction.log_score(scorer="greater_than_5_scorer", score=output > 5)
prediction.log_score(scorer="greater_than_7_scorer", score=output > 7)
prediction.finish()
ev.log_summary()
```
fire-and-forget 패턴은 여러 예측을 병렬로 처리할 때 특히 효과적입니다.
다음 예시는 `EvaluationLogger`의 동시 인스턴스를 여러 개 생성하여 평가를 병렬로 일괄 처리합니다.
```typescript twoslash lines theme={"system"}
// @noErrors
// 토큰 추적을 보장하려면 모델을 호출하기 전에 EvaluationLogger를 초기화하세요
const ev = new EvaluationLogger({
name: 'parallel-eval',
model: 'example_model',
dataset: 'example_dataset'
});
// 토큰 추적을 위해 OpenAI Call 등의 모델 출력은 logger 초기화 이후에 생성해야 합니다
const outputs = await Promise.all(
yourDataset.map(inputs => yourOutputGenerator(inputs))
);
// Fire-and-forget: await 없이 모든 예측 처리
const predictions = yourDataset.map((inputs, i) =>
ev.logPrediction(inputs, outputs[i])
);
predictions.forEach((prediction, i) => {
const output = outputs[i];
// Fire-and-forget: await 불필요
prediction.logScore('greater_than_5_scorer', output > 5);
prediction.logScore('greater_than_7_scorer', output > 7);
prediction.finish();
});
// logSummary는 대기 중인 모든 오퍼레이션이 완료될 때까지 기다립니다
await ev.logSummary();
```
fire-and-forget 패턴을 사용하면 컴퓨팅 리소스가 허용하는 만큼 많은 평가를 병렬로 처리할 수 있습니다.
입력, 출력, 점수에는 이미지, 비디오, 오디오 또는 구조화된 table과 같은 리치 미디어를 포함할 수 있습니다. 리치 미디어를 로깅하면 Weights & Biases UI에서 점수와 함께 실제 콘텐츠를 확인할 수 있어 멀티모달 모델의 정성적 분석에 유용합니다. `log_prediction` 또는 `log_score` 방법에 딕셔너리나 미디어 객체를 전달하세요.
```python lines theme={"system"}
import io
import wave
import struct
from PIL import Image
import random
from typing import Any
import weave
def generate_random_audio_wave_read(duration=2, sample_rate=44100):
n_samples = duration * sample_rate
amplitude = 32767 # 16비트 최대 진폭
buffer = io.BytesIO()
# 버퍼에 wave 데이터 쓰기
with wave.open(buffer, 'wb') as wf:
wf.setnchannels(1)
wf.setsampwidth(2) # 16비트
wf.setframerate(sample_rate)
for _ in range(n_samples):
sample = random.randint(-amplitude, amplitude)
wf.writeframes(struct.pack(' dict[str, Any]:
return {
"result": random.randint(0, 10),
"image": image,
"audio": audio,
}
ev = EvaluationLogger(model="example_model", dataset="example_dataset")
for inputs in rich_media_dataset:
output = your_output_generator(**inputs)
prediction = ev.log_prediction(inputs, output)
prediction.log_score(scorer="greater_than_5_scorer", score=output["result"] > 5)
prediction.log_score(scorer="greater_than_7_scorer", score=output["result"] > 7)
ev.log_summary()
```
TypeScript SDK는 `weaveImage` 및 `weaveAudio` 함수를 사용한 이미지와 오디오 로깅을 지원합니다. 다음 예시는 이미지와 오디오 파일을 불러와 모델로 처리하고 결과를 점수와 함께 로깅합니다.
```typescript twoslash lines theme={"system"}
// @noErrors
import weave, {EvaluationLogger} from 'weave';
import * as fs from 'fs';
await weave.init('[YOUR-TEAM]/[YOUR-PROJECT]');
// 파일에서 이미지와 오디오 불러오기
const richMediaDataset = [
{
image: weave.weaveImage({data: fs.readFileSync('sample1.png')}),
audio: weave.weaveAudio({data: fs.readFileSync('sample1.wav')}),
},
{
image: weave.weaveImage({data: fs.readFileSync('sample2.png')}),
audio: weave.weaveAudio({data: fs.readFileSync('sample2.wav')}),
},
];
// 미디어를 처리하고 결과를 반환하는 모델
const yourOutputGenerator = weave.op(
async (inputs: {image: any; audio: any}) => {
const result = Math.floor(Math.random() * 10);
return {
result,
image: inputs.image,
audio: inputs.audio,
};
},
{name: 'yourOutputGenerator'}
);
const ev = new EvaluationLogger({
name: 'rich-media-eval',
model: 'example_model',
dataset: 'example_dataset',
});
for (const inputs of richMediaDataset) {
const output = await yourOutputGenerator(inputs);
// 입력과 출력 모두에 리치 미디어를 포함하여 예측 로깅하기
const prediction = ev.logPrediction(inputs, output);
prediction.logScore('greater_than_5_scorer', output.result > 5);
prediction.logScore('greater_than_7_scorer', output.result > 7);
prediction.finish();
}
await ev.logSummary();
```
여러 평가 로깅 및 비교
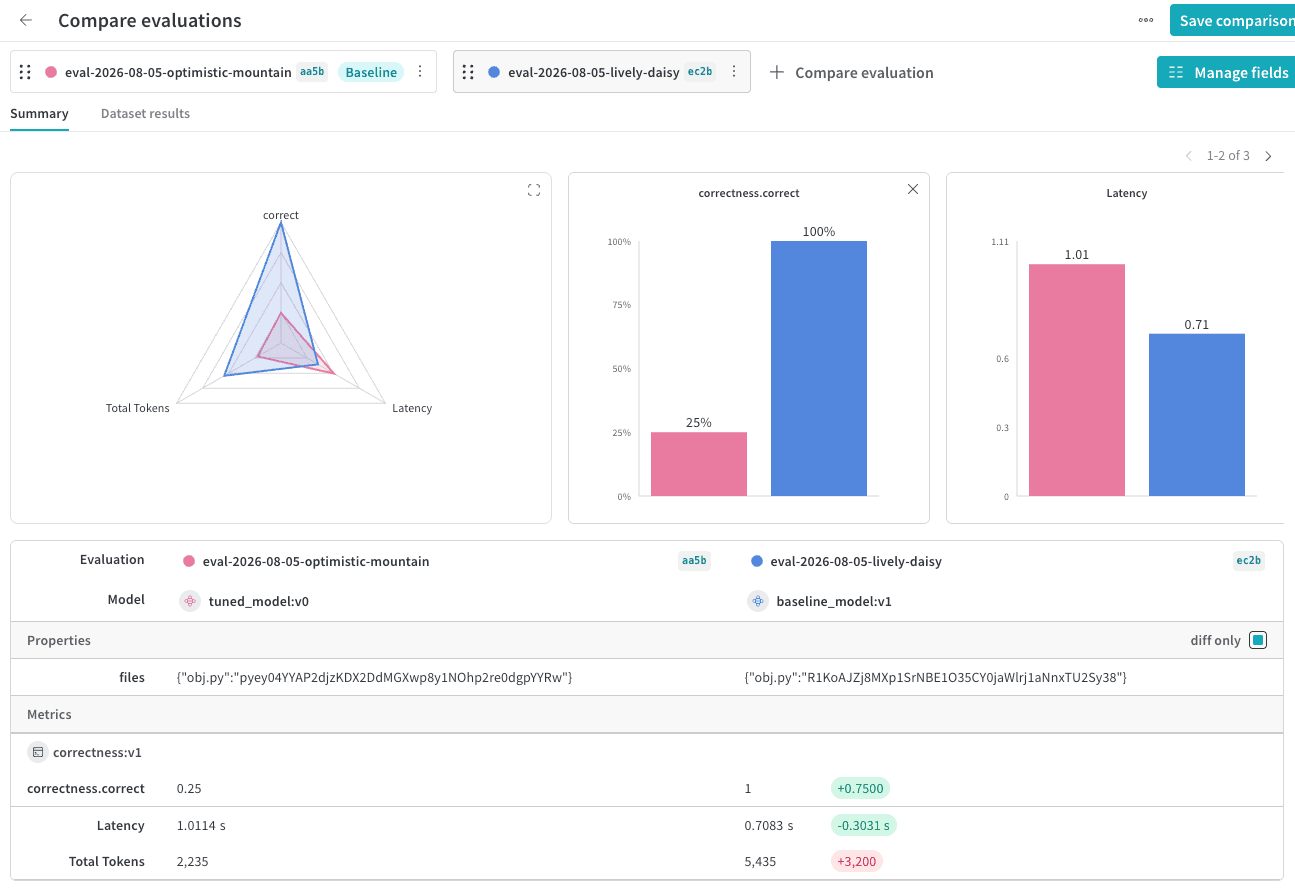
`EvaluationLogger`를 사용하면 Weights & Biases UI에서 여러 평가를 로깅하고 나란히 비교할 수 있습니다. 이는 같은 데이터셋에서 서로 다른 모델의 성능을 평가하는 데 유용합니다.
1. 다음 코드 예시를 실행하세요.
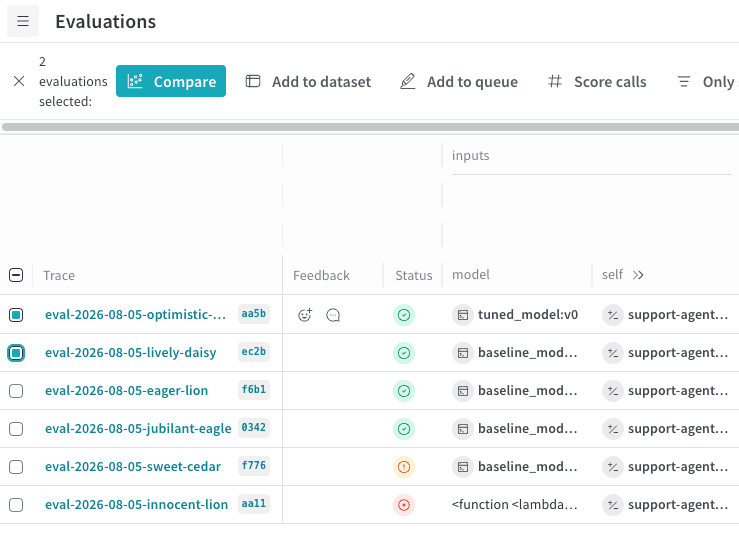
2. Weights & Biases UI에서 **Evals** 탭을 여세요.
3. 비교할 평가를 선택하세요.
4. **비교**를 클릭하세요. Compare 뷰에서는 다음 작업을 수행할 수 있습니다.
* 추가하거나 제거할 평가를 선택합니다.
* 표시하거나 숨길 메트릭을 선택합니다.
* 특정 예시를 페이지별로 살펴보며 주어진 데이터셋의 동일한 입력에 대해 서로 다른 모델이 어떤 성능을 보였는지 확인합니다.
비교에 대한 자세한 내용은 [비교](/ko/products/wandb/weave/guides/tools/comparison)를 참조하세요.
```python lines theme={"system"}
import weave
models = [
"model1",
"model2",
{"name": "model3", "metadata": {"coolness": 9001}}
]
for model in models:
# 토큰을 캡처하려면 모델 Call 전에 EvalLogger를 초기화해야 합니다
ev = EvaluationLogger(
name="comparison-eval",
model=model,
dataset="example_dataset",
scorers=["greater_than_3_scorer", "greater_than_5_scorer", "greater_than_7_scorer"],
eval_attributes={"experiment_id": "exp_123"}
)
for inputs in your_dataset:
output = your_output_generator(**inputs)
prediction = ev.log_prediction(inputs=inputs, output=output)
prediction.log_score(scorer="greater_than_3_scorer", score=output > 3)
prediction.log_score(scorer="greater_than_5_scorer", score=output > 5)
prediction.log_score(scorer="greater_than_7_scorer", score=output > 7)
prediction.finish()
ev.log_summary()
```
```typescript twoslash lines theme={"system"}
// @noErrors
import weave from 'weave';
import {EvaluationLogger} from 'weave/evaluationLogger';
import {WeaveObject} from 'weave/weaveObject';
await weave.init('[YOUR-TEAM]/[YOUR-PROJECT]');
const models = [
'model1',
'model2',
new WeaveObject({name: 'model3', metadata: {coolness: 9001}})
];
for (const model of models) {
// 토큰을 캡처하려면 모델 Call 전에 EvalLogger를 초기화해야 합니다
const ev = new EvaluationLogger({
name: 'comparison-eval',
model: model,
dataset: 'example_dataset',
description: 'Model comparison evaluation',
scorers: ['greater_than_3_scorer', 'greater_than_5_scorer', 'greater_than_7_scorer'],
attributes: {experiment_id: 'exp_123'}
});
for (const inputs of yourDataset) {
const output = await yourOutputGenerator(inputs);
// 깔끔하고 효율적인 로깅을 위한 fire-and-forget 패턴
const prediction = ev.logPrediction(inputs, output);
prediction.logScore('greater_than_3_scorer', output > 3);
prediction.logScore('greater_than_5_scorer', output > 5);
prediction.logScore('greater_than_7_scorer', output > 7);
prediction.finish();
}
await ev.logSummary();
}
```
사용 팁
다음 팁을 참고하면 `EvaluationLogger`를 최대한 효과적으로 활용할 수 있습니다.
* 각 예측이 끝나면 바로 `finish()`를 호출하세요.
* 개별 예측에 속하지 않는 메트릭(예: 전체 지연 시간)을 캡처하려면 `log_summary`를 사용하세요.
* 리치 미디어 로깅은 정성적 분석에 유용합니다.
* **자동 종료 동작**: 코드를 명확하게 유지하려면 각 예측에서 `finish()`를 명시적으로 호출하세요. `logSummary()`는 아직 종료되지 않은 예측을 모두 자동으로 종료합니다. 단, `finish()`를 호출한 후에는 해당 예측에 더 이상 점수를 로깅할 수 없습니다.
* **설정 옵션**: `name`, `description`, `dataset`, `model`, `scorers`, `attributes` 등의 설정 옵션을 사용하면 Weights & Biases UI에서 평가를 정리하고 필터링할 수 있습니다.
## Related topics
- [About CoreWeave Sandbox](/products/sandboxes.md)