> ## Documentation Index
> Fetch the complete documentation index at: https://docs.coreweave.com/llms.txt
> Use this file to discover all available pages before exploring further.
# 맞춤형 모니터 설정
> 프로덕션 트래픽을 수동으로 점수화하여 추세와 문제를 파악합니다
맞춤형 모니터는 프로덕션 트래픽을 모니터링하던 이전 방식입니다. 새로 구현하는 경우에는 Weave for Agents의 **Signals**를 사용하세요. 자세한 내용은 [에이전트 시그널 보기](/ko/products/wandb/weave/guides/tracking/view-agent-signals)를 참조하세요.
이 페이지에서는 W\&B Weave에서 맞춤형 모니터를 설정하는 방법을 설명합니다. 맞춤형 모니터를 사용하면 프로덕션 트래픽을 수동으로 점수화하여 LLM 애플리케이션의 추세와 문제를 파악할 수 있습니다. Weave의 사전 설정 시그널만으로는 부족하여 프로덕션 트레이스에 적용할 자체 평가 기준을 정의하려는 경우 이 가이드를 참고하세요.
모니터는 LLM 평가자를 사용해 프로덕션 트래픽을 수동으로 점수화하고, 이를 통해 LLM 애플리케이션의 추세와 문제를 파악합니다. 예를 들어 애플리케이션 응답의 정확성이나 유용성을 모니터링할 수 있고, 사용자 입력을 모니터링하여 사용자가 에이전트에게 주로 어떤 질문을 하는지 추세를 파악할 수도 있습니다. 모니터는 모든 점수화 결과를 Weave 데이터베이스에 자동으로 저장하므로 과거 추세와 패턴을 분석할 수 있습니다.
애플리케이션의 입력과 출력에 포함된 텍스트, 이미지, 오디오를 모니터링할 수 있습니다.
모니터를 사용하더라도 애플리케이션 코드를 변경할 필요가 없습니다. Weights & Biases UI에서 설정하기만 하면 됩니다.
점수에 따라 애플리케이션 동작에 능동적으로 개입해야 한다면 [가드레일](/ko/products/wandb/weave/guides/evaluation/guardrails)을 사용하세요.
시그널과 맞춤형 모니터
프로덕션 트레이스용으로 미리 구성된 자동 Scorer인 [시그널](/ko/products/wandb/weave/guides/evaluation/monitors)로 프로덕션 모니터링을 빠르게 시작한 다음, 애플리케이션에 특화된 평가 기준이 필요하면 맞춤형 모니터를 추가하세요.
| | 시그널 | 맞춤형 모니터 |
| - | - | - |
| **설정** | 클릭 한 번으로 활성화, 프롬프트 작성 불필요 | 점수화 프롬프트, 모델, 매개변수를 완전히 제어 |
| **범위** | 미리 구성된 품질 및 오류 분류기 | 사용자가 정의하는 모든 평가 기준 |
| **트레이스 선택** | 자동(품질은 성공한 루트 트레이스, 오류는 실패한 트레이스 대상) | 오퍼레이션, 필터, 샘플링 비율 구성 가능 |
| **모델** | Serverless Inference(사전 설정) | 모든 상용 모델 또는 Serverless Inference 모델 |
| **사용 사례** | 검증된 분류기를 활용한 빠른 프로덕션 모니터링 | 애플리케이션에 특화된 맞춤형 평가 기준 |
Weave에서 모니터 만들기
Weave에서 맞춤형 모니터를 만들려면 다음 단계를 따르세요.
1. [Weights & Biases UI](https://forge.coreweave.com/wandb)를 연 다음 Weights & Biases 프로젝트를 여세요.
2. Weave 사이드바에서 **Monitors**를 선택한 다음 **+ New Monitor** 버튼을 선택하세요. **Create new monitor** 모달 대화 상자가 열립니다.
3. **Create new monitor** 메뉴에서 다음 필드를 설정하세요.
* **Name**: 문자 또는 숫자로 시작해야 하며 문자, 숫자, 하이픈, 밑줄을 사용할 수 있습니다.
* **Description** (선택): 모니터의 용도를 설명합니다.
* **Active monitor** 토글: 모니터를 켜거나 끕니다.
* **Calls to monitor**:
* **Operations**: 모니터링할 `@weave.op`를 하나 이상 선택합니다. 사용 가능한 Op 목록에 Op가 표시되려면 먼저 해당 Op를 사용하는 트레이스를 하나 이상 로깅해야 합니다.
* **Filter** (선택): 점수화 대상이 되는 Call의 범위를 좁힙니다(예: `max_tokens` 또는 `top_p` 기준).
* **샘플링 비율**: 점수화할 Call의 비율입니다(0%\~100%).
점수화 Call마다 비용이 발생하므로 샘플링 비율을 낮추면 비용을 줄일 수 있습니다.
* **LLM-as-a-judge configuration**:
* **Scorer name**: 문자 또는 숫자로 시작해야 하며 문자, 숫자, 하이픈, 밑줄을 사용할 수 있습니다.
* **Score Audio**: 사용 가능한 LLM 모델 중 오디오 지원 모델만 표시되도록 필터링하고 **Media Scoring JSON Paths** 필드를 엽니다.
* **Score Images**: 사용 가능한 LLM 모델 중 이미지 지원 모델만 표시되도록 필터링하고 **Media Scoring JSON Paths** 필드를 엽니다.
* **Judge model**: Op를 점수화할 모델을 선택합니다. 메뉴에는 CoreWeave Forge 계정에 설정한 상용 LLM 모델과 [Serverless Inference 모델](/ko/products/inference/serverless/models)이 표시됩니다. 오디오 지원 모델은 이름 옆에 **Audio Input** 레이블이 붙습니다. 선택한 모델에 대해 다음 항목을 설정하세요.
* **Configuration name**: 이 모델 설정의 이름입니다.
* **System prompt**: 평가 모델의 역할과 페르소나를 정의합니다. 예: "You are an impartial AI judge."
* **Response format**: 평가자가 응답을 출력하는 형식입니다(예: `json_object` 또는 일반 `text`).
* **Scoring prompt**: Op를 점수화하는 데 사용할 평가 작업입니다. 점수화 프롬프트에서 Op의 [프롬프트 변수](/ko/products/wandb/weave/guides/evaluation/scorers#access-variables-from-your-ops-in-scoring-prompts)를 참조할 수 있습니다. 예: "Evaluate whether `{output}` is accurate based on `{ground_truth}`."
* **Media Scoring JSON Paths**: 트레이스 데이터에서 미디어를 추출할 JSONPath 표현식(RFC 9535)을 지정합니다. 경로를 지정하지 않으면 user 메시지에 포함된 점수화 가능한 모든 미디어가 대상이 됩니다. 이 필드는 **Score Audio** 또는 **Score Images**를 활성화하면 표시됩니다.
4. 모니터 필드를 모두 설정했으면 **Create monitor**를 선택하세요. 모니터가 Weights & Biases 프로젝트에 추가됩니다. 코드에서 트레이스가 생성되기 시작하면 **Traces** 탭에서 모니터 이름을 선택하고 표시되는 패널에서 점수를 확인할 수 있습니다.
Weights & Biases UI에서 모니터의 트레이스 데이터를 [비교](/ko/products/wandb/weave/guides/tools/comparison)하고 시각화할 수 있으며, **Traces** 탭의 다운로드 버튼()을 사용해 CSV, JSON 등의 형식으로 다운로드할 수도 있습니다.
Weave는 모든 Scorer 결과를 [Call](/ko/products/wandb/weave/guides/tracking/tracing#calls) 객체의 `feedback` 필드에 자동으로 저장합니다.
예시: 진실성 모니터 만들기
다음은 생성된 문장의 진실성을 평가하는 모니터를 만드는 과정을 처음부터 끝까지 보여 주는 예시입니다. 이 과정을 마치면 Weave 프로젝트의 샘플 op를 점수화하는 활성 모니터가 만들어지고, 점수화된 트레이스를 Weights & Biases UI에서 확인할 수 있습니다.
1. 문장을 생성하는 함수를 정의합니다. 이 함수는 사실인 문장과 사실이 아닌 문장을 섞어서 생성합니다.
```python lines theme={"system"}
import weave
import random
import openai
weave.init("my-team/my-weave-project")
client = openai.OpenAI()
@weave.op()
def generate_statement(ground_truth: str) -> str:
if random.random() < 0.5:
response = client.chat.completions.create(
model="gpt-4.1",
messages=[
{
"role": "user",
"content": f"Generate a statement that is incorrect based on this fact: {ground_truth}"
}
]
)
return response.choices[0].message.content
else:
return ground_truth
generate_statement("The Earth revolves around the Sun.")
```
```typescript lines twoslash theme={"system"}
// @noErrors
import * as weave from 'weave';
import OpenAI from 'openai';
await weave.init('my-team/my-weave-project');
const client = new OpenAI();
const generateStatement = weave.op(async (ground_truth: string): Promise => {
if (Math.random() < 0.5) {
const response = await client.chat.completions.create({
model: 'gpt-4.1',
messages: [
{
role: 'user',
content: `Generate a statement that is incorrect based on this fact: ${ground_truth}`,
},
],
});
return response.choices[0]?.message?.content ?? '';
}
return ground_truth;
});
await generateStatement("The Earth revolves around the Sun.");
```
2. 함수를 한 번 이상 실행하여 프로젝트에 트레이스를 로깅합니다. 그러면 Weights & Biases UI에서 해당 op를 모니터링 대상으로 선택할 수 있습니다.
3. Weights & Biases UI에서 프로젝트를 열고 사이드바에서 **Monitors**를 선택한 다음 **New Monitor**를 선택합니다.
4. **Create new monitor** 메뉴에서 각 필드를 다음과 같이 설정합니다.
* **Name**: `truthfulness-monitor`
* **Description**: `Evaluates the truthfulness of generated statements.`
* **Active monitor**: **on**으로 전환합니다.
* **Operations**: `generate_statement`를 선택합니다.
* **샘플링 비율**: 모든 call을 점수화하려면 `100%`로 설정합니다.
* **Scorer name**: `truthfulness-scorer`
* **Judge model**: `o3-mini-2025-01-31`
* **System prompt**: `You are an impartial AI judge. Your task is to evaluate the truthfulness of statements.`
* **Response format**: `json_object`
* **Scoring prompt**:
```text theme={"system"}
Evaluate whether the output statement is accurate based on the input statement.
This is the input statement: {ground_truth}
This is the output statement: {output}
The response should be a JSON object with the following fields:
- is_true: a boolean stating whether the output statement is true or false based on the input statement.
- reasoning: your reasoning as to why the statement is true or false.
```
5. **Create monitor**를 선택합니다. 모니터가 Weave 프로젝트에 추가됩니다.
6. 스크립트에서 진실성이 서로 다른 여러 문장으로 함수를 호출하여 점수화 함수를 테스트합니다.
```python lines theme={"system"}
generate_statement("The Earth revolves around the Sun.")
generate_statement("Water freezes at 0 degrees Celsius.")
generate_statement("The Great Wall of China was built over several centuries.")
```
```typescript lines twoslash theme={"system"}
// @noErrors
await generateStatement("The Earth revolves around the Sun.");
await generateStatement("Water freezes at 0 degrees Celsius.");
await generateStatement("The Great Wall of China was built over several centuries.");
```
7. 여러 문장으로 스크립트를 실행한 후 Weights & Biases UI를 열고 **Traces** 탭으로 이동합니다. **LLMAsAJudgeScorer.score** 트레이스 중 하나를 선택하면 결과를 확인할 수 있습니다.
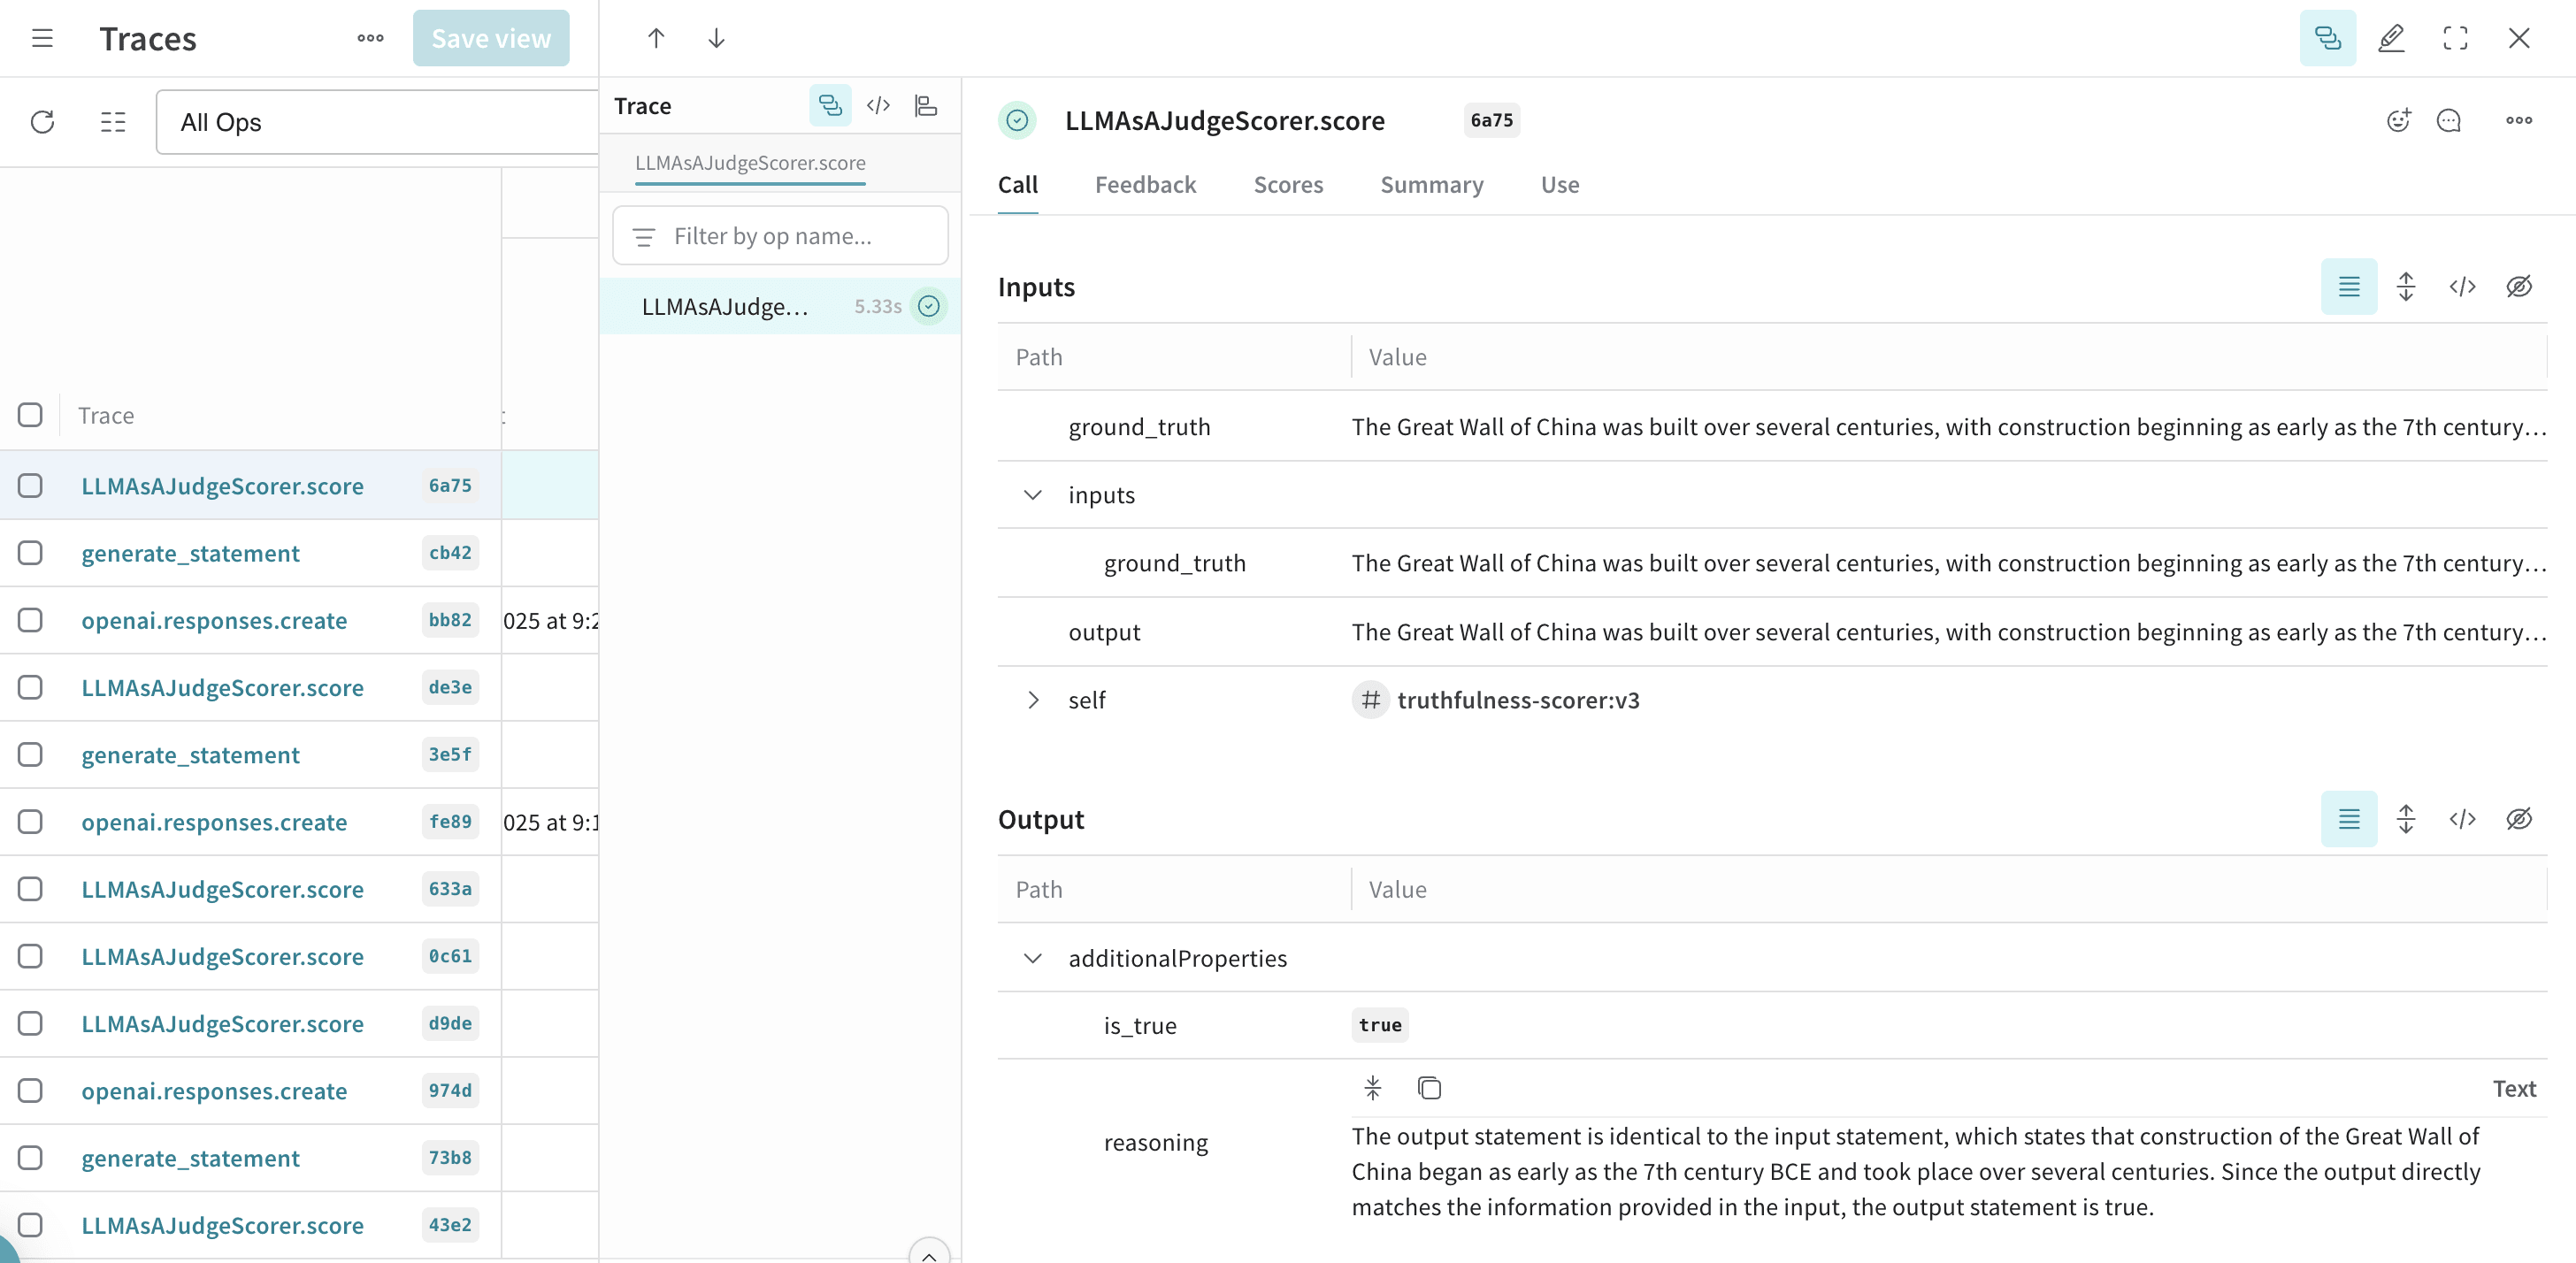 이제 `generate_statement`의 각 호출을 점수화하고 그 결과를 원본 트레이스와 함께 저장하는 진실성 모니터가 준비되었습니다. 저장된 결과는 Weights & Biases UI에서 바로 분석하고 비교할 수 있습니다.
## Related topics
- [기본 제공 시그널로 모니터링하기](/ko/products/wandb/weave/guides/evaluation/monitors.md)
이제 `generate_statement`의 각 호출을 점수화하고 그 결과를 원본 트레이스와 함께 저장하는 진실성 모니터가 준비되었습니다. 저장된 결과는 Weights & Biases UI에서 바로 분석하고 비교할 수 있습니다.
## Related topics
- [기본 제공 시그널로 모니터링하기](/ko/products/wandb/weave/guides/evaluation/monitors.md)