> ## Documentation Index
> Fetch the complete documentation index at: https://docs.coreweave.com/llms.txt
> Use this file to discover all available pages before exploring further.
> 클라우드 또는 온프레미스에서 Kubernetes Operator로 W&B Platform 배포
# Kubernetes Operator로 W&B 배포
개요
이 페이지에서는 플랫폼 관리자가 W\&B Kubernetes Operator를 사용하여 Kubernetes(클라우드 또는 온프레미스)에 W\&B Server를 배포하고 관리하는 방법을 설명합니다. 이 가이드를 완료하면 Operator가 자동으로 관리하고 업그레이드하는 W\&B Server 설치가 실행됩니다. W\&B 배포를 직접 관리하며 클라우드, 온프레미스, 에어갭 환경 전반에서 사용할 수 있는 설치 방법이 필요한 경우 이 가이드를 사용하세요.
W\&B Kubernetes Operator는 Kubernetes(클라우드 또는 온프레미스)에 W\&B Server를 배포하는 권장 방법입니다. Operator의 개요, W\&B가 이를 사용하는 이유, 설정 계층 구조의 작동 방식은 [Self-Managed](/ko/products/wandb/platform/hosting/hosting-options/self-managed#about-the-wb-kubernetes-operator)를 참고하세요.
시작하기 전에
Kubernetes Operator로 W\&B를 배포하기 전에 인프라가 모든 요구 사항을 충족하는지 확인하세요.
1. **인프라 요구 사항 검토**: 다음 항목에 대한 자세한 내용은 [Self-Managed 인프라 요구 사항](/ko/products/wandb/platform/hosting/self-managed/requirements) 페이지를 참조하세요.
* 소프트웨어 버전 요구 사항(Kubernetes, MySQL, Redis, Helm, ClickHouse)
* 하드웨어 요구 사항(CPU 아키텍처, 사이징 권장 사항)
* Kubernetes 클러스터 설정
* 네트워킹, SSL/TLS, DNS 요구 사항
2. **W\&B Server 라이선스 획득**: 요구 사항 페이지의 [라이선스](/ko/products/wandb/platform/hosting/self-managed/requirements#license) 섹션을 참조하세요.
3. **외부 서비스 프로비저닝**: 배포 전에 MySQL, Redis, 객체 저장소를 설정하세요.
추가 정보는 [레퍼런스 아키텍처](/ko/products/wandb/platform/hosting/self-managed/ref-arch) 페이지를 참조하세요.
MySQL 데이터베이스
MySQL 8.0.x는 2026년 4월에 지원이 종료(EOL)되었습니다. W\&B Self-Managed 배포는 보안 패치와 중요 버그 수정이 계속 제공되는, 지원 대상 MySQL 버전에서 실행해야 합니다. 커뮤니티 MySQL을 사용하는 경우 **MySQL 8.4.x**를 설치하거나 해당 버전으로 업그레이드하세요. 관리형 서비스를 사용하는 경우 공급자가 지원 및 패치 대상으로 명시한 엔진 버전을 실행하세요(예: Amazon RDS for MySQL, Google Cloud SQL for MySQL, Azure Database for MySQL). W\&B는 MySQL 8.4.0 및 최신 8.4.x 릴리스에서 플랫폼 검증을 완료했습니다. 아직 MySQL 8.0.x를 사용 중이라면 [MySQL을 8.4.x로 업그레이드](/ko/products/wandb/platform/hosting/self-managed/operator#upgrade-mysql-to-84x)에 안내된 단계에 따라 업그레이드를 계획하세요.
W\&B에는 외부 MySQL 데이터베이스가 필요합니다.
프로덕션 환경에서는 관리형 데이터베이스 서비스를 사용하는 것이 좋습니다.
* [AWS RDS Aurora MySQL](https://aws.amazon.com/rds/aurora/)
* [Google Cloud SQL for MySQL](https://cloud.google.com/sql/mysql)
* [Azure Database for MySQL](https://azure.microsoft.com/en-us/products/mysql/)
관리형 데이터베이스 서비스는 자동 백업, 모니터링, 고가용성, 패치를 제공하며 운영 부담을 줄여줍니다.
사이징 권장 사항과 설정 매개변수를 포함한 MySQL 요구 사항은 [레퍼런스 아키텍처](/ko/products/wandb/platform/hosting/self-managed/ref-arch#mysql)를 참조하세요. 데이터베이스를 생성하는 SQL은 [베어메탈 가이드](/ko/products/wandb/platform/hosting/self-managed/operator#mysql-database)를 참조하세요. 배포 환경의 데이터베이스 설정에 관한 질문은 [지원팀](mailto:forge-support@coreweave.com) 또는 담당 AISE에 문의하세요.
설정 매개변수와 데이터베이스 생성을 포함한 전체 MySQL 설정 지침은 [요구 사항 페이지의 MySQL 섹션](/ko/products/wandb/platform/hosting/self-managed/requirements#mysql-database)을 참조하세요.
MySQL 8.0.x에서 업그레이드하는 경우 [MySQL 8.4.x로 업그레이드](#upgrade-mysql-to-84x)를 참조하세요.
Redis
W\&B는 단일 노드 Redis 7.x 배포에 의존하며, W\&B의 컴포넌트는 작업 큐잉과 데이터 캐싱에 이를 사용합니다. 테스트 및 개념 증명 작업의 경우, W\&B Self-Managed에는 로컬 Redis 배포가 포함됩니다. 이 번들 배포는 프로덕션 용도로는 적합하지 않습니다.
프로덕션 배포의 경우, W\&B는 다음 환경의 Redis 인스턴스에 연결할 수 있습니다:
* [Amazon ElastiCache](https://aws.amazon.com/elasticache/)
* [Google Cloud Memorystore](https://cloud.google.com/memorystore?hl=en)
* [Azure Cache for Redis](https://azure.microsoft.com/en-us/products/cache)
* 클라우드 또는 온프레미스 인프라에서 자체 호스팅하는 Redis
Helm 값에서 외부 Redis 인스턴스를 설정하는 방법은 [외부 Redis 설정 섹션](#external-redis)을 참조하세요.
객체 저장소
W\&B를 사용하려면 사전 서명된 URL과 CORS를 지원하는 오브젝트 스토리지가 필요합니다.
W\&B에서 권장하는 스토리지 공급자는 다음과 같습니다.
* [Amazon S3](https://aws.amazon.com/s3/): 확장성, 데이터 가용성, 보안, 성능을 제공하는 오브젝트 스토리지 서비스입니다.
* [Google Cloud Storage](https://cloud.google.com/storage): 대규모 비정형 데이터를 저장하기 위한 관리형 서비스입니다.
* [Azure Blob Storage](https://azure.microsoft.com/en-us/products/storage/blobs): 대규모 비정형 데이터를 위한 클라우드 기반 오브젝트 스토리지입니다.
* [CoreWeave AI Object Storage](/products/storage/object-storage): AI 워크로드에 최적화된 S3 호환 오브젝트 스토리지입니다.
* [MinIO Enterprise (AIStor)](https://www.min.io/product/aistor), [NetApp StorageGRID](https://www.netapp.com/data-storage/storagegrid/) 등의 엔터프라이즈 S3 호환 저장소 또는 기타 엔터프라이즈 솔루션
MinIO 오픈 소스는 [유지 관리 모드](https://github.com/minio/minio)로 전환되어 더 이상 활발히 개발되지 않으며, 사전 컴파일된 바이너리도 제공되지 않습니다. 프로덕션 배포에는 관리형 오브젝트 스토리지 서비스나 MinIO Enterprise (AIStor) 같은 엔터프라이즈 S3 호환 솔루션을 사용할 것을 권장합니다.
공급자를 선택했다면 W\&B가 액세스할 수 있도록 버킷을 설정하세요. IAM 정책, CORS 설정, 액세스 설정 등 버킷 프로비저닝에 대한 자세한 방법은 [Bring Your Own Bucket (BYOB) 가이드](/ko/products/wandb/platform/hosting/data-security/secure-storage-connector)를 참조하세요.
용량 및 성능 가이드를 비롯한 오브젝트 스토리지 요구 사항의 전체 목록은 [레퍼런스 아키텍처의 오브젝트 스토리지 섹션](/ko/products/wandb/platform/hosting/self-managed/ref-arch#object-storage)을 참조하세요.
저장소 버킷 프로비저닝
W\&B를 설정하기 전에 오브젝트 저장소 버킷을 프로비저닝하고 필수 IAM 정책, CORS 설정, 액세스 자격 증명을 구성해야 합니다.
다음 항목별 프로비저닝 절차는 [Bring Your Own Bucket (BYOB) 가이드](/ko/products/wandb/platform/hosting/data-security/secure-storage-connector)에서 단계별로 자세히 확인하세요.
* Amazon S3 (IAM 정책 및 버킷 정책 포함)
* Google Cloud Storage (PubSub 알림 포함)
* Azure Blob Storage (관리 ID 포함)
* CoreWeave AI Object Storage
* S3 호환 저장소 (MinIO Enterprise, NetApp StorageGRID 및 기타 엔터프라이즈 솔루션)
Helm 값에서 객체 저장소를 설정하는 방법은 [객체 저장소 설정 섹션](#object-storage-bucket)을 참조하세요.
OpenShift Kubernetes 클러스터
W\&B는 클라우드, 온프레미스, 에어갭 환경의 [OpenShift Kubernetes 클러스터](https://www.redhat.com/en/technologies/cloud-computing/openshift)에 배포하는 것을 지원합니다.
공식 W\&B Helm 차트를 사용하여 설치하는 것을 권장합니다.
권한 없는 사용자로 컨테이너 실행
OpenShift 및 유사한 오케스트레이터는 root로 실행되는 컨테이너를 거부하는 경우가 많으므로, W\&B 컨테이너는 root 그룹에 속한 비 root 사용자로 실행되도록 설정해야 합니다. 기본적으로 컨테이너는 `$UID` 값으로 999를 사용합니다. 오케스트레이터에서 컨테이너를 비 root 사용자로 실행하도록 요구하는 경우 `$UID` >= 100000과 `$GID` 값 0을 지정하세요.
파일 시스템 권한이 제대로 작동하려면 W\&B가 root 그룹(`$GID=0`)으로 시작되어야 합니다.
각 W\&B 컴포넌트의 보안 컨텍스트를 설정하세요. 예를 들어, API 컴포넌트를 설정하려면:
```yaml theme={"system"}
api:
install: true
image:
repository: wandb/megabinary
tag: 0.74.1 # 실제 사용하는 버전으로 바꾸세요
pod:
securityContext:
fsGroup: 10001
fsGroupChangePolicy: Always
runAsGroup: 0
runAsNonRoot: true
runAsUser: 10001
seccompProfile:
type: RuntimeDefault
container:
securityContext:
allowPrivilegeEscalation: false
capabilities:
drop:
- ALL
privileged: false
readOnlyRootFilesystem: false
```
필요한 경우 `app` 또는 `console`과 같은 다른 컴포넌트에 맞춤형 보안 컨텍스트를 설정하세요. 자세한 내용은 [맞춤형 보안 컨텍스트](#custom-security-context)를 참조하세요.
W\&B Server 애플리케이션 배포
클라우드, 온프레미스, 에어갭 환경을 포함한 모든 W\&B Self-Managed 배포에는 **Helm을 사용하는 W\&B Kubernetes Operator가 권장 설치 방법입니다**.
배포 방법을 선택하세요:
W\&B는 W\&B Kubernetes Operator를 Kubernetes 클러스터에 배포하기 위한 Helm chart를 제공합니다. 이 방식을 사용하면 Helm CLI 또는 ArgoCD와 같은 지속적 배포 도구로 W\&B Server를 배포할 수 있습니다.
배포 관련 고려 사항은 [환경별 고려 사항](#environment-specific-considerations) 및 [퍼블릭 클라우드에서 Terraform으로 배포](#deploy-with-terraform-on-public-cloud)를 참고하세요. 인터넷과 연결되지 않은 환경의 경우 [에어갭 Kubernetes에 배포](/ko/products/wandb/platform/hosting/self-managed/on-premises-deployments/kubernetes-airgapped)를 참고하세요.
다음 단계에 따라 Helm CLI로 W\&B Kubernetes Operator를 설치하세요.
1. W\&B Helm 저장소를 추가합니다. W\&B Helm chart는 W\&B Helm 저장소에서 제공됩니다.
```shell theme={"system"}
helm repo add wandb https://charts.wandb.ai
helm repo update
```
2. Kubernetes 클러스터에 Operator를 설치합니다.
```shell theme={"system"}
helm upgrade --install operator wandb/operator -n wandb-cr --create-namespace
```
3. W\&B Server 설치가 트리거되도록 W\&B operator 맞춤형 리소스를 설정합니다. W\&B 배포 설정을 담은 `operator.yaml` 파일을 생성하세요. 사용 가능한 모든 옵션은 [설정 레퍼런스](#configuration-reference-for-wb-server)를 참고하세요.
다음은 최소 설정 예시입니다.
```yaml theme={"system"}
apiVersion: apps.wandb.com/v1
kind: WeightsAndBiases
metadata:
labels:
app.kubernetes.io/name: weightsandbiases
app.kubernetes.io/instance: wandb
name: wandb
namespace: default
spec:
values:
global:
host: https://
license: eyJhbGnUzaH...j9ZieKQ2x5GGfw
bucket:
mysql:
ingress:
annotations:
```
4. 맞춤형 설정으로 Operator를 시작하여 Operator가 W\&B Server 애플리케이션을 설치, 설정 및 관리하도록 합니다.
```shell theme={"system"}
kubectl apply -f operator.yaml
```
배포가 완료될 때까지 기다리세요. 몇 분 정도 걸립니다.
5. 웹 UI에서 설치를 확인하려면 첫 번째 Admin 사용자 계정을 생성한 다음 [설치 확인](#verify-the-installation)에 설명된 확인 단계를 따르세요.
위 단계를 완료하면 `wandb-cr` namespace에서 W\&B Kubernetes Operator가 실행되고, operator가 `operator.yaml` 맞춤형 리소스를 기반으로 W\&B Server 애플리케이션을 관리하게 됩니다.
Terraform을 사용하여 코드형 인프라 방식으로 W\&B를 배포하세요. 다음 중 선택하세요:
* **Helm Terraform 모듈**: 기존 Kubernetes 인프라에 오퍼레이터를 배포합니다.
* **클라우드 Terraform 모듈**: AWS, Google Cloud, Azure에 전체 인프라와 애플리케이션을 함께 배포합니다.
배포별 고려 사항은 [환경별 고려 사항](#environment-specific-considerations) 및 [퍼블릭 클라우드에서 Terraform으로 배포](#deploy-with-terraform-on-public-cloud)를 참조하세요. 외부와 연결되지 않은 환경은 [에어갭 Kubernetes에 배포](/ko/products/wandb/platform/hosting/self-managed/on-premises-deployments/kubernetes-airgapped)를 참조하세요.
이 방법은 Terraform의 코드형 인프라 접근 방식을 통해 일관성과 반복 가능성을 확보하면서 특정 요구 사항에 맞게 사용자 지정한 배포를 지원합니다. 공식 W\&B [Helm 기반 Terraform 모듈](https://registry.terraform.io/modules/wandb/wandb/helm/latest)은 Terraform Registry에서 사용할 수 있습니다.
다음 코드를 시작점으로 사용하세요. 프로덕션 수준의 배포에 필요한 모든 설정 옵션이 포함되어 있습니다:
```hcl theme={"system"}
module "wandb" {
source = "wandb/wandb/helm"
spec = {
values = {
global = {
host = "https://"
license = "eyJhbGnUzaH...j9ZieKQ2x5GGfw"
bucket = {
}
mysql = {
}
}
ingress = {
annotations = {
"a" = "b"
"x" = "y"
}
}
}
}
}
```
설정 옵션은 [설정 레퍼런스](#configuration-reference-for-wb-server)에 설명된 것과 동일하지만, 구문은 HashiCorp Configuration Language(HCL)를 따라야 합니다. Terraform 모듈은 W\&B 맞춤형 리소스 정의(CRD)를 생성합니다.
W\&B가 Helm Terraform 모듈을 사용하여 고객을 위한 Dedicated Cloud 설치 환경을 배포하는 방법을 확인하려면 다음 링크를 참조하세요:
* [AWS](https://github.com/wandb/terraform-aws-wandb/blob/45e1d746f53e78e73e68f911a1f8cad5408e74b6/main.tf#L225)
* [Azure](https://github.com/wandb/terraform-azurerm-wandb/blob/170e03136b6b6fc758102d59dacda99768854045/main.tf#L155)
* [Google Cloud](https://github.com/wandb/terraform-google-wandb/blob/49ddc3383df4cefc04337a2ae784f57ce2a2c699/main.tf#L189)
W\&B는 AWS, Google Cloud, Azure용 Terraform 모듈을 제공합니다. 이 모듈은 W\&B Server 애플리케이션과 함께 Kubernetes 클러스터, 로드 밸런서, MySQL 데이터베이스를 포함한 전체 인프라를 배포합니다. 이러한 공식 W\&B 클라우드별 Terraform 모듈에는 다음 버전부터 W\&B Kubernetes Operator가 포함됩니다:
| Terraform Registry | 소스 코드 | 버전 |
| - | - | - |
| [AWS](https://registry.terraform.io/modules/wandb/wandb/aws/latest) | [https://github.com/wandb/terraform-aws-wandb](https://github.com/wandb/terraform-aws-wandb) | v4.0.0+ |
| [Azure](https://github.com/wandb/terraform-azurerm-wandb) | [https://github.com/wandb/terraform-azurerm-wandb](https://github.com/wandb/terraform-azurerm-wandb) | v2.0.0+ |
| [Google Cloud](https://github.com/wandb/terraform-google-wandb) | [https://github.com/wandb/terraform-google-wandb](https://github.com/wandb/terraform-google-wandb) | v2.0.0+ |
이 모듈은 배포 과정에서 W\&B Kubernetes Operator를 설치하므로, 추가 설정 없이 클라우드 환경에서 이를 사용하여 W\&B Server를 관리할 수 있습니다.
이러한 클라우드별 모듈 사용에 관한 자세한 지침은 [퍼블릭 클라우드에서 Terraform으로 배포](#deploy-with-terraform-on-public-cloud)를 참조하세요.
설치 확인
설치 확인을 위해 W\&B는 [W\&B CLI](/ko/products/wandb/ref/cli) 사용을 권장합니다. `wandb verify` 명령은 컴포넌트와 설정이 예상대로 작동하는지 확인하는 테스트를 실행합니다.
이 절차는 브라우저에서 첫 번째 Admin 사용자 계정을 생성한다고 가정합니다.
설치 확인:
1. W\&B CLI 설치:
```bash theme={"system"}
pip install wandb
```
2. W\&B에 로그인:
```bash theme={"system"}
wandb login --host=https://YOUR_DNS_DOMAIN
```
예시:
```bash theme={"system"}
wandb login --host=https://wandb.company-name.com
```
3. 설치 확인:
```bash theme={"system"}
wandb verify
```
명령 실행 후, 성공적인 설치 시 다음 출력이 표시됩니다:
```console theme={"system"}
Default host selected: https://wandb.company-name.com
Find detailed logs for this test at: /var/folders/pn/b3g3gnc11_sbsykqkm3tx5rh0000gp/T/tmpdtdjbxua/wandb
Checking if logged in...................................................✅
Checking signed URL upload..............................................✅
Checking ability to send large payloads through proxy...................✅
Checking requests to base url...........................................✅
Checking requests made over signed URLs.................................✅
Checking CORs configuration of the bucket...............................✅
Checking wandb package version is up to date............................✅
Checking logged metrics, saving and downloading a file..................✅
Checking artifact save and download workflows...........................✅
```
오류가 발생하면 W\&B 지원팀에 문의하세요.
MCP 서버 활성화
[W\&B MCP 서버](/ko/products/wandb/platform/mcp-server)는 `operator-wandb`의 선택적 하위 차트로 제공됩니다. 활성화하면 Operator가 클러스터 내에 MCP 서버를 배포하고 기존 ingress를 통해 `/mcp`에 노출하므로, 모든 MCP 호환 클라이언트가 W\&B API 키를 사용하여 연결할 수 있습니다. 이 서버는 W\&B가 `https://mcp.withwandb.com/mcp`에서 호스팅 서비스로 운영하는 서버와 동일하지만, 사용자의 배포 데이터에 연결됩니다.
최종 사용자를 위한 클라이언트 설정 및 도구 목록은 [Use the W\&B MCP server](/ko/products/wandb/platform/mcp-server)를 참조하세요. 이 섹션에서는 Operator 측 활성화만 다룹니다.
사전 요구 사항
MCP 서버를 활성화하기 전에 배포가 다음 요구 사항을 충족하는지 확인하세요:
* **차트 버전**: `operator-wandb` `0.42.3` 이상. `mcp-server` 하위 차트는 `0.42.1`에서 도입되었지만, 다음 예시에서 사용하는 Datadog 및 개인정보 보호 필드는 이후에 추가되었습니다.
* **Weave Traces 활성화**: MCP 서버는 트레이스 도구와 `WF_TRACE_SERVER_URL` 기본값에 Weave Traces를 사용합니다. `weave-trace.install: true`를 설정하세요. Weave Traces가 활성화되지 않으면 Helm 렌더링이 `mcp-server requires weave-trace.install=true` 오류로 실패합니다.
* **접근 가능한 ingress**: `global.host`는 이미 이름 확인이 가능하고 W\&B ingress로 라우팅되어야 합니다. MCP 파드는 `global.host`에서 `WANDB_BASE_URL`을 읽으며 `/mcp`에서 사용할 수 있습니다.
* **노드 용량**: MCP 파드는 기본적으로 CPU `500m`과 메모리 `1Gi`를 요청합니다(제한은 CPU `2`와 메모리 `4Gi`). 하위 차트를 활성화하기 전에 Node Pool에 충분한 여유 용량이 있는지 확인하세요.
하위 차트 활성화
`mcp-server` 하위 차트를 활성화하여 Operator가 클러스터 내 MCP 서버를 배포하고 기존 W\&B ingress에 `/mcp` 경로를 추가하도록 하세요. 기존 `WeightsAndBiases` 맞춤형 리소스(CR)의 `spec.values` 블록에 기존 `global`, `ingress` 및 기타 재정의 설정과 함께 다음 내용을 추가하세요. Datadog 블록은 선택 사항이지만, Datadog Agent DaemonSet이 이미 클러스터에서 파드 로그와 트레이스를 수집하고 있다면 추가하는 것이 좋습니다.
```yaml theme={"system"}
spec:
values:
weave-trace:
install: true
mcp-server:
install: true
image:
repository: us-docker.pkg.dev/wandb-production/public/wandb/mcp-server
tag: "0.3.3"
datadog:
enabled: true
mode: "agent"
service: "wandb-mcp-server-"
env: ""
deploymentType: "self-managed"
customer: ""
extraTags:
- "region:"
- "tier:"
privacy:
logLevel: "standard"
```
각 블록을 설정하세요:
* **`weave-trace.install: true`**: `mcp-server.env.WF_TRACE_SERVER_URL`을 직접 설정하지 않는 한 필수입니다.
* **`datadog.mode: "agent"`**: Datadog Agent DaemonSet이 로그 및 트레이스 수집을 담당하는 Kubernetes 배포에 사용하세요. 에이전트 모드에서는 MCP 파드에 Datadog API 키가 필요하지 않습니다.
* **`datadog.service`, `env`, `deploymentType`, `customer`, `extraTags`**: 배포의 관측성 명명 규칙에 맞게 설정하세요. 고객 태그를 원하지 않으면 `customer`를 빈 문자열로 설정하세요.
* **`privacy.logLevel`**: 대부분의 Self-Managed Kubernetes 설치에는 `"standard"`를 사용하세요. 이 설정은 로그에서 자유 형식 텍스트 매개변수 값을 가리는 동시에 운영자가 디버깅에 흔히 사용하는 배포 식별자는 유지합니다. entity, 프로젝트, run 또는 사용자 식별자가 평문 로그에 남아서는 안 되는 경우 `"strict"`를 사용하세요. 해당 값을 평문으로 로깅하려는 명시적인 의도가 있을 때만 `"off"`를 사용하세요.
변경 사항을 적용하여 조정을 트리거하세요:
```bash theme={"system"}
kubectl apply -f operator.yaml
```
Operator는 릴리스 namespace에 `wandb-mcp-server` 배포와 Service를 생성하고, W\&B ingress에 `/mcp` 경로를 추가합니다.
MCP 서버 확인
파드가 `Running` 상태가 될 때까지 기다린 다음, 클러스터 내부와 ingress를 통해 상태 확인 엔드포인트를 확인하세요:
```bash theme={"system"}
kubectl get pod -l app.kubernetes.io/component=mcp-server
kubectl port-forward svc/wandb-mcp-server 8080:8080
curl -s http://localhost:8080/mcp/health
curl -s "https:///mcp/health"
```
두 요청 모두 `200 OK`를 반환해야 합니다. 클러스터 내부 검사는 파드가 정상 상태인지 확인합니다. ingress 검사는 라우팅을 확인합니다. 클러스터 내부 검사는 `200 OK`를 반환하지만 ingress 검사는 `404 Not Found`를 반환하는 경우 [문제 해결](#troubleshooting)을 참조하세요. Datadog를 활성화한 경우 설정된 `mcp-server.datadog.service` 및 `mcp-server.datadog.env` 값으로 MCP 서버 로그도 Datadog에 표시되어야 합니다.
클라이언트 연결
MCP 서버가 정상 상태가 되면 W\&B API 키를 Bearer 토큰으로 사용하여 `https:///mcp`에 연결하도록 MCP 클라이언트를 설정하세요. IDE 및 에이전트 설정 방법은 [Use the W\&B MCP server](/ko/products/wandb/platform/mcp-server)를 참조하세요.
문제 해결
| 증상 | 원인 및 해결 방법 |
| - | - |
| `helm render`가 `mcp-server requires weave-trace.install=true` 오류와 함께 실패함 | `spec.values`에 `weave-trace.install: true`를 추가하세요. MCP 서버의 트레이스 도구는 Weave Traces에 의존합니다. |
| `wandb-mcp-server` 파드가 `Insufficient cpu` 또는 `Insufficient memory`로 인해 `Pending` 상태에서 멈춤 | 노드 용량을 추가하거나 CR에서 `mcp-server.resources.requests` 값을 낮추세요. 기본값은 CPU `500m`, 메모리 `1Gi`입니다. |
| `curl https:///mcp/health`가 404를 반환함 | 차트는 `mcp-server.install: true`인 경우에만 `/mcp` ingress 경로를 렌더링합니다. CR을 다시 적용한 후 ingress 컨트롤러에 새 경로가 반영될 때까지 기다리세요. |
| MCP 로그가 Datadog에 표시되지 않음 | `mcp-server.datadog.enabled: true` 및 `mcp-server.datadog.mode: "agent"`로 설정되어 있는지, Datadog Agent DaemonSet이 파드 stdout을 수집하는지 확인하세요. 설정한 `service` 및 `env` 값으로 Datadog에서 검색하세요. |
| MCP 로그에 사용자가 입력한 텍스트가 예상보다 많이 포함됨 | `mcp-server.privacy.logLevel`을 `"standard"` 또는 `"strict"`로 설정하세요. entity, 프로젝트, run, 사용자 이름 등의 식별자가 로그에 평문으로 남지 않아야 하는 경우 `"strict"`를 사용하세요. |
| 에어갭 또는 미러링된 클러스터에서 `wandb-mcp-server` 파드가 `ImagePullBackOff` 상태임 | 이미지를 사용 중인 레지스트리로 미러링하고 CR에서 `mcp-server.image.repository`를 재정의하세요. 에어갭 설치 환경에서 다른 W\&B 컴포넌트 이미지에 적용하는 방식과 동일합니다. [에어갭 Kubernetes에 배포](/ko/products/wandb/platform/hosting/self-managed/on-premises-deployments/kubernetes-airgapped)를 참조하세요. |
환경별 고려 사항
Kubernetes는 온프레미스에서 실행하든 클라우드에서 실행하든 동일합니다. 주요 차이는 명명 방식과 관리형 서비스에 있습니다(예: MySQL과 RDS, 또는 S3와 온프레미스 객체 저장소). 이 섹션에서는 환경에 따라 달라지는 고려 사항을 다룹니다.
온프레미스 또는 베어 메탈 Kubernetes에 배포할 때는 다음 사항에 유의하세요.
로드 밸런서 설정
온프레미스 Kubernetes 클러스터는 일반적으로 로드 밸런서를 수동으로 설정해야 합니다. 다음 옵션을 사용할 수 있습니다:
* **외부 로드 밸런서**: F5 또는 HAProxy와 같은 기존 하드웨어 또는 소프트웨어 로드 밸런서를 설정하세요.
* **Nginx Ingress 컨트롤러**: NodePort 또는 호스트 네트워킹을 사용하여 nginx-ingress-controller를 배포하세요.
* **MetalLB**: 베어 메탈 Kubernetes 클러스터에서 MetalLB는 로드 밸런서 서비스를 제공합니다.
자세한 로드 밸런서 설정 예시는 [레퍼런스 아키텍처의 네트워킹 섹션](/ko/products/wandb/platform/hosting/self-managed/ref-arch#networking)을 참조하세요.
영구 저장소
Kubernetes 클러스터에 영구 볼륨용 StorageClass가 설정되어 있는지 확인하세요. W\&B 컴포넌트는 캐싱 및 임시 데이터용으로 영구 저장소가 필요할 수 있습니다.
일반적으로 사용하는 온프레미스 저장소 옵션은 다음과 같습니다.
* NFS 기반 저장소 클래스
* Ceph/Rook 저장소
* 로컬 영구 볼륨
* NetApp, Pure Storage 등의 엔터프라이즈 저장소 솔루션
DNS 및 인증서 관리
온프레미스 배포의 경우 다음 작업을 완료하세요:
* 내부 DNS 레코드가 W\&B 호스트 이름을 가리키도록 설정하세요.
* 내부 인증 기관(CA)에서 SSL/TLS 인증서를 발급받으세요.
* 자체 서명 인증서를 사용하는 경우 Operator가 CA 인증서를 신뢰하도록 설정하세요.
인증서 설정에 대한 자세한 내용은 [SSL/TLS 요구 사항](/ko/products/wandb/platform/hosting/self-managed/requirements#ssl-tls)을 참조하세요.
OpenShift 배포
W\&B는 OpenShift Kubernetes 클러스터에서의 배포를 전체 지원합니다. OpenShift는 보안 정책이 더 엄격하므로 OpenShift 배포에는 추가 보안 컨텍스트 설정이 필요합니다.
OpenShift 관련 설정에 대한 자세한 내용은 [OpenShift Kubernetes 클러스터](#openshift-kubernetes-clusters)를 참조하세요. 에어갭 환경의 OpenShift 예시는 [에어갭 Kubernetes에 배포](/ko/products/wandb/platform/hosting/self-managed/on-premises-deployments/kubernetes-airgapped#openshift-configuration)를 참조하세요.
온프레미스 및 S3 호환 객체 저장소
객체 저장소 버킷을 프로비저닝한 후([객체 저장소 프로비저닝](/ko/products/wandb/platform/hosting/data-security/secure-storage-connector) 참조), W\&B 맞춤형 리소스에서 설정하세요.
**AWS S3(온프레미스)**
온프레미스 AWS S3의 경우(Outposts 또는 호환 저장소를 통해 사용):
```yaml theme={"system"}
bucket:
kmsKey: # 암호화용 KMS 키(선택)
name: # 예시: wandb
path: "" # 빈 문자열로 유지하세요
provider: s3
region: # 예시: us-east-1
```
**MinIO, Ceph, NetApp 등의 S3 호환 저장소**
S3 호환 저장소 시스템의 경우:
```yaml theme={"system"}
bucket:
kmsKey: null
name: # 예시: s3.example.com:9000
path: # 예시: wandb
provider: s3
region: # 예시: us-east-1
```
S3 호환 저장소에서 TLS를 활성화하려면 버킷 경로에 `?tls=true`를 추가하세요:
```yaml theme={"system"}
bucket:
path: "wandb?tls=true"
```
인증서는 신뢰할 수 있어야 합니다. 자체 서명 인증서는 추가 설정이 필요합니다. 자세한 내용은 [SSL/TLS 요구 사항](/ko/products/wandb/platform/hosting/self-managed/requirements#ssl-tls)을 참조하세요.
**온프레미스 객체 저장소의 주요 고려 사항**
자체 객체 저장소를 운영할 때는 다음 사항을 고려하세요.
1. **저장소 용량 및 성능**: 디스크 용량을 주의 깊게 모니터링하세요. 일반적인 W\&B 사용 시 수십\~수백 기가바이트가 필요합니다. 사용량이 많으면 저장소 사용량이 페타바이트에 이를 수 있습니다.
2. **내결함성**: 물리적 디스크에는 최소한 RAID 배열을 사용하세요. S3 호환 저장소에는 분산 또는 고가용성 설정을 사용하세요.
3. **가용성**: 저장소를 계속 사용할 수 있도록 모니터링을 설정하세요.
**MinIO 고려 사항**
MinIO 오픈 소스는 현재 [유지 관리 모드](https://github.com/minio/minio)로, 활발한 개발이 이루어지지 않습니다. 사전 컴파일된 바이너리는 더 이상 제공되지 않으며, 중대한 보안 수정만 사안별로 검토됩니다. 프로덕션 배포에는 관리형 객체 저장소 서비스 또는 [MinIO Enterprise (AIStor)](https://min.io/product/aistor)를 사용하는 것이 W\&B의 권장 사항입니다.
온프레미스 객체 저장소의 엔터프라이즈 대안은 다음과 같습니다.
* [Amazon S3 on Outposts](https://aws.amazon.com/s3/outposts/)
* [NetApp StorageGRID](https://www.netapp.com/data-storage/storagegrid/)
* MinIO Enterprise (AIStor)
* [Dell ObjectScale](https://www.dell.com/en-us/shop/cty/sf/objectscale)
기존 MinIO 배포 또는 MinIO Enterprise를 사용 중이라면 MinIO 클라이언트를 사용하여 버킷을 생성할 수 있습니다.
```bash theme={"system"}
mc config host add local http://$MINIO_HOST:$MINIO_PORT "$MINIO_ACCESS_KEY" "$MINIO_SECRET_KEY" --api s3v4
mc mb --region=us-east-1 local/wandb-files
```
AWS, Google Cloud 또는 Azure에서 인프라와 애플리케이션 전체를 배포하려면 [퍼블릭 클라우드에서 Terraform으로 배포](#deploy-with-terraform-on-public-cloud)를 참조하세요.
W\&B는 [W\&B Multi-tenant Cloud](/ko/products/wandb/platform/hosting/hosting-options/multi_tenant_cloud) 또는 [W\&B Dedicated Cloud](/ko/products/wandb/platform/hosting/hosting-options/dedicated-cloud) 배포 유형과 같은 완전 관리형 배포 옵션을 권장합니다. 완전 관리형 서비스는 설정이 거의 또는 전혀 필요하지 않습니다.
W\&B는 퍼블릭 클라우드 제공업체에 플랫폼을 배포하기 위한 Terraform 모듈을 제공합니다. 이 모듈은 인프라 프로비저닝과 W\&B Server 설치를 자동화하므로 각 클라우드 리소스를 수동으로 생성하지 않고도 전체 환경을 구축할 수 있습니다.
시작하기 전에 W\&B는 Terraform에서 사용할 수 있는 [원격 백엔드](https://developer.hashicorp.com/terraform/language/backend) 중 하나를 선택하여 [상태 파일](https://developer.hashicorp.com/terraform/language/state)을 저장할 것을 권장합니다. 상태 파일은 모든 컴포넌트를 다시 생성하지 않고 배포 환경에 업그레이드를 적용하거나 변경 사항을 반영하는 데 필요한 리소스입니다.
클라우드 제공업체를 선택하세요:
W\&B는 AWS에 플랫폼을 배포할 때 [W\&B Server AWS Terraform Module](https://registry.terraform.io/modules/wandb/wandb/aws/latest)을 사용할 것을 권장합니다.
Terraform 모듈은 다음 필수 컴포넌트를 배포합니다:
* 로드 밸런서
* AWS ID 및 액세스 관리(IAM)
* AWS 키 관리 시스템(KMS)
* Amazon Aurora MySQL
* Amazon VPC
* Amazon S3
* Amazon Route53
* Amazon Certificate Manager (ACM)
* Amazon Elastic Load Balancing (ALB)
* Amazon Secrets Manager
선택 컴포넌트는 다음과 같습니다:
* Elastic Cache for Redis
* SQS
사전 요구 권한
Terraform을 실행하는 계정은 이전 섹션에 나열된 모든 컴포넌트를 생성할 수 있어야 하며, **IAM 정책**과 **IAM 역할**을 생성하고 리소스에 역할을 부여할 권한이 있어야 합니다.
일반적인 단계
이 섹션의 단계는 모든 배포 옵션에 공통으로 적용됩니다.
1. 개발 환경을 준비하세요.
* [Terraform](https://developer.hashicorp.com/terraform/tutorials/aws-get-started/install-cli)을 설치하세요.
* W\&B는 버전 관리를 위해 Git 저장소를 생성할 것을 권장합니다.
2. `terraform.tfvars` 파일을 생성하세요.
설치 유형에 따라 `tvfars` 파일 내용을 사용자 지정하세요. 최소 권장 내용은 다음 예시와 같습니다.
```bash theme={"system"}
namespace = "wandb"
license = "xxxxxxxxxxyyyyyyyyyyyzzzzzzz"
subdomain = "wandb-aws"
domain_name = "wandb.ml"
zone_id = "xxxxxxxxxxxxxxxx"
allowed_inbound_cidr = ["0.0.0.0/0"]
allowed_inbound_ipv6_cidr = ["::/0"]
eks_cluster_version = "1.29"
```
`namespace` 변수는 Terraform이 생성하는 모든 리소스에 접두사로 붙는 문자열이므로 배포하기 전에 `tvfars` 파일에 변수를 정의하세요.
`subdomain`과 `domain`의 조합이 W\&B 인스턴스의 FQDN을 구성합니다. 앞선 예시에서 W\&B FQDN은 `wandb-aws.wandb.ml`이며, DNS `zone_id`는 Terraform이 FQDN 레코드를 생성하는 위치입니다.
`allowed_inbound_cidr`와 `allowed_inbound_ipv6_cidr`도 모두 설정해야 합니다. 모듈에서 이는 필수 입력입니다. 다음 예시는 모든 소스에서 W\&B 설치 환경에 액세스할 수 있도록 허용합니다.
3. `versions.tf` 파일을 생성하세요.
이 파일에는 AWS에 W\&B를 배포하는 데 필요한 Terraform 및 Terraform 공급자 버전이 포함되어 있습니다:
```bash theme={"system"}
provider "aws" {
region = "eu-central-1"
default_tags {
tags = {
GithubRepo = "terraform-aws-wandb"
GithubOrg = "wandb"
Enviroment = "Example"
Example = "PublicDnsExternal"
}
}
}
```
[Terraform 공식 문서](https://registry.terraform.io/providers/hashicorp/aws/latest/docs#provider-configuration)를 참고하여 AWS 공급자를 설정하세요.
W\&B는 이 문서의 시작 부분에서 언급한 [원격 백엔드 설정](https://developer.hashicorp.com/terraform/language/backend)도 추가할 것을 권장합니다.
4. `variables.tf` 파일을 생성하세요
Terraform에서는 `terraform.tfvars`에 설정한 모든 옵션에 대해 해당하는 변수 선언이 필요합니다.
```hcl theme={"system"}
variable "namespace" {
type = string
description = "Name prefix used for resources"
}
variable "domain_name" {
type = string
description = "Domain name used to access instance."
}
variable "subdomain" {
type = string
default = null
description = "Subdomain for accessing the Weights & Biases UI."
}
variable "license" {
type = string
}
variable "zone_id" {
type = string
description = "Domain for creating the Weights & Biases subdomain on."
}
variable "allowed_inbound_cidr" {
description = "CIDRs allowed to access wandb-server."
nullable = false
type = list(string)
}
variable "allowed_inbound_ipv6_cidr" {
description = "CIDRs allowed to access wandb-server."
nullable = false
type = list(string)
}
variable "eks_cluster_version" {
description = "EKS cluster kubernetes version"
nullable = false
type = string
}
```
권장 배포
이는 모든 필수 컴포넌트를 생성하고 Kubernetes 클러스터에 W\&B의 최신 버전을 설치하는 가장 간단한 배포 옵션 설정입니다.
1. `main.tf`를 생성하세요
일반 단계에서 파일을 생성한 디렉터리에 다음 내용으로 `main.tf` 파일을 생성하세요:
```hcl theme={"system"}
module "wandb_infra" {
source = "wandb/wandb/aws"
version = "~>7.0"
namespace = var.namespace
domain_name = var.domain_name
license = var.license
subdomain = var.subdomain
zone_id = var.zone_id
allowed_inbound_cidr = var.allowed_inbound_cidr
allowed_inbound_ipv6_cidr = var.allowed_inbound_ipv6_cidr
public_access = true
external_dns = true
kubernetes_public_access = true
kubernetes_public_access_cidrs = ["0.0.0.0/0"]
eks_cluster_version = var.eks_cluster_version
}
data "aws_eks_cluster" "eks_cluster_id" {
name = module.wandb_infra.cluster_name
}
data "aws_eks_cluster_auth" "eks_cluster_auth" {
name = module.wandb_infra.cluster_name
}
provider "kubernetes" {
host = data.aws_eks_cluster.eks_cluster_id.endpoint
cluster_ca_certificate = base64decode(data.aws_eks_cluster.eks_cluster_id.certificate_authority.0.data)
token = data.aws_eks_cluster_auth.eks_cluster_auth.token
}
provider "helm" {
kubernetes {
host = data.aws_eks_cluster.eks_cluster_id.endpoint
cluster_ca_certificate = base64decode(data.aws_eks_cluster.eks_cluster_id.certificate_authority.0.data)
token = data.aws_eks_cluster_auth.eks_cluster_auth.token
}
}
output "url" {
value = module.wandb_infra.url
}
output "bucket" {
value = module.wandb_infra.bucket_name
}
```
2. W\&B 배포
W\&B를 배포하려면 다음 명령어를 실행하세요:
```bash theme={"system"}
terraform init
terraform apply -var-file=terraform.tfvars
```
Redis 활성화
Redis로 SQL 쿼리를 캐시하고 메트릭을 로드할 때 애플리케이션 응답 속도를 높이려면 `main.tf` 파일에 `create_elasticache_subnet = true` 옵션을 추가하세요:
```hcl theme={"system"}
module "wandb_infra" {
source = "wandb/wandb/aws"
version = "~>7.0"
namespace = var.namespace
domain_name = var.domain_name
subdomain = var.subdomain
zone_id = var.zone_id
create_elasticache_subnet = true
}
[...]
```
메시지 브로커(큐) 활성화
SQS를 사용하는 외부 메시지 브로커를 활성화하려면 `main.tf` 파일에 `use_internal_queue = false` 옵션을 추가하세요:
W\&B에는 내장 브로커가 포함되어 있으므로 이는 선택 사항입니다. 이 옵션은 성능을 개선하지 않습니다.
```hcl theme={"system"}
module "wandb_infra" {
source = "wandb/wandb/aws"
version = "~>7.0"
namespace = var.namespace
domain_name = var.domain_name
subdomain = var.subdomain
zone_id = var.zone_id
use_internal_queue = false
[...]
}
```
추가 자료
* [AWS Terraform 모듈 문서](https://registry.terraform.io/modules/wandb/wandb/aws/latest)
* [AWS Terraform 모듈 소스 코드](https://github.com/wandb/terraform-aws-wandb)
* [오퍼레이터 기반 AWS Terraform 모듈로 마이그레이션](#migrate-to-operator-based-aws-terraform-modules)
W\&B는 Google Cloud에 플랫폼을 배포할 때 [W\&B Server Google Cloud Terraform Module](https://registry.terraform.io/modules/wandb/wandb/google/latest)을 사용할 것을 권장합니다.
모듈 문서에는 사용 가능한 모든 옵션의 목록이 나와 있습니다.
시작하기 전에 W\&B는 Terraform에서 사용 가능한 [원격 백엔드](https://developer.hashicorp.com/terraform/language/backend/remote) 중 하나를 선택하여 [상태 파일](https://developer.hashicorp.com/terraform/language/state)을 저장할 것을 권장합니다. 상태 파일은 모든 컴포넌트를 다시 생성하지 않고 업그레이드를 배포하거나 배포를 변경하는 데 필요한 리소스입니다.
Terraform 모듈은 다음 필수 컴포넌트를 배포합니다:
* VPC
* Cloud SQL for MySQL
* Cloud Storage 버킷
* Google Kubernetes Engine
* Memorystore for Redis
* KMS 암호화 키
* 로드 밸런서
선택 컴포넌트는 다음과 같습니다:
* Pub/Sub 메시지 시스템
사전 필수 권한
Terraform을 실행하는 계정에는 사용하는 Google Cloud 프로젝트의 `roles/owner` 역할이 있어야 합니다.
일반적인 단계
이 섹션의 단계는 모든 배포 옵션에 공통으로 적용됩니다.
1. 개발 환경을 준비하세요.
* [Terraform](https://developer.hashicorp.com/terraform/tutorials/aws-get-started/install-cli)을 설치하세요.
* W\&B는 코드용 Git 저장소를 만드는 것을 권장하지만, 파일을 로컬에 보관해도 됩니다.
* [Google Cloud Console](https://console.cloud.google.com/)에서 프로젝트를 만드세요.
* `gcloud auth application-default login`을 사용하여 Google Cloud에 인증하세요(먼저 [gcloud를 설치](https://cloud.google.com/sdk/docs/install)해야 합니다).
2. `terraform.tfvars` 파일을 생성하세요.
설치 유형에 따라 `tvfars` 파일 내용을 사용자 지정하세요. 최소 권장 내용은 다음 예시와 같습니다.
```bash theme={"system"}
project_id = "wandb-project"
region = "europe-west2"
zone = "europe-west2-a"
namespace = "wandb"
license = "xxxxxxxxxxyyyyyyyyyyyzzzzzzz"
subdomain = "wandb-gcp"
domain_name = "wandb.ml"
```
배포 전에 이러한 변수의 값을 결정해야 합니다. `namespace` 변수는 Terraform이 생성하는 모든 리소스에 접두사로 붙는 문자열입니다.
`subdomain`과 `domain`의 조합으로 W\&B를 설정하는 FQDN이 구성됩니다. 앞의 예시에서 W\&B FQDN은 `wandb-gcp.wandb.ml`입니다.
3. `variables.tf` 파일을 생성하세요.
Terraform에서는 `terraform.tfvars`에 설정한 모든 옵션에 대해 해당하는 변수 선언이 필요합니다.
```hcl theme={"system"}
variable "project_id" {
type = string
description = "Project ID"
}
variable "region" {
type = string
description = "Google region"
}
variable "zone" {
type = string
description = "Google zone"
}
variable "namespace" {
type = string
description = "Namespace prefix used for resources"
}
variable "domain_name" {
type = string
description = "Domain name for accessing the Weights & Biases UI."
}
variable "subdomain" {
type = string
description = "Subdomain for access the Weights & Biases UI."
}
variable "license" {
type = string
description = "W&B License"
}
```
권장 배포
이는 모든 필수 컴포넌트를 생성하고 Kubernetes 클러스터에 W\&B의 최신 버전을 설치하는 가장 간단한 배포 옵션 설정입니다.
1. `main.tf`를 생성하세요
일반 단계에서 파일을 생성한 디렉터리에 다음 내용으로 `main.tf` 파일을 생성하세요:
```hcl theme={"system"}
provider "google" {
project = var.project_id
region = var.region
zone = var.zone
}
provider "google-beta" {
project = var.project_id
region = var.region
zone = var.zone
}
data "google_client_config" "current" {}
provider "kubernetes" {
host = "https://${module.wandb.cluster_endpoint}"
cluster_ca_certificate = base64decode(module.wandb.cluster_ca_certificate)
token = data.google_client_config.current.access_token
}
provider "helm" {
kubernetes {
host = "https://${module.wandb.cluster_endpoint}"
cluster_ca_certificate = base64decode(module.wandb.cluster_ca_certificate)
token = data.google_client_config.current.access_token
}
}
# 필요한 모든 서비스를 시작하세요
module "wandb" {
source = "wandb/wandb/google"
version = "~> 10.0"
namespace = var.namespace
license = var.license
domain_name = var.domain_name
subdomain = var.subdomain
}
# 할당된 IP 주소로 DNS를 업데이트하세요
output "url" {
value = module.wandb.url
}
output "address" {
value = module.wandb.address
}
output "bucket_name" {
value = module.wandb.bucket_name
}
```
2. W\&B를 배포하세요.
W\&B를 배포하려면 다음 명령어를 실행하세요:
```bash theme={"system"}
terraform init
terraform apply -var-file=terraform.tfvars
```
Redis 활성화
Redis를 사용하여 SQL 쿼리를 캐시하고 메트릭을 로드할 때 애플리케이션 응답 속도를 높이려면 `main.tf` 파일에 `create_redis = true` 옵션을 추가하세요:
```hcl theme={"system"}
[...]
module "wandb" {
source = "wandb/wandb/google"
version = "~> 10.0"
namespace = var.namespace
license = var.license
domain_name = var.domain_name
subdomain = var.subdomain
create_redis = true
}
[...]
```
메시지 브로커(큐) 활성화
Pub/Sub를 사용하는 외부 메시지 브로커를 활성화하려면 `main.tf` 파일에 `use_internal_queue = false` 옵션을 추가하세요:
W\&B에는 내장 브로커가 포함되어 있으므로 이는 선택 사항입니다. 이 옵션은 성능을 개선하지 않습니다.
```hcl theme={"system"}
[...]
module "wandb" {
source = "wandb/wandb/google"
version = "~> 10.0"
namespace = var.namespace
license = var.license
domain_name = var.domain_name
subdomain = var.subdomain
use_internal_queue = false
}
[...]
```
추가 자료
* [Google Cloud Terraform 모듈 문서](https://registry.terraform.io/modules/wandb/wandb/google/latest)
* [Google Cloud Terraform 모듈 소스 코드](https://github.com/wandb/terraform-google-wandb)
W\&B는 Azure에 플랫폼을 배포할 때 [W\&B Server Azure Terraform Module](https://registry.terraform.io/modules/wandb/wandb/azurerm/latest)을 사용할 것을 권장합니다.
모듈 문서에는 사용 가능한 모든 옵션의 목록이 나와 있습니다.
Terraform 모듈은 다음 필수 컴포넌트를 배포합니다:
* Azure 리소스 그룹
* Azure 가상 네트워크(VPC)
* Azure MySQL Flexible Server
* Azure 저장소 계정 및 Blob Storage
* Azure Kubernetes Service
* Azure Application Gateway
선택 컴포넌트는 다음과 같습니다:
* Azure Cache for Redis
* Azure Event Grid
사전 필수 권한
AzureRM 공급자를 설정하는 가장 단순한 방법은 [Azure CLI](https://registry.terraform.io/providers/hashicorp/azurerm/latest/docs/guides/azure_cli)를 사용하는 것입니다. 자동화를 위해 [Azure 서비스 주체](https://registry.terraform.io/providers/hashicorp/azurerm/latest/docs/guides/service_principal_client_secret)를 사용할 수도 있습니다.
사용하는 인증 방법과 관계없이 Terraform을 실행하는 계정은 이전 섹션에 나열된 모든 컴포넌트를 생성할 수 있어야 합니다.
일반적인 단계
이 섹션의 단계는 모든 배포 옵션에 공통으로 적용됩니다.
1. 개발 환경을 준비하세요.
* [Terraform](https://developer.hashicorp.com/terraform/tutorials/aws-get-started/install-cli)을 설치하세요.
* W\&B는 코드용 Git 저장소를 만드는 것을 권장하지만, 파일을 로컬에 보관해도 됩니다.
2. `terraform.tfvars` 파일을 생성하세요.
설치 유형에 따라 `tvfars` 파일 내용을 사용자 지정하세요. 최소 권장 내용은 다음 예시와 같습니다.
```bash theme={"system"}
namespace = "wandb"
wandb_license = "xxxxxxxxxxyyyyyyyyyyyzzzzzzz"
subdomain = "wandb-azure"
domain_name = "wandb.ml"
location = "westeurope"
```
배포 전에 이러한 변수의 값을 결정해야 합니다. `namespace` 변수는 Terraform이 생성하는 모든 리소스에 접두사로 붙는 문자열입니다.
`subdomain`과 `domain`의 조합은 W\&B를 설정하는 FQDN을 구성합니다. 앞의 예시에서 W\&B FQDN은 `wandb-azure.wandb.ml`입니다.
3. `versions.tf` 파일을 생성하세요.
이 파일에는 Azure에 W\&B를 배포하는 데 필요한 Terraform 및 Terraform 공급자 버전이 포함되어 있습니다:
```bash theme={"system"}
terraform {
required_version = "~> 1.3"
required_providers {
azurerm = {
source = "hashicorp/azurerm"
version = "~> 3.17"
}
}
}
```
[Terraform 공식 문서](https://registry.terraform.io/providers/hashicorp/azurerm/latest/docs)를 참고하여 Azure 공급자를 설정하세요.
W\&B는 이 문서의 시작 부분에서 언급한 [원격 백엔드 설정](https://developer.hashicorp.com/terraform/language/backend)도 추가할 것을 권장합니다.
4. `variables.tf` 파일을 생성하세요
Terraform에서는 `terraform.tfvars`에 설정한 모든 옵션에 대해 해당하는 변수 선언이 필요합니다.
```bash theme={"system"}
variable "namespace" {
type = string
description = "String used for prefix resources."
}
variable "location" {
type = string
description = "Azure Resource Group location"
}
variable "domain_name" {
type = string
description = "Domain for accessing the Weights & Biases UI."
}
variable "subdomain" {
type = string
default = null
description = "Subdomain for accessing the Weights & Biases UI. Default creates record at Route53 Route."
}
variable "license" {
type = string
description = "Your wandb/local license"
}
```
권장 배포
이는 모든 필수 컴포넌트를 생성하고 Kubernetes 클러스터에 W\&B의 최신 버전을 설치하는 가장 간단한 배포 옵션 설정입니다.
1. `main.tf`를 생성하세요
일반 단계에서 파일을 생성한 디렉터리에 다음 내용으로 `main.tf` 파일을 생성하세요:
```bash theme={"system"}
provider "azurerm" {
features {}
}
provider "kubernetes" {
host = module.wandb.cluster_host
cluster_ca_certificate = base64decode(module.wandb.cluster_ca_certificate)
client_key = base64decode(module.wandb.cluster_client_key)
client_certificate = base64decode(module.wandb.cluster_client_certificate)
}
provider "helm" {
kubernetes {
host = module.wandb.cluster_host
cluster_ca_certificate = base64decode(module.wandb.cluster_ca_certificate)
client_key = base64decode(module.wandb.cluster_client_key)
client_certificate = base64decode(module.wandb.cluster_client_certificate)
}
}
# 필요한 모든 서비스 시작
module "wandb" {
source = "wandb/wandb/azurerm"
version = "~> 1.2"
namespace = var.namespace
location = var.location
license = var.license
domain_name = var.domain_name
subdomain = var.subdomain
deletion_protection = false
tags = {
"Example" : "PublicDns"
}
}
output "address" {
value = module.wandb.address
}
output "url" {
value = module.wandb.url
}
```
2. W\&B 배포
W\&B를 배포하려면 다음 명령어를 실행하세요:
```bash theme={"system"}
terraform init
terraform apply -var-file=terraform.tfvars
```
Redis 활성화
Redis를 사용하여 SQL 쿼리를 캐시하고 메트릭을 로드할 때 애플리케이션 응답 속도를 높이려면 `main.tf` 파일에 `create_redis = true` 옵션을 추가하세요:
```bash theme={"system"}
# 필요한 모든 서비스를 시작하세요
module "wandb" {
source = "wandb/wandb/azurerm"
version = "~> 1.2"
namespace = var.namespace
location = var.location
license = var.license
domain_name = var.domain_name
subdomain = var.subdomain
create_redis = true
[...]
}
```
메시지 브로커(큐) 활성화
Azure Event Grid를 사용하는 외부 메시지 브로커를 활성화하려면 `main.tf` 파일에 `use_internal_queue = false` 옵션을 추가하세요:
W\&B에는 내장 브로커가 포함되어 있으므로 이는 선택 사항입니다. 이 옵션은 성능을 개선하지 않습니다.
```bash theme={"system"}
# 필요한 모든 서비스를 시작하세요
module "wandb" {
source = "wandb/wandb/azurerm"
version = "~> 1.2"
namespace = var.namespace
location = var.location
license = var.license
domain_name = var.domain_name
subdomain = var.subdomain
use_internal_queue = false
[...]
}
```
추가 자료
* [Azure Terraform 모듈 문서](https://registry.terraform.io/modules/wandb/wandb/azurerm/latest)
* [Azure Terraform 모듈 소스 코드](https://github.com/wandb/terraform-azurerm-wandb)
기타 배포 옵션
모든 설정을 같은 파일에 추가하여 여러 배포 옵션을 조합할 수 있습니다. 각 Terraform 모듈은 권장 배포 섹션의 표준 옵션 및 최소 설정과 조합할 수 있는 여러 옵션을 제공합니다.
사용 가능한 옵션의 전체 목록은 해당 클라우드 제공업체의 모듈 문서를 참고하세요:
* [AWS 모듈 문서](https://registry.terraform.io/modules/wandb/wandb/aws/latest)
* [Google Cloud 모듈 문서](https://registry.terraform.io/modules/wandb/wandb/google/latest)
* [Azure 모듈 문서](https://registry.terraform.io/modules/wandb/wandb/azurerm/latest)
W\&B 관리 콘솔에 액세스
W\&B Kubernetes Operator에는 관리 콘솔이 함께 제공됩니다. 이 콘솔에서 배포 상태를 검토하고, 컴포넌트 메트릭을 확인하고, operator 수준의 설정을 조정할 수 있습니다. 관리 콘솔은 `${HOST_URI}/console`에서 사용할 수 있습니다(예: `https://wandb.company-name.com/console`).
관리 콘솔에 로그인하는 방법은 두 가지입니다.
1. 브라우저에서 W\&B 애플리케이션을 열고 로그인합니다. `${HOST_URI}/`(예: `https://wandb.company-name.com/`)에서 W\&B 애플리케이션에 로그인하세요.
2. 콘솔에 액세스합니다. 오른쪽 상단의 아이콘을 클릭한 다음 **System console**을 클릭하세요. **System console** 항목은 Admin 권한이 있는 사용자에게만 표시됩니다.
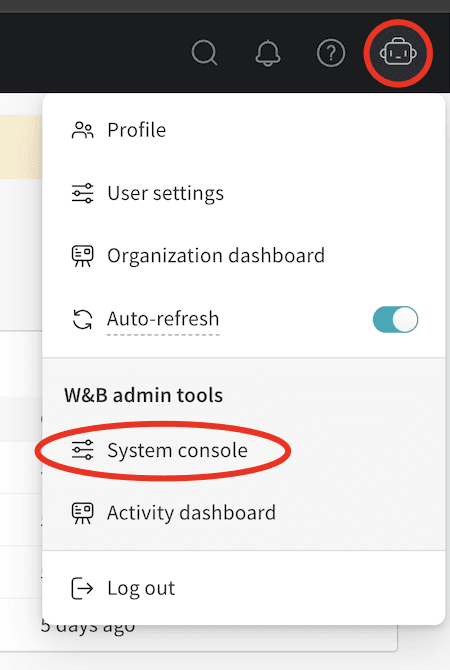 W\&B는 옵션 1이 작동하지 않는 경우에만 다음 단계에 따라 콘솔에 액세스할 것을 권장합니다.
1. 브라우저에서 콘솔 애플리케이션을 엽니다. 앞 섹션에서 설명한 URL을 열면 로그인 화면으로 리디렉션됩니다.
W\&B는 옵션 1이 작동하지 않는 경우에만 다음 단계에 따라 콘솔에 액세스할 것을 권장합니다.
1. 브라우저에서 콘솔 애플리케이션을 엽니다. 앞 섹션에서 설명한 URL을 열면 로그인 화면으로 리디렉션됩니다.
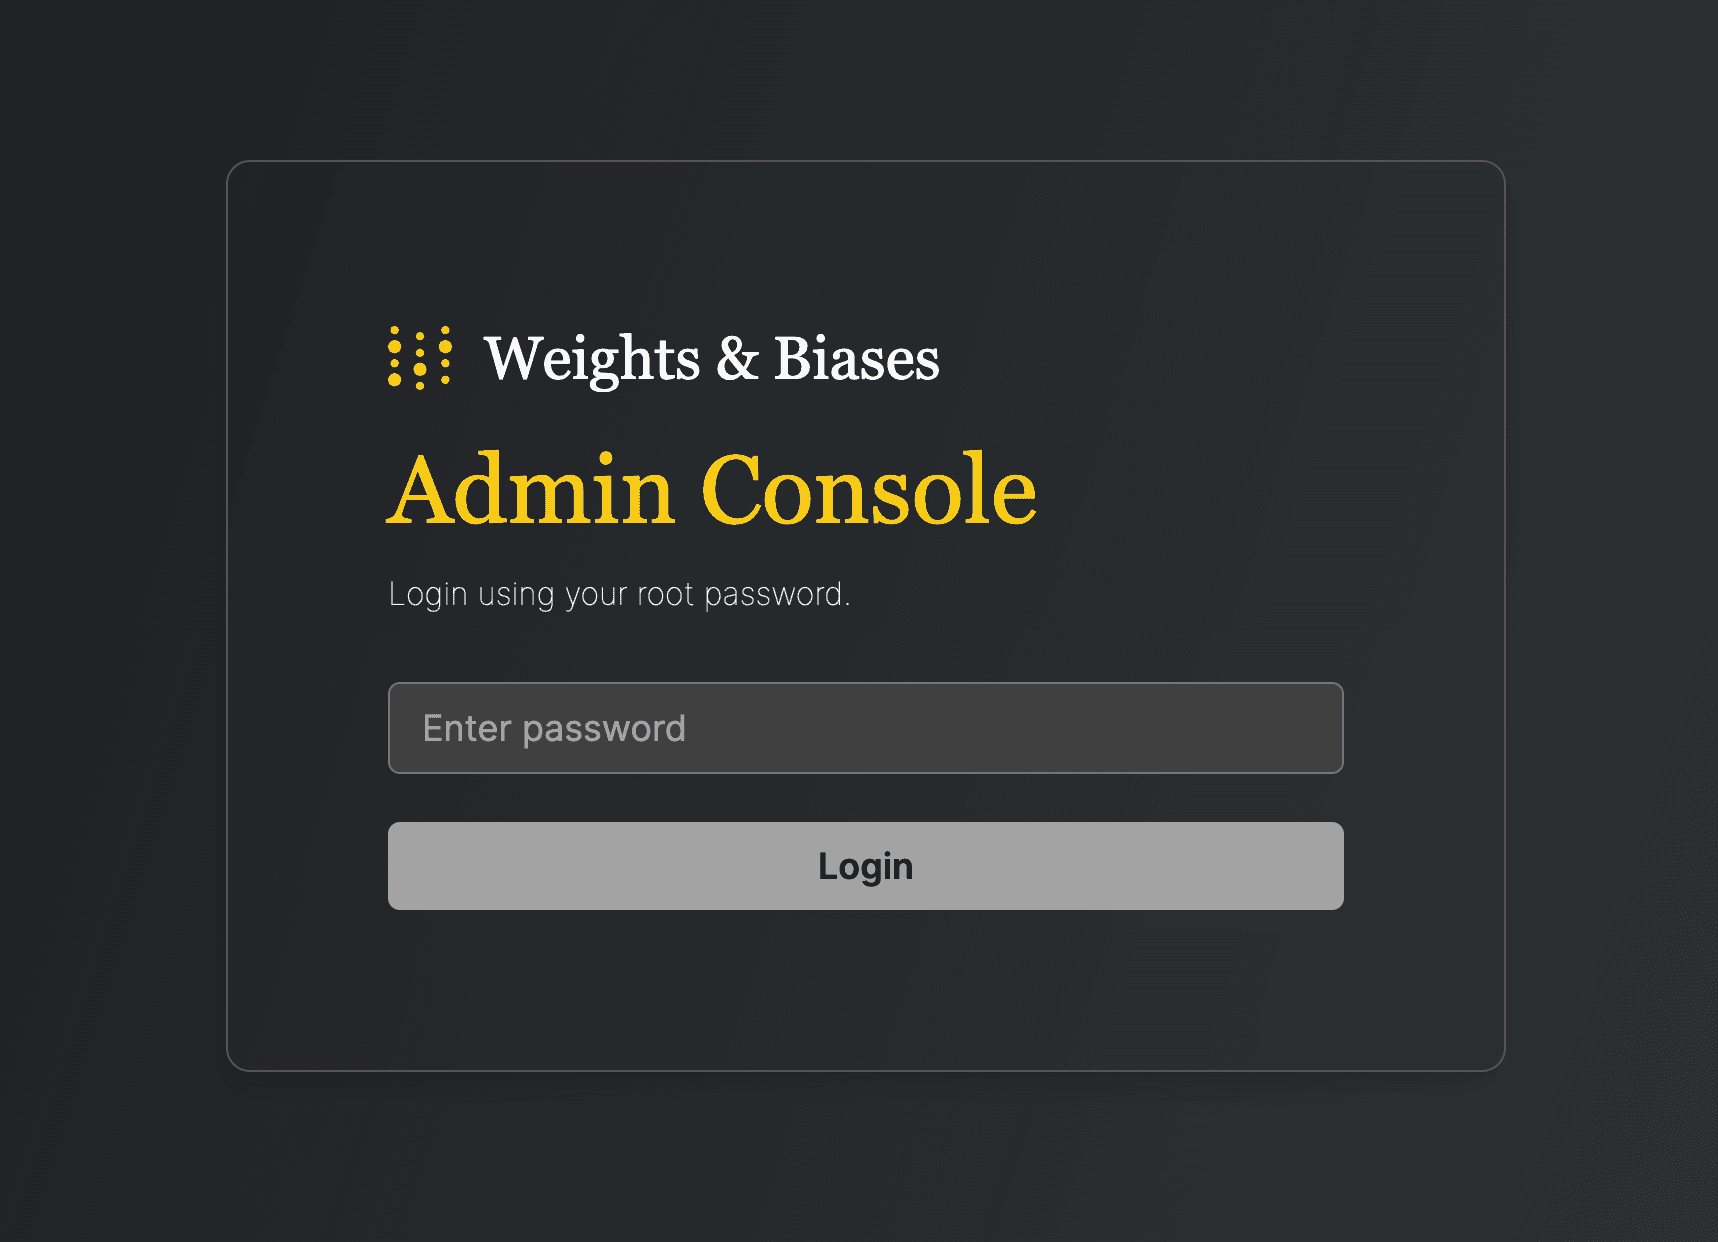 2. 설치 시 생성된 Kubernetes 시크릿에서 비밀번호를 가져옵니다.
```shell theme={"system"}
kubectl get secret wandb-password -o jsonpath='{.data.password}' | base64 -d
```
비밀번호를 복사하세요.
3. 콘솔에 로그인합니다. 복사한 비밀번호를 붙여 넣은 다음 **Login**을 클릭하세요.
2. 설치 시 생성된 Kubernetes 시크릿에서 비밀번호를 가져옵니다.
```shell theme={"system"}
kubectl get secret wandb-password -o jsonpath='{.data.password}' | base64 -d
```
비밀번호를 복사하세요.
3. 콘솔에 로그인합니다. 복사한 비밀번호를 붙여 넣은 다음 **Login**을 클릭하세요.
W\&B Kubernetes Operator 업데이트
이 섹션에서는 W\&B Kubernetes Operator 자체를 업데이트하는 방법을 설명합니다. 버그 수정 사항과 새로운 조정(reconciliation) 기능을 적용하려면 operator를 주기적으로 업데이트하세요.
* W\&B Kubernetes Operator를 업데이트해도 W\&B Server 애플리케이션은 업데이트되지 않습니다.
* W\&B Kubernetes Operator를 사용하지 않는 Helm 차트를 사용 중이라면, 이 섹션의 단계에 따라 W\&B Operator를 업데이트하기 전에 먼저 [마이그레이션 지침](#migrate-self-managed-instances-to-wb-operator)을 참조하세요.
다음 코드 스니펫을 복사하여 터미널에 붙여 넣으세요.
1. [`helm repo update`](https://helm.sh/docs/helm/helm_repo_update/)로 저장소를 업데이트합니다.
```shell theme={"system"}
helm repo update
```
2. [`helm upgrade`](https://helm.sh/docs/helm/helm_upgrade/)로 Helm 차트를 업데이트합니다.
```shell theme={"system"}
helm upgrade operator wandb/operator -n wandb-cr --reuse-values
```
W\&B Server 애플리케이션 업데이트
W\&B Kubernetes Operator를 사용하면 더 이상 W\&B Server 애플리케이션을 직접 업데이트할 필요가 없습니다.
W\&B 소프트웨어의 새 버전이 릴리스되면 operator가 W\&B Server 애플리케이션을 자동으로 업데이트합니다.
MySQL을 8.4.x로 업그레이드
MySQL 8.0.x는 지원이 종료되었습니다. Self-Managed 배포에서는 보안 패치와 중요한 버그 수정이 제공되는 지원 대상 MySQL 버전을 실행해야 합니다. 커뮤니티 MySQL을 실행하는 경우 **MySQL 8.4.x**를 설치하거나 해당 버전으로 업그레이드하세요. 관리형 서비스를 사용하는 경우 공급자가 문서에서 지원 및 패치 제공 대상으로 명시한 엔진 버전을 실행하세요(예: Amazon RDS for MySQL, Google Cloud SQL for MySQL 또는 Azure Database for MySQL). W\&B는 MySQL 8.4.0 및 현재 8.4.x 릴리스에서 플랫폼을 검증했습니다.
다음 단계는 W\&B 관점에서의 작업 순서를 설명합니다. 백업과 버전별 업그레이드 경로를 포함한 MySQL 자체의 업그레이드 방법은 MySQL 배포판 또는 클라우드 제공업체의 문서를 따르세요. 동일한 순서가 [표준](/ko/products/wandb/platform/hosting/self-managed/operator) 및 [에어갭](/ko/products/wandb/platform/hosting/self-managed/on-premises-deployments/kubernetes-airgapped) Operator 배포에 적용됩니다. 에어갭 환경에서는 데이터베이스를 업그레이드하기 전에 내부 배포 절차를 통해 MySQL 8.4.x 소프트웨어를 획득하세요.
시작하기 전에 유지 관리 시간을 계획하고 사용자에게 알리세요. 호환성이나 배포 토폴로지에 관한 질문이 있으면 [Customer Support](mailto:forge-support@coreweave.com) 또는 담당 W\&B 팀에 문의하세요.
1. 대상 버전과 그 사이의 모든 버전에 대한 MySQL 릴리스 노트 및 문서에서 요구 사항과 기타 세부 정보를 검토하세요.
2. 유지 관리를 준비하세요.
업그레이드를 시작하기 전에 데이터베이스에 대해 [MySQL Shell 업그레이드 검사기](https://dev.mysql.com/doc/mysql-shell/8.4/en/mysql-shell-utilities-upgrade.html)를 실행하여 대상 버전의 호환성 문제를 파악하고 수정할 수 있습니다. 진행하기 전에 검사기 출력에 나타난 오류나 경고를 모두 해결하세요. MySQL 배포판의 문서를 참고하세요.
3. MySQL을 종료하고 MySQL 배포판의 문서에 따라 MySQL 데이터베이스의 전체 백업을 수행하세요.
업그레이드 중에는 MySQL을 사용할 수 없습니다. 데이터베이스를 사용할 수 없는 동안 W\&B 클라이언트 애플리케이션은 연결할 수 없으며 일시적인 오류가 발생합니다.
4. MySQL 배포판의 문서에 따라 MySQL을 8.4.x로 업그레이드하세요.
5. MySQL을 다시 시작하고 정상적으로 작동하는지 확인하세요.
6. MySQL이 가동되면 `wandb verify`를 실행하여 W\&B 배포를 검증하세요. 이 명령은 일련의 검사를 실행하고 결과를 `STDOUT`에 보고합니다. 문제가 보고되면 필요한 사항을 조정한 후 다시 실행하세요. 설정 및 로그인 단계는 [설치 확인](#verify-the-installation)을 참고하세요.
7. 검증이 완료되면 사용자는 정상적인 작업을 재개할 수 있습니다.
ClickHouse compatibility for upgrades
Self-Managed 배포는 외부 ClickHouse 클러스터를 사용하는 경우 W\&B Server를 업그레이드하기 전에 ClickHouse 호환성을 확인해야 합니다.
지원되는 ClickHouse 버전
W\&B Weave는 ClickHouse Server와 ClickHouse Keeper 모두 지원되는 버전이 필요합니다.
* Weave는 ClickHouse 25.8부터 25.12까지, 그리고 26.3 이상을 지원합니다.
* Weave는 ClickHouse 26.1 또는 26.2와 호환되지 않습니다.
**W\&B Self-Managed를 업그레이드하기 *전에***, ClickHouse Server와 ClickHouse Keeper가 모두 Weave가 지원하는 버전으로 실행 중인지 확인하세요. ClickHouse 버전을 변경해야 하는 경우, 두 컴포넌트를 함께 업그레이드하세요.
W\&B Self-Managed 배포에서 Weave를 사용하지 않는 경우, ClickHouse가 필요하지 않으며 이 요구 사항은 업그레이드에 적용되지 않습니다.
Dedicated Cloud 및 Multi-tenant Cloud 배포는 이미 호환되는 ClickHouse 버전을 실행 중이므로 영향을 받지 않습니다.
버전별 릴리스 노트는 [Supported W\&B Server releases](/ko/release-notes/server-releases)를 참조하세요.
Self-Managed 인스턴스를 W\&B Operator로 마이그레이션
이 섹션에서는 W\&B Server 설치를 직접 관리하던 방식에서 W\&B Operator가 대신 관리하는 방식으로 마이그레이션하는 방법을 설명합니다. 마이그레이션하면 operator가 조정(reconciliation)과 W\&B Server 업그레이드를 자동으로 처리하므로, 애플리케이션의 매니페스트 변경이나 Helm 업그레이드를 더 이상 직접 조율하지 않아도 됩니다. 마이그레이션 절차는 W\&B Server를 설치한 방법에 따라 다릅니다.
W\&B Operator는 W\&B Server의 기본 설치 방법이자 권장 설치 방법입니다. 궁금한 점이 있으면 [Customer Support](mailto:forge-support@coreweave.com) 또는 담당 W\&B 팀에 문의하세요.
* 공식 W\&B Cloud Terraform 모듈을 사용한 경우, 해당 문서로 이동하여 안내된 단계를 따르세요.
* [AWS](#migrate-to-operator-based-aws-terraform-modules)
* [Google Cloud](#migrate-to-operator-based-google-cloud-terraform-modules)
* [Azure](#migrate-to-operator-based-azure-terraform-modules)
* [W\&B Non-Operator Helm 차트](https://github.com/wandb/helm-charts/tree/main/charts/wandb)를 사용한 경우, [operator-based Helm 차트로 마이그레이션](#migrate-to-operator-based-helm-chart)을 참조하세요.
* [W\&B Non-Operator Helm 차트를 Terraform과 함께](https://registry.terraform.io/modules/wandb/wandb/kubernetes/latest) 사용한 경우, [operator-based Terraform Helm 차트로 마이그레이션](#migrate-to-operator-based-terraform-helm-chart)을 참조하세요.
* 매니페스트로 Kubernetes 리소스를 생성한 경우, [operator-based Helm 차트로 마이그레이션](#migrate-to-operator-based-helm-chart)을 참조하세요.
마이그레이션 프로세스에 대한 자세한 설명은 [operator-wandb 차트 문서](https://github.com/wandb/helm-charts/tree/main/charts/operator-wandb)를 참조하세요.
질문이 있거나 지원이 필요하시면 [Customer Support](mailto:forge-support@coreweave.com) 또는 담당 W\&B 팀에 문의하세요.
[Customer Support](mailto:forge-support@coreweave.com) 또는 담당 W\&B 팀에 문의하여 질문이 있거나 도움이 필요하시면 도움을 받으세요.
operator-based Helm 차트로 마이그레이션
operator-based Helm 차트로 마이그레이션하려면 다음 단계를 따르세요:
1. 현재 W\&B 설정을 조회하세요. non-operator-based 버전의 Helm 차트로 W\&B를 배포한 경우, 다음과 같이 값을 내보내세요:
```shell theme={"system"}
helm get values wandb
```
Kubernetes 매니페스트로 W\&B를 배포한 경우, 다음과 같이 값을 내보내세요:
```shell theme={"system"}
kubectl get deployment wandb -o yaml
```
이제 다음 단계에 필요한 모든 설정 값을 확보했습니다.
2. `operator.yaml`이라는 파일을 만드세요. [설정 레퍼런스](#configuration-reference-for-wb-operator)에 설명된 형식을 따르세요. 1단계의 값을 사용하세요.
3. 현재 배포를 0 파드로 스케일링하세요. 이 단계는 현재 배포를 중지합니다.
```shell theme={"system"}
kubectl scale --replicas=0 deployment wandb
```
4. Helm 차트 저장소를 업데이트하세요:
```shell theme={"system"}
helm repo update
```
5. 새 Helm 차트를 설치하세요:
```shell theme={"system"}
helm upgrade --install operator wandb/operator -n wandb-cr --create-namespace
```
6. 새 Helm 차트를 설정하고 W\&B 애플리케이션 배포를 트리거하세요. 새 설정을 적용하세요.
```shell theme={"system"}
kubectl apply -f operator.yaml
```
배포가 완료되는 데 몇 분 정도 걸립니다.
7. 설치를 확인하세요. [설치 확인](#verify-the-installation)의 단계를 따라 모든 것이 제대로 작동하는지 확인하세요.
8. 이전 설치를 제거하세요. 이전 Helm 차트를 제거하거나 매니페스트로 생성한 리소스를 삭제하세요.
operator-based Terraform Helm 차트로 마이그레이션하려면 다음 단계를 따르세요:
1. Terraform 설정을 준비하세요. Terraform 설정에서 이전 배포의 Terraform 코드를 [Helm Terraform 모듈로 W\&B 배포](#deploy-wb-with-helm-terraform-module)에 설명된 코드로 교체하세요. 이전과 동일한 변수를 설정하세요. `.tfvars` 파일이 있는 경우 변경하지 마세요.
2. Terraform run을 실행하세요. `terraform init`, `terraform plan`, `terraform apply`를 실행하세요.
3. 설치 확인을 수행하세요. [설치 확인](#verify-the-installation)의 단계를 따라 모든 것이 제대로 작동하는지 확인하세요.
4. 이전 설치를 제거하세요. 이전 Helm 차트를 제거하거나 매니페스트로 생성한 리소스를 삭제하세요.
W\&B Server 설정 레퍼런스
이 섹션은 `WeightsAndBiases` 맞춤형 리소스에서 지정하는 설정 옵션에 대한 레퍼런스입니다. `operator.yaml` 파일을 작성하거나 업데이트할 때 MySQL, Redis, ingress 또는 OIDC와 같은 특정 서브시스템의 YAML 스키마를 확인하는 데 참고하세요.
이 섹션에서는 W\&B Server 애플리케이션의 설정 옵션을 설명합니다. 애플리케이션은 [WeightsAndBiases](#how-it-works)라는 맞춤형 리소스 정의를 통해 설정을 받습니다. 일부 옵션은 아래 설정을 통해 지정할 수 있으며, 나머지 옵션은 환경 변수로 설정해야 합니다.
문서에서는 환경 변수 목록을 [기본](/ko/products/wandb/platform/hosting/env-vars)과 [고급](/ko/products/wandb/platform/hosting/iam/advanced_env_vars)으로 나누어 제공합니다. 필요한 설정 옵션을 Helm 차트에서 지정할 수 없는 경우에만 환경 변수를 사용하세요.
기본 예시
이 예제는 W\&B에 필요한 최소한의 값 집합을 정의합니다. 보다 현실적인 프로덕션 예시는 [전체 예제](#complete-example)를 참조하세요.
이 YAML 파일은 버전, 환경 변수, 데이터베이스와 같은 외부 리소스 및 기타 필요한 설정을 포함하여 W\&B 배포의 원하는 상태를 정의합니다.
```yaml theme={"system"}
apiVersion: apps.wandb.com/v1
kind: WeightsAndBiases
metadata:
labels:
app.kubernetes.io/name: weightsandbiases
app.kubernetes.io/instance: wandb
name: wandb
namespace: default
spec:
values:
global:
host: https://
license: eyJhbGnUzaH...j9ZieKQ2x5GGfw
bucket:
mysql:
ingress:
annotations:
```
[W\&B Helm 저장소](https://github.com/wandb/helm-charts/blob/main/charts/operator-wandb/values.yaml)에서 전체 값 세트를 확인하세요. **override할 필요가 있는 값만 변경하세요**.
전체 예제
이 예제 설정은 Google Cloud Storage를 사용하여 W\&B를 Google Cloud Anthos에 배포합니다:
```yaml theme={"system"}
apiVersion: apps.wandb.com/v1
kind: WeightsAndBiases
metadata:
labels:
app.kubernetes.io/name: weightsandbiases
app.kubernetes.io/instance: wandb
name: wandb
namespace: default
spec:
values:
global:
host: https://abc-wandb.sandbox-gcp.wandb.ml
bucket:
name: abc-wandb-moving-pipefish
provider: gcs
mysql:
database: wandb_local
host: 10.218.0.2
name: wandb_local
password: 8wtX6cJHizAZvYScjDzZcUarK4zZGjpV
port: 3306
user: wandb
redis:
host: redis.example.com
port: 6379
password: password
api:
enabled: true
glue:
enabled: true
executor:
enabled: true
license: eyJhbGnUzaHgyQjQyQWhEU3...ZieKQ2x5GGfw
ingress:
annotations:
ingress.gcp.kubernetes.io/pre-shared-cert: abc-wandb-cert-creative-puma
kubernetes.io/ingress.class: gce
kubernetes.io/ingress.global-static-ip-name: abc-wandb-operator-address
```
Host
```yaml theme={"system"}
# 프로토콜을 포함한 FQDN을 제공하세요
global:
# 예시 호스트 이름, 자신의 것으로 교체하세요
host: https://wandb.example.com
```
객체 저장소 (버킷)
**AWS**
```yaml theme={"system"}
global:
bucket:
provider: "s3"
name: ""
kmsKey: ""
region: ""
```
**Google Cloud**
```yaml theme={"system"}
global:
bucket:
provider: "gcs"
name: ""
```
**Azure**
```yaml theme={"system"}
global:
bucket:
provider: "az"
name: ""
secretKey: ""
```
**기타 공급자(Minio, Ceph 및 기타 S3 호환 저장소)**
기타 S3 호환 공급자의 경우, 버킷 설정을 다음과 같이 지정하세요:
```yaml theme={"system"}
global:
bucket:
# 예시 값입니다. 본인의 값으로 교체하세요
provider: s3
name: storage.example.com
kmsKey: null
path: wandb
region: default
accessKey: 5WOA500...P5DK7I
secretKey: HDKYe4Q...JAp1YyjysnX
```
AWS 외부에서 호스팅되는 S3 호환 저장소의 경우, `kmsKey`는 `null`이어야 합니다.
`accessKey`와 `secretKey`를 시크릿에서 참조하려면:
```yaml theme={"system"}
global:
bucket:
# 예시 값입니다. 자신의 값으로 교체하세요
provider: s3
name: storage.example.com
kmsKey: null
path: wandb
region: default
secret:
secretName: bucket-secret
accessKeyName: ACCESS_KEY
secretKeyName: SECRET_KEY
```
MySQL
```yaml theme={"system"}
global:
mysql:
# 예시 값입니다. 자신의 값으로 교체하세요
host: db.example.com
port: 3306
database: wandb_local
user: wandb
password: 8wtX6cJH...ZcUarK4zZGjpV
```
시크릿에서 `password`를 참조하려면:
```yaml theme={"system"}
global:
mysql:
# 예시 값입니다. 자신의 값으로 교체하세요
host: db.example.com
port: 3306
database: wandb_local
user: wandb
passwordSecret:
name: database-secret
passwordKey: MYSQL_WANDB_PASSWORD
```
라이선스
```yaml theme={"system"}
global:
# 예시 라이선스, 자신의 것으로 교체하세요
license: eyJhbGnUzaHgyQjQy...VFnPS_KETXg1hi
```
시크릿에서 `license`를 참조하려면:
```yaml theme={"system"}
global:
licenseSecret:
name: license-secret
key: CUSTOMER_WANDB_LICENSE
```
Ingress
[Kubernetes ingress 클래스를 파악하는 방법](#how-to-identify-the-kubernetes-ingress-class)을 참조하세요.
**TLS 없이**
```yaml theme={"system"}
global:
# IMPORTANT: Ingress는 YAML에서 'global'과 같은 수준에 있습니다 (하위 항목이 아님)
ingress:
class: ""
```
**TLS 사용**
인증서를 포함하는 시크릿을 생성하세요
```console theme={"system"}
kubectl create secret tls wandb-ingress-tls --key wandb-ingress-tls.key --cert wandb-ingress-tls.crt
```
ingress 설정에서 시크릿을 참조하세요
```yaml theme={"system"}
global:
# 중요: Ingress는 YAML에서 'global'과 같은 수준에 있습니다('global'의 하위가 아님)
ingress:
class: ""
annotations:
{}
# kubernetes.io/ingress.class: nginx
# kubernetes.io/tls-acme: "true"
tls:
- secretName: wandb-ingress-tls
hosts:
-
```
Nginx의 경우 다음 어노테이션을 추가해야 할 수 있습니다:
```yaml theme={"system"}
ingress:
annotations:
nginx.ingress.kubernetes.io/proxy-body-size: 0
```
맞춤형 Kubernetes 서비스 계정
W\&B 파드를 실행할 맞춤형 Kubernetes 서비스 계정을 지정하세요.
다음 스니펫은 지정된 이름의 서비스 계정을 배포의 일부로 생성합니다:
```yaml theme={"system"}
app:
serviceAccount:
name: custom-service-account
create: true
parquet:
serviceAccount:
name: custom-service-account
create: true
global:
...
```
서브시스템 "app"과 "parquet"은 지정된 서비스 계정에서 실행됩니다. 다른 서브시스템은 기본 서비스 계정에서 실행됩니다.
서비스 계정이 클러스터에 이미 존재하는 경우, `create: false`로 설정하세요:
```yaml theme={"system"}
app:
serviceAccount:
name: custom-service-account
create: false
parquet:
serviceAccount:
name: custom-service-account
create: false
global:
...
```
app, parquet, console 등의 다양한 서브시스템에서 서비스 계정을 지정할 수 있습니다:
```yaml theme={"system"}
app:
serviceAccount:
name: custom-service-account
create: true
console:
serviceAccount:
name: custom-service-account
create: true
global:
...
```
서비스 계정은 서브시스템 간에 다를 수 있습니다:
```yaml theme={"system"}
app:
serviceAccount:
name: custom-service-account
create: false
console:
serviceAccount:
name: another-custom-service-account
create: true
global:
...
```
외부 Redis
```yaml theme={"system"}
redis:
install: false
global:
redis:
host: ""
port: 6379
password: ""
parameters: {}
caCert: ""
```
시크릿에서 `password`를 참조하려면:
```console theme={"system"}
kubectl create secret generic redis-secret --from-literal=redis-password=supersecret
```
다음 설정에서 참조하세요:
```yaml theme={"system"}
redis:
install: false
global:
redis:
host: redis.example
port: 9001
auth:
enabled: true
secret: redis-secret
key: redis-password
```
LDAP
LDAP 설정 지원은 현재 Helm 차트에서 제한적입니다. LDAP를 설정하는 데 대한 지원이 필요하시면 W\&B 지원팀 또는 AISE에 문의하세요.
`global.extraEnv`에서 환경 변수를 설정하여 LDAP를 설정하세요:
```yaml theme={"system"}
global:
extraEnv:
LDAP_ADDRESS: ldaps://ldap.company.example.com
LDAP_BASE_DN: cn=accounts,dc=company,dc=example,dc=com
LDAP_USER_BASE_DN: cn=users,cn=accounts,dc=company,dc=example,dc=com
LDAP_GROUP_BASE_DN: cn=groups,cn=accounts,dc=company,dc=example,dc=com
LDAP_BIND_DN: uid=ldapbind,cn=sysaccounts,cn=etc,dc=company,dc=example,dc=com
LDAP_BIND_PW: ********************
LDAP_ATTRIBUTES: email=mail,name=cn
LDAP_TLS_ENABLE: "true"
LDAP_LOGIN: "true"
LDAP_USER_OBJECT_CLASS: user
LDAP_GROUP_OBJECT_CLASS: group
```
이 레거시 접근 방식은 더 이상 권장되지 않습니다. 이 섹션은 레퍼런스로 제공됩니다.
**TLS 없이**
```yaml theme={"system"}
global:
ldap:
enabled: true
# "ldap://" 또는 "ldaps://"를 포함한 LDAP 서버 주소
host:
# 사용자를 찾는 데 사용할 LDAP 검색 base
baseDN:
# 바인드할 LDAP 사용자(익명 바인드를 사용하지 않는 경우)
bindDN:
# 바인드할 LDAP 비밀번호가 있는 시크릿 이름 및 키(익명 바인드를 사용하지 않는 경우)
bindPW:
# 이메일 및 group ID 속성 이름에 대한 LDAP 속성을 쉼표로 구분된 문자열 값으로 지정합니다.
attributes:
# LDAP group 허용 목록
groupAllowList:
# LDAP TLS 활성화
tls: false
```
**TLS 사용**
LDAP TLS 인증서 설정에는 인증서 내용이 미리 생성된 ConfigMap이 필요합니다.
ConfigMap을 생성하려면 다음 명령어를 사용할 수 있습니다:
```console theme={"system"}
kubectl create configmap ldap-tls-cert --from-file=certificate.crt
```
그리고 YAML에서 ConfigMap을 다음과 같은 예시처럼 사용합니다.
```yaml theme={"system"}
global:
ldap:
enabled: true
# "ldap://" 또는 "ldaps://"를 포함한 LDAP 서버 주소
host:
# 사용자를 찾는 데 사용할 LDAP 검색 base
baseDN:
# 바인드할 LDAP 사용자(익명 바인드를 사용하지 않는 경우)
bindDN:
# 바인드할 LDAP 비밀번호가 있는 시크릿 이름 및 키(익명 바인드를 사용하지 않는 경우)
bindPW:
# 이메일 및 group ID 속성 이름에 대한 LDAP 속성을 쉼표로 구분된 문자열 값으로 지정합니다.
attributes:
# LDAP group 허용 목록
groupAllowList:
# LDAP TLS 활성화
tls: true
# LDAP 서버용 CA 인증서가 있는 ConfigMap 이름 및 키
tlsCert:
configMap:
name: "ldap-tls-cert"
key: "certificate.crt"
```
OIDC SSO
```yaml theme={"system"}
global:
auth:
sessionLengthHours: 720
oidc:
clientId: ""
secret: ""
# IdP에서 요구하는 경우에만 포함하세요.
authMethod: ""
issuer: ""
```
`authMethod`은 선택 사항입니다.
SMTP
```yaml theme={"system"}
global:
email:
smtp:
host: ""
port: 587
user: ""
password: ""
```
환경 변수
```yaml theme={"system"}
global:
extraEnv:
GLOBAL_ENV: "example"
```
요청 속도 제한 설정
Dedicated Cloud 및 Self-Managed 배포에서 Operator를 사용하는 경우, `spec.values.global.extraEnv`에서 환경 변수를 설정하여 요청 속도 제한을 선택적으로 설정할 수 있습니다. 레퍼런스로, 이 예제는 각 요청 속도 제한을 기본값으로 명시적으로 설정합니다. 실제로는 기본값을 override하기 위해서만 요청 속도 제한을 정의하세요.
요청 속도 제한을 활성화하려면 `GORILLA_LIMITER`를 Redis 서버의 주소로 설정해야 합니다.
```yaml theme={"system"}
spec:
values:
global:
extraEnv:
GORILLA_DEFAULT_RATE_LIMITS_FILESTREAM: "5"
GORILLA_DEFAULT_RATE_LIMITS_FILESTREAM_COUNT: "5"
GORILLA_DEFAULT_RATE_LIMITS_FILESTREAM_PER_RUN_COUNT: "0.8"
GORILLA_DEFAULT_RATE_LIMITS_FILESTREAM_SIZE: "10"
GORILLA_DEFAULT_RATE_LIMITS_RUN_UPDATE_COUNT: "10"
GORILLA_LIMITER: "redis://$HOST:6379?ttlInSeconds=900"
```
다음 table을 참고하세요:
| 환경 변수 | Default | 설명 |
| - | - | - |
| `GORILLA_DEFAULT_RATE_LIMITS_FILESTREAM` | `5` | 기본 filestream 요청. |
| `GORILLA_DEFAULT_RATE_LIMITS_FILESTREAM_COUNT` | `5` | 초당 filestream 요청. |
| `GORILLA_DEFAULT_RATE_LIMITS_FILESTREAM_PER_RUN_COUNT` | `0.8` | 초당 run당 filestream 요청. |
| `GORILLA_DEFAULT_RATE_LIMITS_FILESTREAM_SIZE` | `10` | 초당 MB 단위 filestream 수집 제한. |
| `GORILLA_DEFAULT_RATE_LIMITS_RUN_UPDATE_COUNT` | `10` | 초당 run 메타데이터 업데이트 요청. |
맞춤형 인증 기관
`customCACerts`는 목록이며 여러 인증서를 포함할 수 있습니다. `customCACerts`에 지정된 인증 기관은 W\&B Server 애플리케이션에만 적용됩니다.
```yaml theme={"system"}
global:
customCACerts:
- |
-----BEGIN CERTIFICATE-----
MIIBnDCCAUKgAwIBAg.....................fucMwCgYIKoZIzj0EAwIwLDEQ
MA4GA1UEChMHSG9tZU.....................tZUxhYiBSb290IENBMB4XDTI0
MDQwMTA4MjgzMFoXDT.....................oNWYggsMo8O+0mWLYMAoGCCqG
SM49BAMCA0gAMEUCIQ.....................hwuJgyQRaqMI149div72V2QIg
P5GD+5I+02yEp58Cwxd5Bj2CvyQwTjTO4hiVl1Xd0M0=
-----END CERTIFICATE-----
- |
-----BEGIN CERTIFICATE-----
MIIBxTCCAWugAwIB.......................qaJcwCgYIKoZIzj0EAwIwLDEQ
MA4GA1UEChMHSG9t.......................tZUxhYiBSb290IENBMB4XDTI0
MDQwMTA4MjgzMVoX.......................UK+moK4nZYvpNpqfvz/7m5wKU
SAAwRQIhAIzXZMW4.......................E8UFqsCcILdXjAiA7iTluM0IU
aIgJYVqKxXt25blH/VyBRzvNhViesfkNUQ==
-----END CERTIFICATE-----
```
CA 인증서는 ConfigMap에도 저장할 수 있습니다:
```yaml theme={"system"}
global:
caCertsConfigMap: custom-ca-certs
```
ConfigMap은 다음과 같아야 합니다:
```yaml theme={"system"}
apiVersion: v1
kind: ConfigMap
metadata:
name: custom-ca-certs
data:
ca-cert1.crt: |
-----BEGIN CERTIFICATE-----
...
-----END CERTIFICATE-----
ca-cert2.crt: |
-----BEGIN CERTIFICATE-----
...
-----END CERTIFICATE-----
```
ConfigMap을 사용하는 경우, ConfigMap의 각 키는 `.crt`로 끝나야 합니다(예시: `my-cert.crt` 또는 `ca-cert1.crt`). 이 명명 규칙은 `update-ca-certificates`가 각 인증서를 파싱하여 시스템 CA 저장소에 추가하는 데 필요합니다.
맞춤형 security context
각 W\&B 컴포넌트는 다음 형식의 맞춤형 security context 설정을 지원합니다:
```yaml theme={"system"}
pod:
securityContext:
runAsNonRoot: true
runAsUser: 1001
runAsGroup: 0
fsGroup: 1001
fsGroupChangePolicy: Always
seccompProfile:
type: RuntimeDefault
container:
securityContext:
capabilities:
drop:
- ALL
readOnlyRootFilesystem: false
allowPrivilegeEscalation: false
```
`runAsGroup:`의 유효한 값은 `0`뿐입니다. 다른 값은 오류입니다.
예를 들어, 애플리케이션 파드를 설정하려면 설정에 `app` 섹션을 추가하세요:
```yaml theme={"system"}
global:
...
app:
pod:
securityContext:
runAsNonRoot: true
runAsUser: 1001
runAsGroup: 0
fsGroup: 1001
fsGroupChangePolicy: Always
seccompProfile:
type: RuntimeDefault
container:
securityContext:
capabilities:
drop:
- ALL
readOnlyRootFilesystem: false
allowPrivilegeEscalation: false
```
동일한 개념이 `console`, `weave`, `weave-trace`, `parquet`에도 적용됩니다.
W\&B Operator 설정 레퍼런스
이 섹션에서는 W\&B Kubernetes Operator(`wandb-controller-manager`)의 설정 옵션에 대해 설명합니다. operator는 YAML 파일 형식으로 설정을 받습니다.
기본적으로 W\&B Kubernetes Operator는 설정 파일이 필요하지 않습니다. 필요한 경우 설정 파일을 만드세요. 예를 들어, 맞춤형 인증 기관을 지정하거나 에어 갭 환경에 배포하는 등의 경우 설정 파일이 필요할 수 있습니다.
사양의 맞춤형 설정 전체 목록은 [Helm 저장소](https://github.com/wandb/helm-charts/blob/main/charts/operator/values.yaml)에서 확인하세요.
맞춤형 CA
맞춤형 인증 기관(`customCACerts`)은 목록 형식이며 여러 인증서를 포함할 수 있습니다. 추가된 인증 기관은 W\&B Kubernetes Operator(`wandb-controller-manager`)에만 적용됩니다.
```yaml theme={"system"}
customCACerts:
- |
-----BEGIN CERTIFICATE-----
MIIBnDCCAUKgAwIBAg.....................fucMwCgYIKoZIzj0EAwIwLDEQ
MA4GA1UEChMHSG9tZU.....................tZUxhYiBSb290IENBMB4XDTI0
MDQwMTA4MjgzMFoXDT.....................oNWYggsMo8O+0mWLYMAoGCCqG
SM49BAMCA0gAMEUCIQ.....................hwuJgyQRaqMI149div72V2QIg
P5GD+5I+02yEp58Cwxd5Bj2CvyQwTjTO4hiVl1Xd0M0=
-----END CERTIFICATE-----
- |
-----BEGIN CERTIFICATE-----
MIIBxTCCAWugAwIB.......................qaJcwCgYIKoZIzj0EAwIwLDEQ
MA4GA1UEChMHSG9t.......................tZUxhYiBSb290IENBMB4XDTI0
MDQwMTA4MjgzMVoX.......................UK+moK4nZYvpNpqfvz/7m5wKU
SAAwRQIhAIzXZMW4.......................E8UFqsCcILdXjAiA7iTluM0IU
aIgJYVqKxXt25blH/VyBRzvNhViesfkNUQ==
-----END CERTIFICATE-----
```
CA 인증서는 ConfigMap에 저장할 수도 있습니다:
```yaml theme={"system"}
caCertsConfigMap: custom-ca-certs
```
ConfigMap은 다음과 같은 형식이어야 합니다:
```yaml theme={"system"}
apiVersion: v1
kind: ConfigMap
metadata:
name: custom-ca-certs
data:
ca-cert1.crt: |
-----BEGIN CERTIFICATE-----
...
-----END CERTIFICATE-----
ca-cert2.crt: |
-----BEGIN CERTIFICATE-----
...
-----END CERTIFICATE-----
```
ConfigMap의 각 키는 `.crt`로 끝나야 합니다(예시: `my-cert.crt` 또는 `ca-cert1.crt`). 이 명명 규칙은 `update-ca-certificates`가 각 인증서를 파싱하고 시스템 CA 저장소에 추가하는 데 필요합니다.
자주 묻는 질문
각 파드의 목적과 역할
W\&B Server 배포에는 다음 파드가 포함됩니다:
* **`wandb-app`**: GraphQL API와 프런트엔드 애플리케이션을 포함하는 W\&B의 핵심입니다. W\&B Platform의 대부분의 기능을 제공합니다.
* **`wandb-console`**: `/console`을 통해 액세스하는 관리 콘솔입니다.
* **`wandb-otel`**: 관리 콘솔에 표시할 메트릭과 로그를 Kubernetes 계층의 리소스에서 수집하는 OpenTelemetry 에이전트입니다.
* **`wandb-prometheus`**: 관리 콘솔에 표시할 메트릭을 다양한 컴포넌트에서 수집하는 Prometheus 서버입니다.
* **`wandb-parquet`**: `wandb-app` 파드와 분리된 백엔드 마이크로서비스로, 데이터베이스 데이터를 Parquet 형식으로 객체 저장소에 내보냅니다.
* **`wandb-weave`**: UI에서 쿼리 table을 로드하고 다양한 핵심 앱 기능을 지원하는 또 다른 백엔드 마이크로서비스입니다.
* **`wandb-weave-trace`**: LLM 기반 애플리케이션을 추적하고, 실험하고, 평가하고, 배포하고, 개선하기 위한 프레임워크입니다. 이 프레임워크는 `wandb-app` 파드를 통해 액세스합니다.
W\&B Operator Console 비밀번호 조회 방법
[W\&B 관리 콘솔 액세스](#access-the-wb-management-console)를 참조하세요.
Ingress가 작동하지 않을 때 W\&B Operator Console에 액세스하는 방법
Kubernetes 클러스터에 연결할 수 있는 호스트에서 다음 명령어를 실행하세요:
```console theme={"system"}
kubectl port-forward svc/wandb-console 8082
```
브라우저에서 `https://localhost:8082/` 콘솔에 액세스하세요.
비밀번호를 조회하는 방법(옵션 2)은 [W\&B 관리 콘솔에 액세스](#access-the-wb-management-console)를 참조하세요.
W\&B Server 로그 확인 방법
애플리케이션 파드의 이름은 **wandb-app-xxx**입니다.
```console theme={"system"}
kubectl get pods
kubectl logs wandb-XXXXX-XXXXX
```
Kubernetes ingress 클래스를 파악하는 방법
클러스터에 설치된 ingress 클래스를 조회하려면 다음을 실행하세요
```console theme={"system"}
kubectl get ingressclass
```