> ## Documentation Index
> Fetch the complete documentation index at: https://docs.coreweave.com/llms.txt
> Use this file to discover all available pages before exploring further.
# Hugging Face Diffusers
> Diffusers와 함께 Weights & Biases autolog를 사용하여 프롬프트, 생성된 미디어, 설정, 파이프라인 아키텍처를 추적하세요.
export const ColabLink = ({url}) =>
Try in Colab
;
[Hugging Face Diffusers](https://huggingface.co/docs/diffusers/index)는 이미지, 오디오, 분자의 3D 구조를 생성하기 위한 사전 트레이닝된 확산 모델 라이브러리입니다. Weights & Biases 인테그레이션은 대화형 중앙 집중식 대시보드에 실험 추적, 미디어 시각화, 파이프라인 아키텍처 추적, 설정 관리 기능을 추가합니다.
두 줄로 실험 로깅하기
실험에 연결된 모든 프롬프트, 네거티브 프롬프트, 생성된 미디어 및 설정을 로깅하려면 다음 두 줄의 코드를 추가하세요:
```python theme={"system"}
# autolog 함수를 임포트하세요
from wandb.integration.diffusers import autolog
# 파이프라인을 호출하기 전에 autolog를 호출하세요
autolog(init=dict(project="diffusers_logging"))
```
시작하기
1. `diffusers`, `transformers`, `accelerate`, `wandb`를 설치하세요.
* 명령줄:
```bash theme={"system"}
pip install --upgrade diffusers transformers accelerate wandb
```
* 노트북:
```bash theme={"system"}
!pip install --upgrade diffusers transformers accelerate wandb
```
2. [`wandb.init()`](/ko/products/wandb/ref/python/functions/init)에 필요한 매개변수 딕셔너리를 받는 `init` 매개변수로 `autolog()`를 호출하세요. `autolog()`는 W\&B run을 초기화하고 [지원되는 모든 파이프라인 호출](https://github.com/wandb/wandb/blob/main/wandb/integration/diffusers/autologger.py#L12-L72)의 입력과 출력을 자동으로 추적합니다:
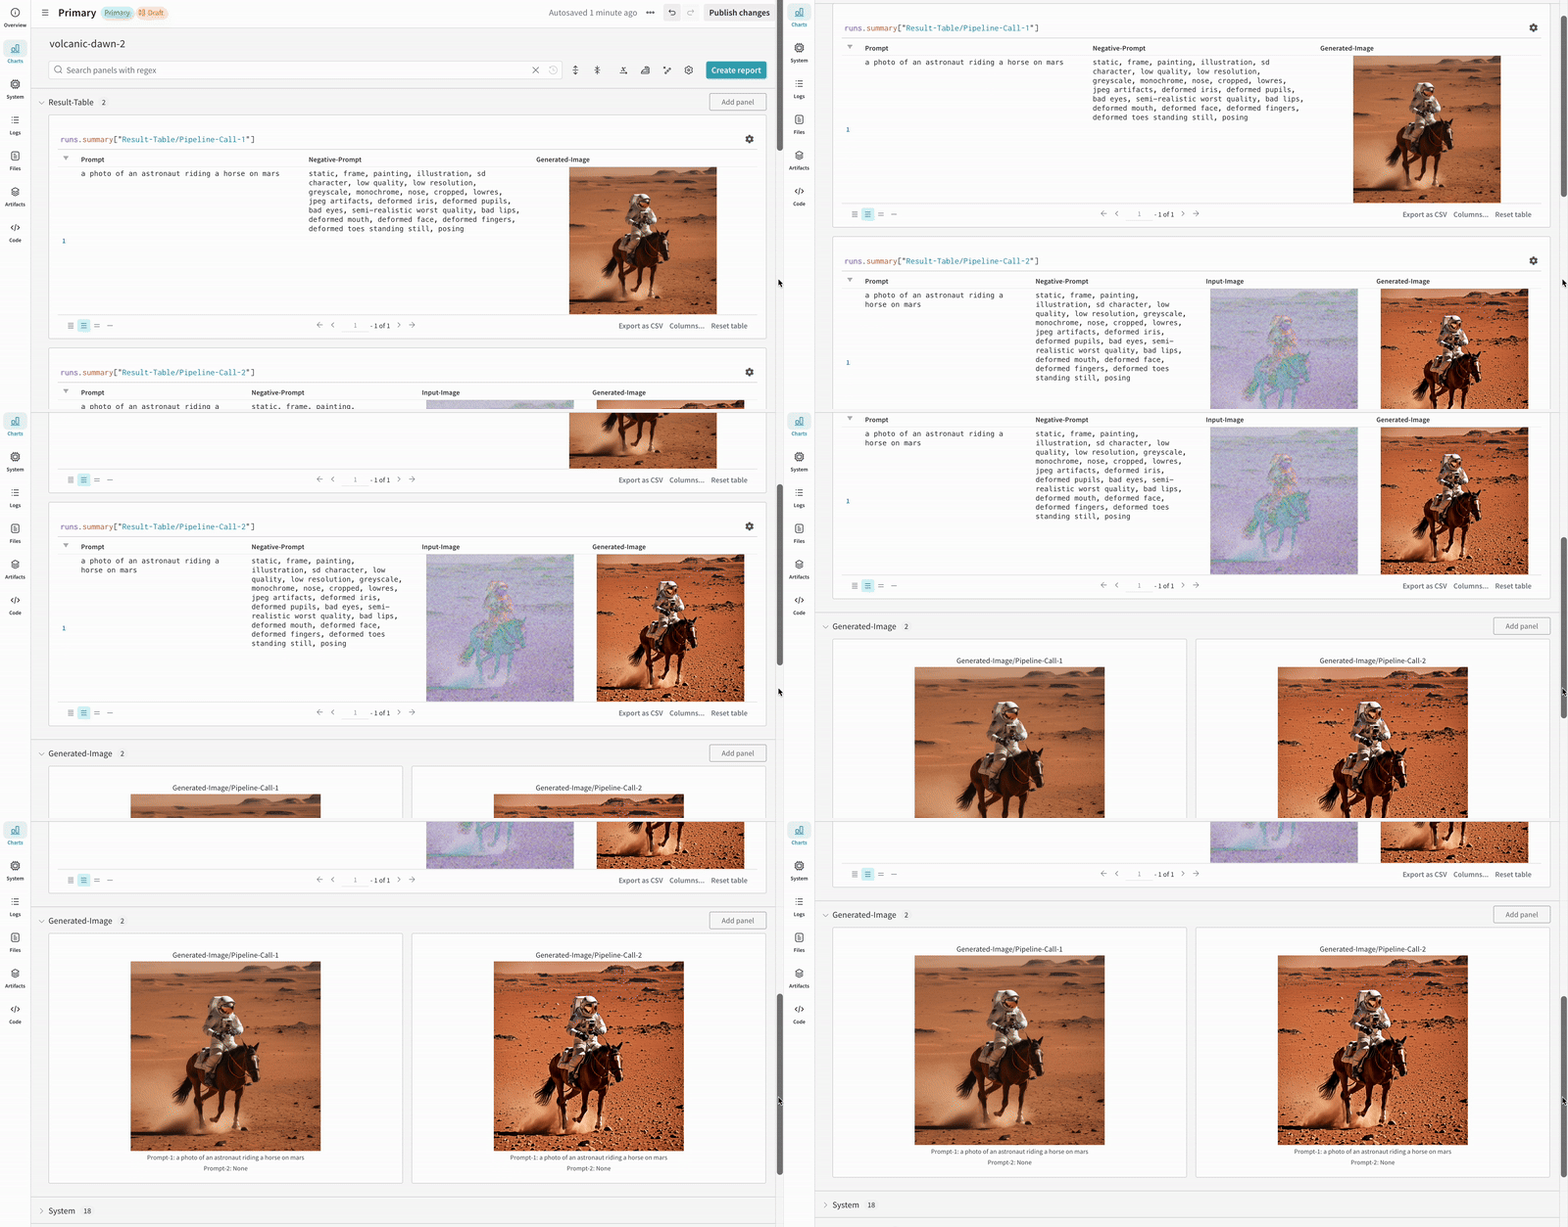
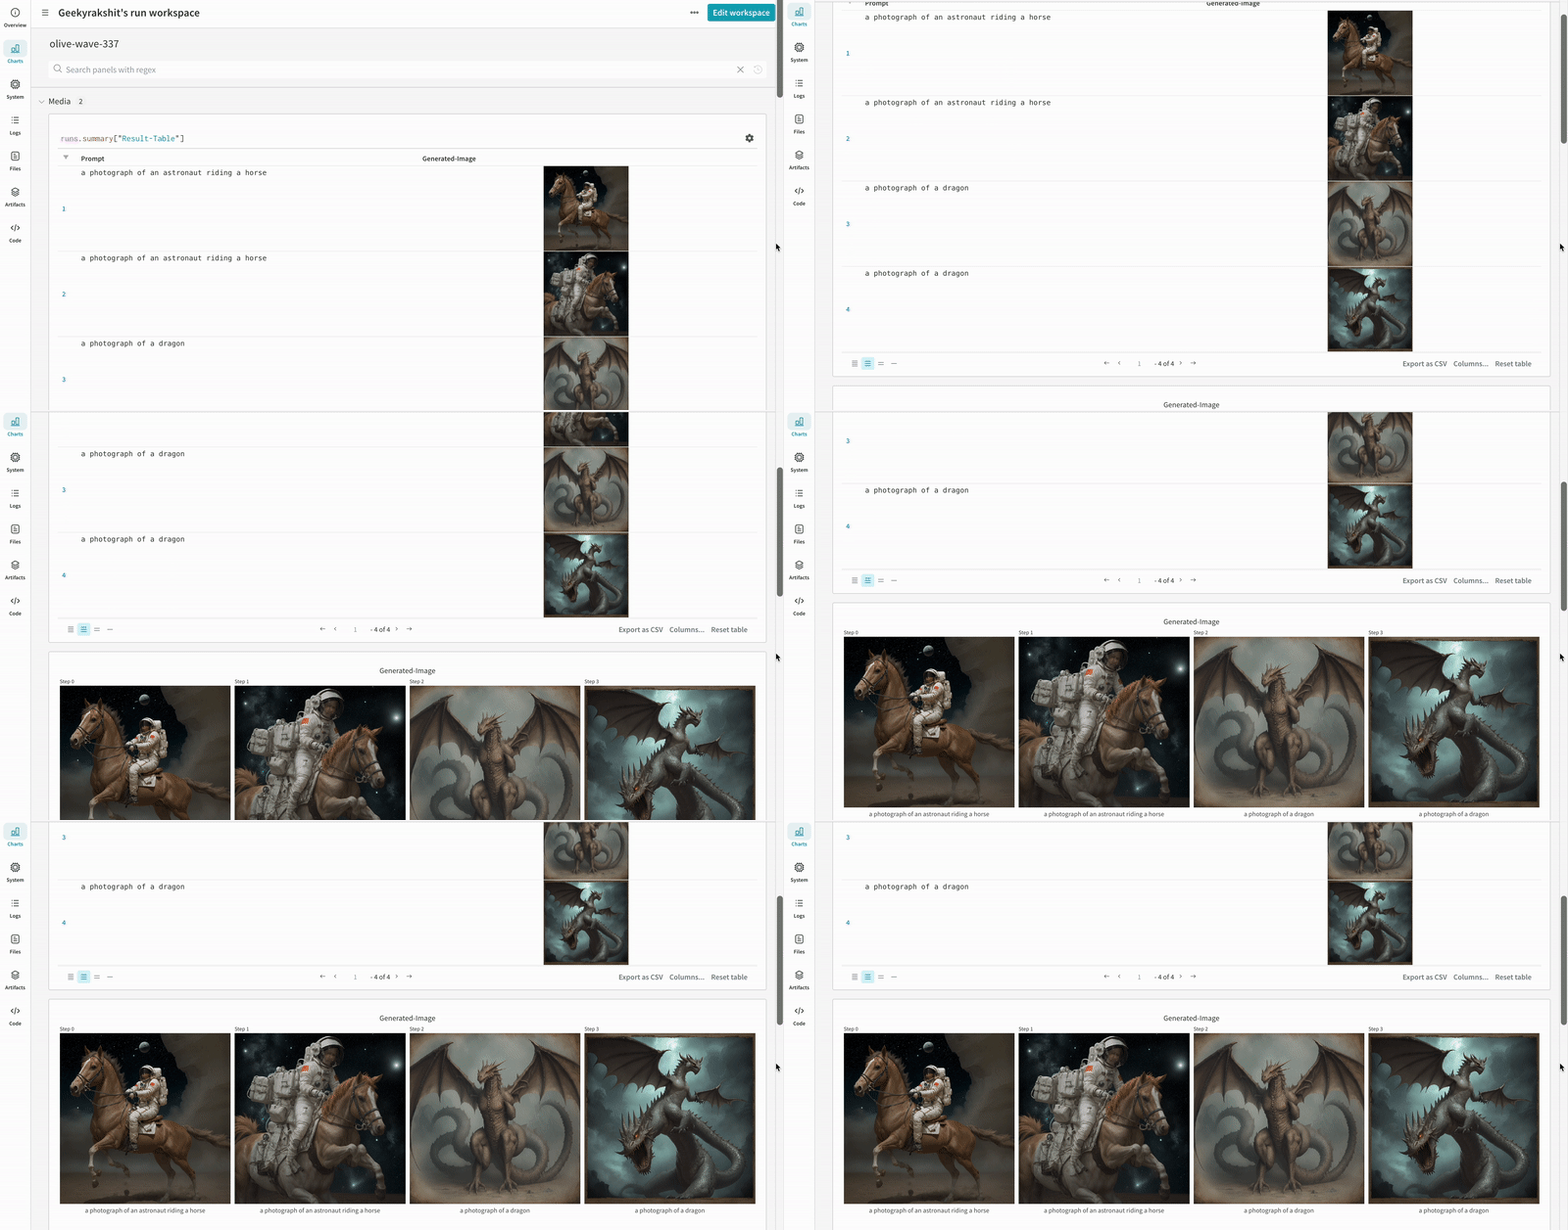
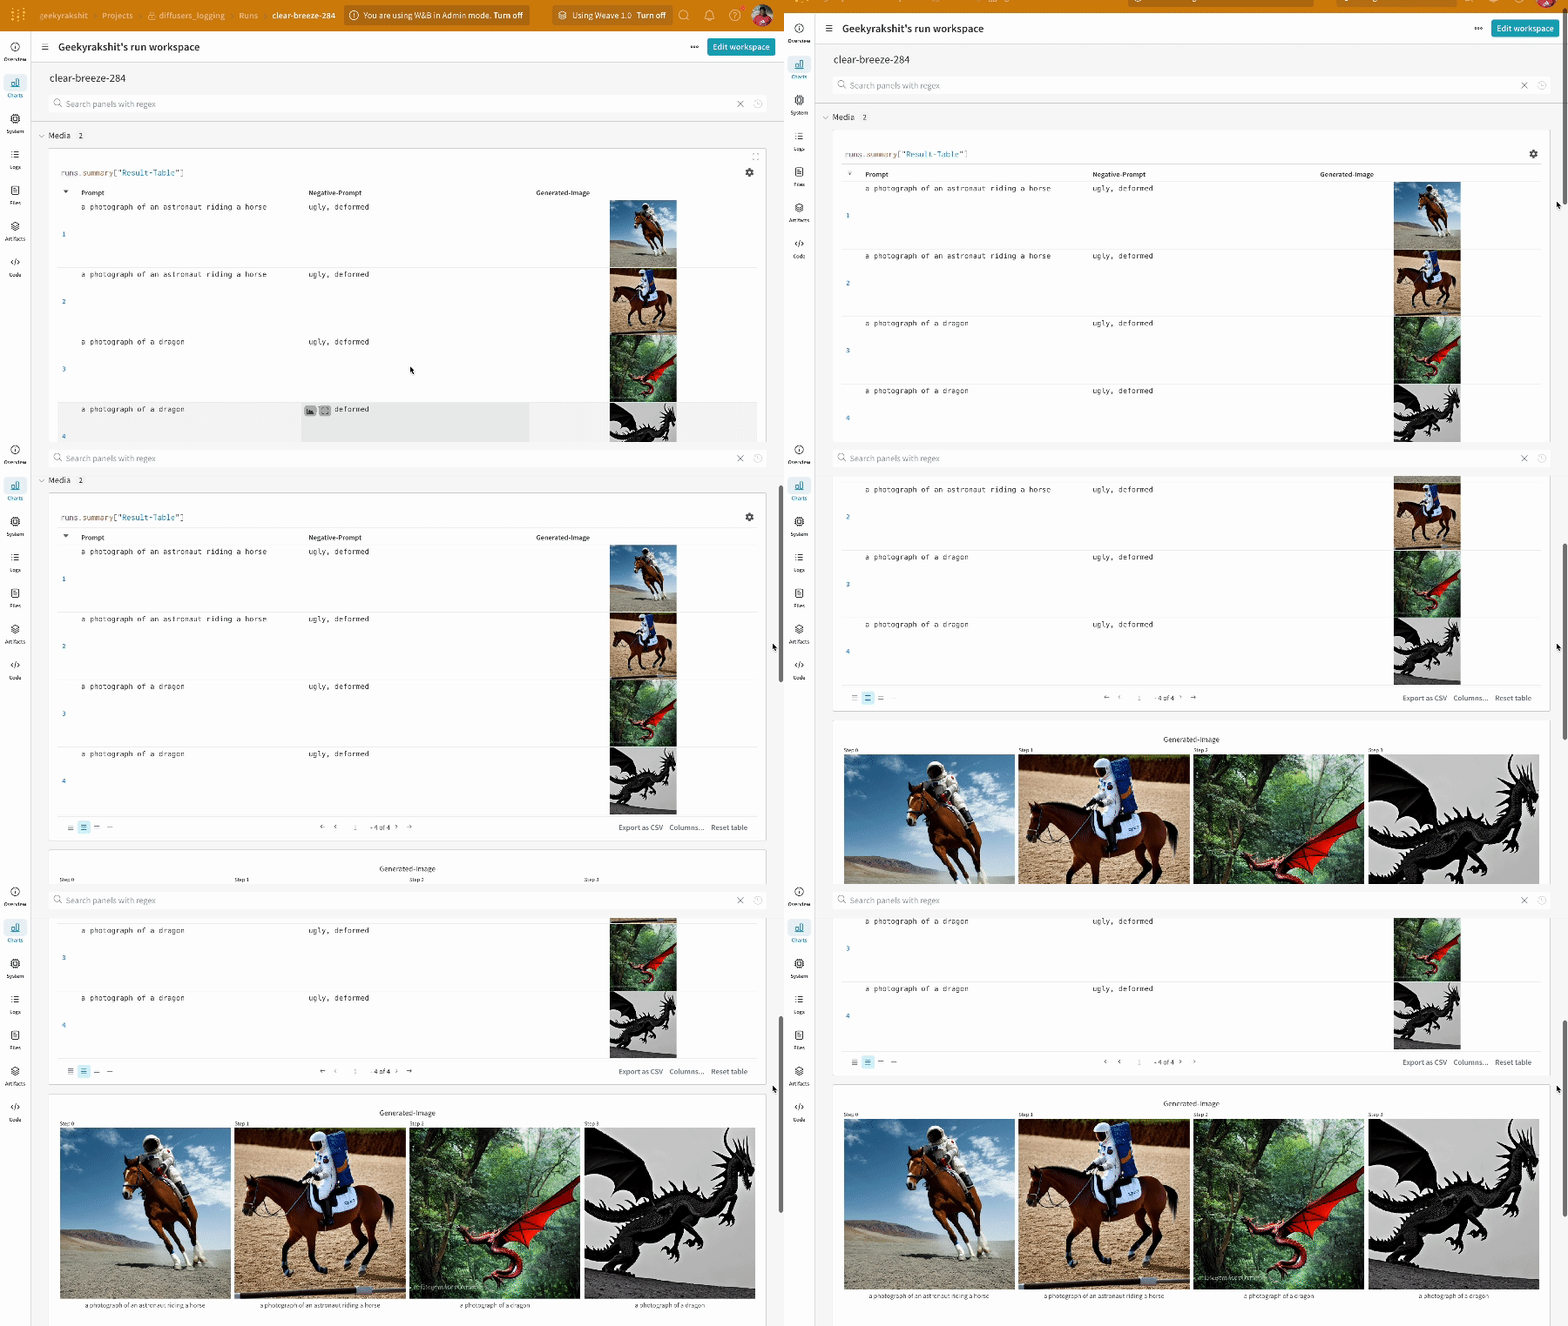
* 각 파이프라인 호출은 작업 공간의 개별 [table](/ko/products/wandb/tables)에 추적되며, 파이프라인 호출에 연결된 설정은 해당 run의 설정에 있는 워크플로 목록에 추가됩니다.
* 프롬프트, 네거티브 프롬프트, 생성된 미디어는 [`wandb.Table`](/ko/products/wandb/tables)에 로깅됩니다.
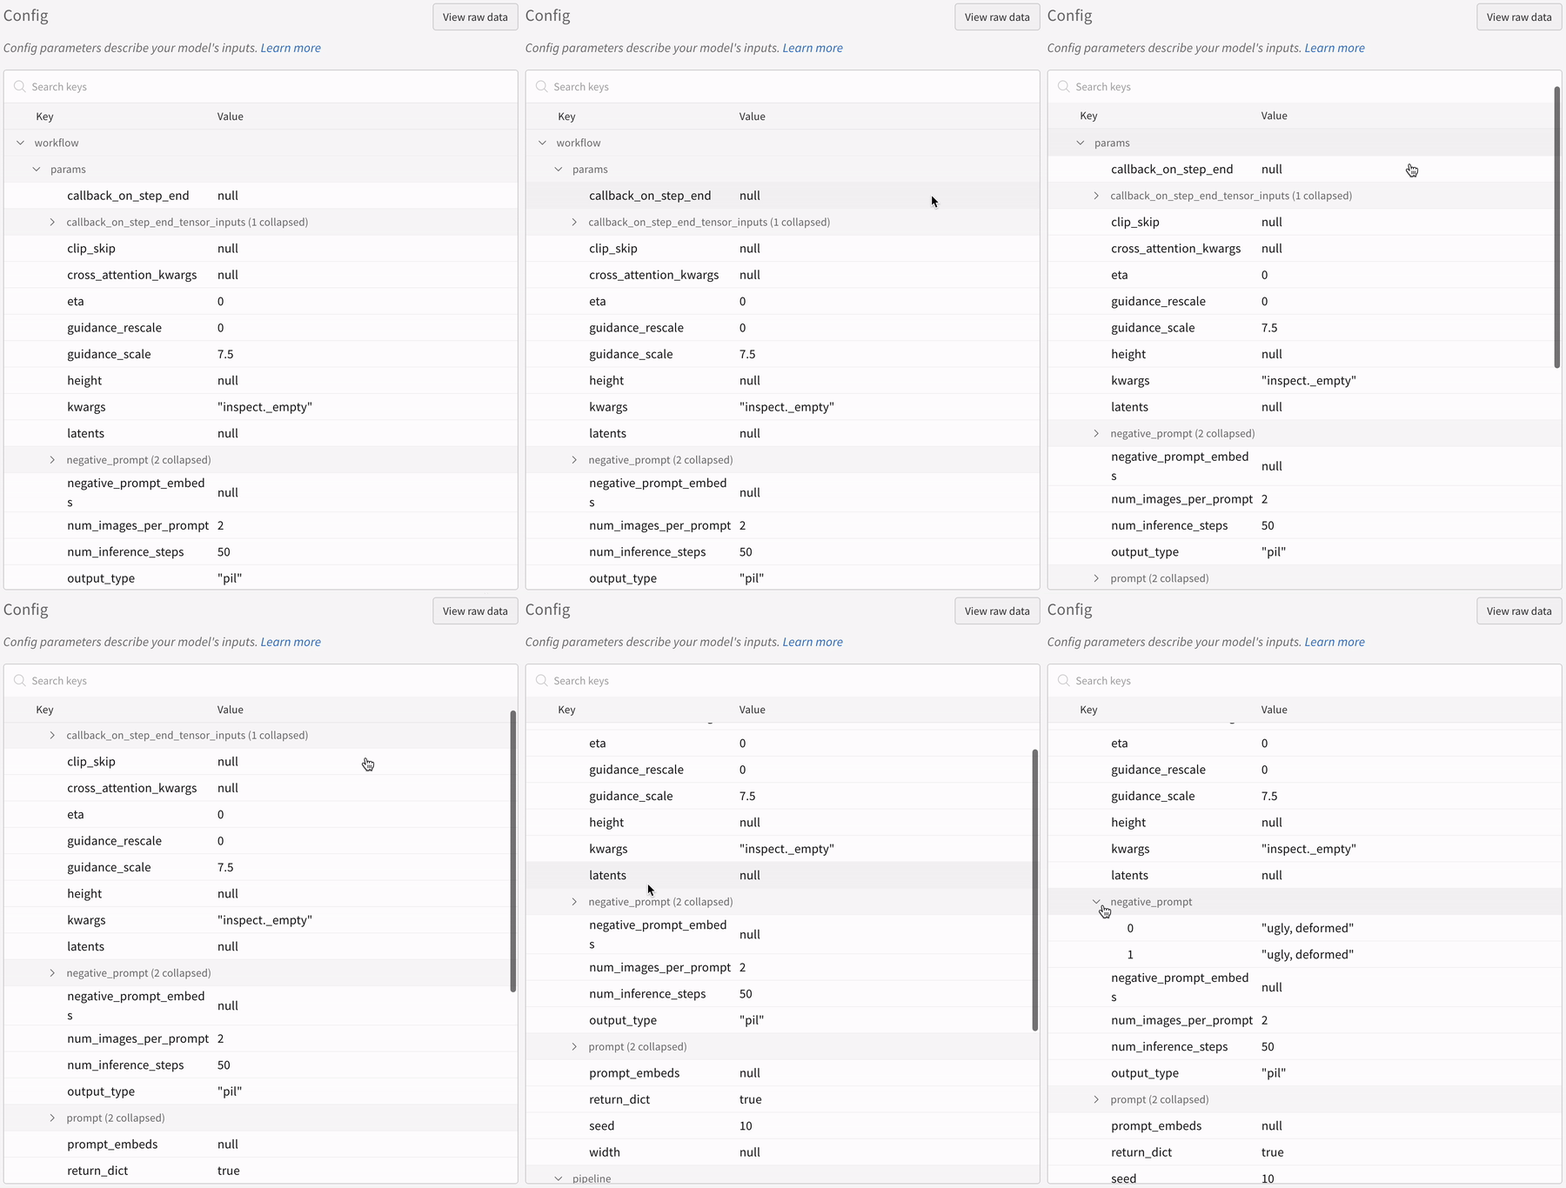
* 시드와 파이프라인 아키텍처를 비롯하여 실험에 연결된 다른 모든 설정은 run의 설정 섹션에 저장됩니다.
* 각 파이프라인 호출에서 생성된 미디어는 run의 [미디어 패널](/ko/products/wandb/track/log/media)에도 로깅됩니다.
[지원되는 파이프라인 호출 목록](https://github.com/wandb/wandb/blob/main/wandb/integration/diffusers/autologger.py#L12-L72)을 확인하세요. 이 인테그레이션의 새 기능을 요청하거나 버그를 신고하려면 [Weights & Biases GitHub 이슈 페이지](https://github.com/wandb/wandb/issues)에서 이슈를 등록하세요.
예시
다음 예시에서는 일반적인 확산 워크플로에서 `autolog`를 사용하는 방법을 보여 줍니다. 이를 참고하여 자신의 파이프라인에 맞게 활용하세요.
autolog 예시
다음은 `autolog`의 전체 과정 예시입니다:
```python theme={"system"}
import torch
from diffusers import DiffusionPipeline
# autolog 함수를 임포트합니다
from wandb.integration.diffusers import autolog
# 파이프라인을 호출하기 전에 autolog를 호출합니다
autolog(init=dict(project="diffusers_logging"))
# 확산 파이프라인을 초기화합니다
pipeline = DiffusionPipeline.from_pretrained(
"stabilityai/stable-diffusion-2-1", torch_dtype=torch.float16
).to("cuda")
# 프롬프트, 네거티브 프롬프트, 시드를 정의합니다.
prompt = ["a photograph of an astronaut riding a horse", "a photograph of a dragon"]
negative_prompt = ["ugly, deformed", "ugly, deformed"]
generator = torch.Generator(device="cpu").manual_seed(10)
# 파이프라인을 호출하여 이미지를 생성합니다
images = pipeline(
prompt,
negative_prompt=negative_prompt,
num_images_per_prompt=2,
generator=generator,
)
```
```python theme={"system"}
import torch
from diffusers import DiffusionPipeline
import wandb
# autolog 함수를 임포트합니다
from wandb.integration.diffusers import autolog
run = wandb.init()
# 파이프라인을 호출하기 전에 autolog를 호출합니다
autolog(init=dict(project="diffusers_logging"))
# 확산 파이프라인을 초기화합니다
pipeline = DiffusionPipeline.from_pretrained(
"stabilityai/stable-diffusion-2-1", torch_dtype=torch.float16
).to("cuda")
# 프롬프트, 네거티브 프롬프트, 시드를 정의합니다.
prompt = ["a photograph of an astronaut riding a horse", "a photograph of a dragon"]
negative_prompt = ["ugly, deformed", "ugly, deformed"]
generator = torch.Generator(device="cpu").manual_seed(10)
# 파이프라인을 호출하여 이미지를 생성합니다
images = pipeline(
prompt,
negative_prompt=negative_prompt,
num_images_per_prompt=2,
generator=generator,
)
# 실험을 종료합니다
run.finish()
```
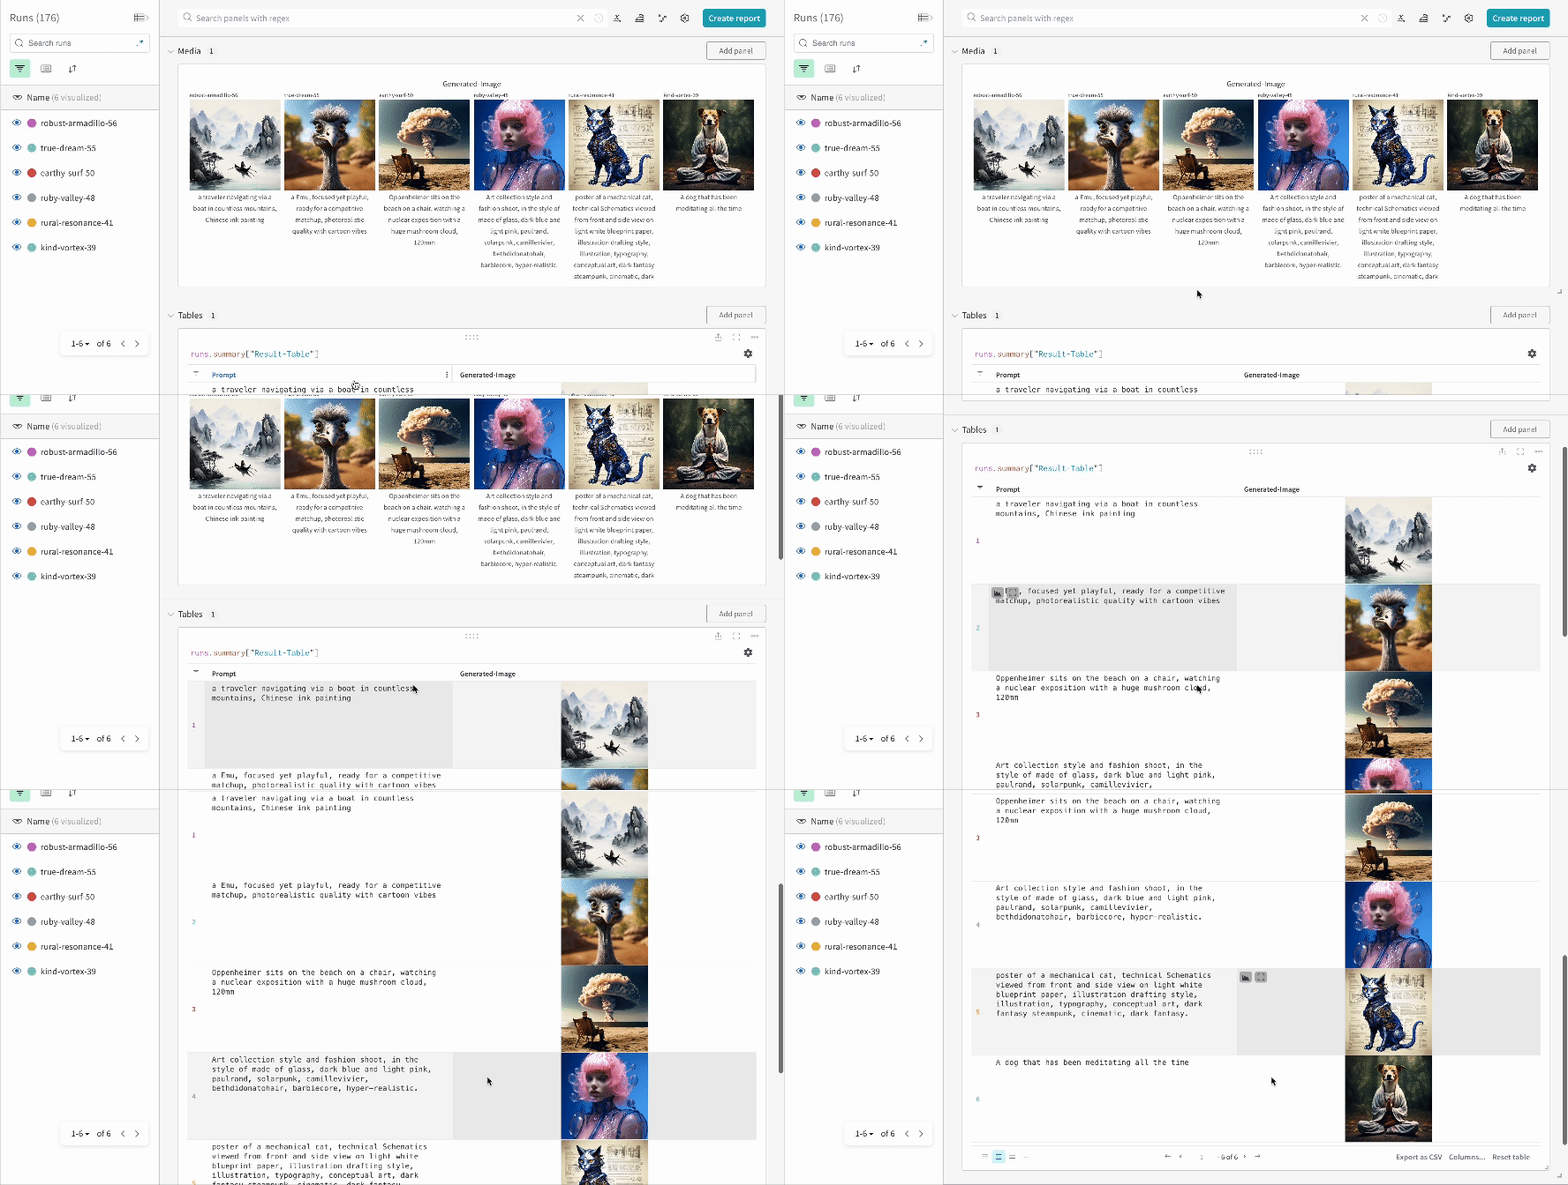
다음 이미지는 Weights & Biases에 로깅되는 내용을 보여줍니다:
* 단일 실험의 결과:
* 여러 실험의 결과:
* 실험의 설정:
IPython 노트북 환경에서 코드를 실행할 때는 파이프라인을 호출한 후 [`wandb.Run.finish()`](/ko/products/wandb/ref/python/functions/finish)을 명시적으로 호출해야 합니다. Python 스크립트를 실행할 때는 필요하지 않습니다.
멀티 파이프라인 워크플로 추적하기
다음 예시는 일반적인 [Stable Diffusion XL + Refiner](https://huggingface.co/docs/diffusers/using-diffusers/sdxl#base-to-refiner-model) 워크플로에서 `autolog`를 사용하는 방법을 보여 줍니다. 이 워크플로에서는 [`StableDiffusionXLPipeline`](https://huggingface.co/docs/diffusers/api/pipelines/stable_diffusion/stable_diffusion_xl)이 생성한 latent를 refiner가 정제합니다.
```python theme={"system"}
import torch
from diffusers import StableDiffusionXLImg2ImgPipeline, StableDiffusionXLPipeline
from wandb.integration.diffusers import autolog
# SDXL 기본 파이프라인을 초기화합니다
base_pipeline = StableDiffusionXLPipeline.from_pretrained(
"stabilityai/stable-diffusion-xl-base-1.0",
torch_dtype=torch.float16,
variant="fp16",
use_safetensors=True,
)
base_pipeline.enable_model_cpu_offload()
# SDXL 리파이너 파이프라인을 초기화합니다
refiner_pipeline = StableDiffusionXLImg2ImgPipeline.from_pretrained(
"stabilityai/stable-diffusion-xl-refiner-1.0",
text_encoder_2=base_pipeline.text_encoder_2,
vae=base_pipeline.vae,
torch_dtype=torch.float16,
use_safetensors=True,
variant="fp16",
)
refiner_pipeline.enable_model_cpu_offload()
prompt = "a photo of an astronaut riding a horse on mars"
negative_prompt = "static, frame, painting, illustration, sd character, low quality, low resolution, greyscale, monochrome, nose, cropped, lowres, jpeg artifacts, deformed iris, deformed pupils, bad eyes, semi-realistic worst quality, bad lips, deformed mouth, deformed face, deformed fingers, deformed toes standing still, posing"
# 무작위성을 제어하여 실험을 재현할 수 있도록 합니다.
# 시드는 WandB에 자동으로 로깅됩니다.
seed = 42
generator_base = torch.Generator(device="cuda").manual_seed(seed)
generator_refiner = torch.Generator(device="cuda").manual_seed(seed)
# Diffusers용 WandB Autolog를 호출합니다. 이를 통해 프롬프트,
# 생성된 이미지, 파이프라인 아키텍처 및 모든 관련 실험 설정이
# W&B에 자동으로 로깅되어 이미지 생성 실험을
# 쉽게 재현하고 공유하고 분석할 수 있습니다.
autolog(init=dict(project="sdxl"))
# 기본 파이프라인을 호출하여 잠재 표현을 생성합니다
image = base_pipeline(
prompt=prompt,
negative_prompt=negative_prompt,
output_type="latent",
generator=generator_base,
).images[0]
# 리파이너 파이프라인을 호출하여 정제된 이미지를 생성합니다
image = refiner_pipeline(
prompt=prompt,
negative_prompt=negative_prompt,
image=image[None, :],
generator=generator_refiner,
).images[0]
```
```python theme={"system"}
import torch
from diffusers import StableDiffusionXLImg2ImgPipeline, StableDiffusionXLPipeline
import wandb
from wandb.integration.diffusers import autolog
run = wandb.init()
# SDXL 기본 파이프라인을 초기화합니다
base_pipeline = StableDiffusionXLPipeline.from_pretrained(
"stabilityai/stable-diffusion-xl-base-1.0",
torch_dtype=torch.float16,
variant="fp16",
use_safetensors=True,
)
base_pipeline.enable_model_cpu_offload()
# SDXL 리파이너 파이프라인을 초기화합니다
refiner_pipeline = StableDiffusionXLImg2ImgPipeline.from_pretrained(
"stabilityai/stable-diffusion-xl-refiner-1.0",
text_encoder_2=base_pipeline.text_encoder_2,
vae=base_pipeline.vae,
torch_dtype=torch.float16,
use_safetensors=True,
variant="fp16",
)
refiner_pipeline.enable_model_cpu_offload()
prompt = "a photo of an astronaut riding a horse on mars"
negative_prompt = "static, frame, painting, illustration, sd character, low quality, low resolution, greyscale, monochrome, nose, cropped, lowres, jpeg artifacts, deformed iris, deformed pupils, bad eyes, semi-realistic worst quality, bad lips, deformed mouth, deformed face, deformed fingers, deformed toes standing still, posing"
# 무작위성을 제어하여 실험을 재현할 수 있도록 합니다.
# 시드는 WandB에 자동으로 로깅됩니다.
seed = 42
generator_base = torch.Generator(device="cuda").manual_seed(seed)
generator_refiner = torch.Generator(device="cuda").manual_seed(seed)
# Diffusers용 WandB Autolog를 호출합니다. 이를 통해 프롬프트,
# 생성된 이미지, 파이프라인 아키텍처 및 모든 관련 실험 설정이
# W&B에 자동으로 로깅되어 이미지 생성 실험을
# 쉽게 재현하고 공유하고 분석할 수 있습니다.
autolog(init=dict(project="sdxl"))
# 기본 파이프라인을 호출하여 잠재 표현을 생성합니다
image = base_pipeline(
prompt=prompt,
negative_prompt=negative_prompt,
output_type="latent",
generator=generator_base,
).images[0]
# 리파이너 파이프라인을 호출하여 정제된 이미지를 생성합니다
image = refiner_pipeline(
prompt=prompt,
negative_prompt=negative_prompt,
image=image[None, :],
generator=generator_refiner,
).images[0]
# 실험을 종료합니다
run.finish()
```
다음 이미지는 Stable Diffusion XL + Refiner 실험의 예시입니다.
추가 자료
* [Stable Diffusion 프롬프트 엔지니어링 가이드](https://forge.coreweave.com/wandb/geekyrakshit/diffusers-prompt-engineering/reports/A-Guide-to-Prompt-Engineering-for-Stable-Diffusion--Vmlldzo1NzY4NzQ3)
* [PIXART-α: A Diffusion Transformer 모델 for Text-to-Image Generation](https://forge.coreweave.com/wandb/geekyrakshit/pixart-alpha/reports/PIXART-A-Diffusion-Transformer-Model-for-Text-to-Image-Generation--Vmlldzo2MTE1NzM3)
 * 여러 실험의 결과:
 * 실험의 설정: