> ## Documentation Index
> Fetch the complete documentation index at: https://docs.coreweave.com/llms.txt
> Use this file to discover all available pages before exploring further.
# Playground UI에서 모델 사용해 보기
> 웹 인터페이스에서 Serverless Inference 모델에 액세스합니다
웹 UI에서 Serverless Inference 서비스를 사용하는 방법을 알아봅니다. 이 가이드에서는 서비스에 액세스하는 방법, 사용 가능한 모델을 둘러보고 비교하는 방법, Playground에서 모델을 사용해 보는 방법을 설명합니다. 코드를 작성하지 않고 대화형으로 모델을 살펴보려면 UI를 사용하세요.
사전 요구 사항
UI를 사용하기 전에 다음 작업을 완료하세요.
* [계정을 생성하세요](/ko/products/wandb/quickstart#create-an-account).
* [API 키를 생성하세요](/ko/products/wandb/quickstart#create-an-api-key).
* Weights & Biases 프로젝트가 필요합니다. 사용량을 추적하려면 CoreWeave Forge 계정에서 프로젝트를 생성하세요. 프로젝트를 지정하지 않으면 Serverless Inference는 기본 팀과 `inference`라는 프로젝트 이름을 사용합니다.
Serverless Inference 서비스 액세스
[https://forge.coreweave.com/inference](https://forge.coreweave.com/inference)에서 Serverless Inference를 시작하세요.
Models
사용 가능한 Serverless Inference 모델을 확인하려면 Serverless Inference 사이드바 메뉴에서 `Models`를 선택하거나 [https://forge.coreweave.com/inference/models](https://forge.coreweave.com/inference/models)로 이동하세요.
모델 이름을 더블 클릭하면 가격, 기능, 사용 예시 코드 등 모델 세부 정보를 확인할 수 있습니다.
모델 세부 정보 페이지에서는 다음 작업을 할 수 있습니다.
* `Compare`를 클릭하면 이 모델의 세부 정보를 하나 이상의 다른 모델과 나란히 놓고 전체 항목을 비교할 수 있습니다.
* `Playground`를 클릭하면 Playground에서 이 모델을 직접 사용해 볼 수 있습니다.
Models 테이블에서 해당 모델 행의 작업 메뉴를 사용해 모델을 바로 비교할 수도 있습니다.
Playground
Serverless Inference 모델을 사용해 보려면 Serverless Inference 사이드바 메뉴에서 `Playground`를 선택하거나 [https://forge.coreweave.com/inference/playground](https://forge.coreweave.com/inference/playground)로 이동하세요.
제목 툴바의 모델 드롭다운에서 테스트할 모델을 선택하세요.
Dedicated Inference 배포를 설정해 두었다면 Playground를 [Dedicated Inference](/products/inference/dedicated) 배포에 연결할 수도 있습니다.
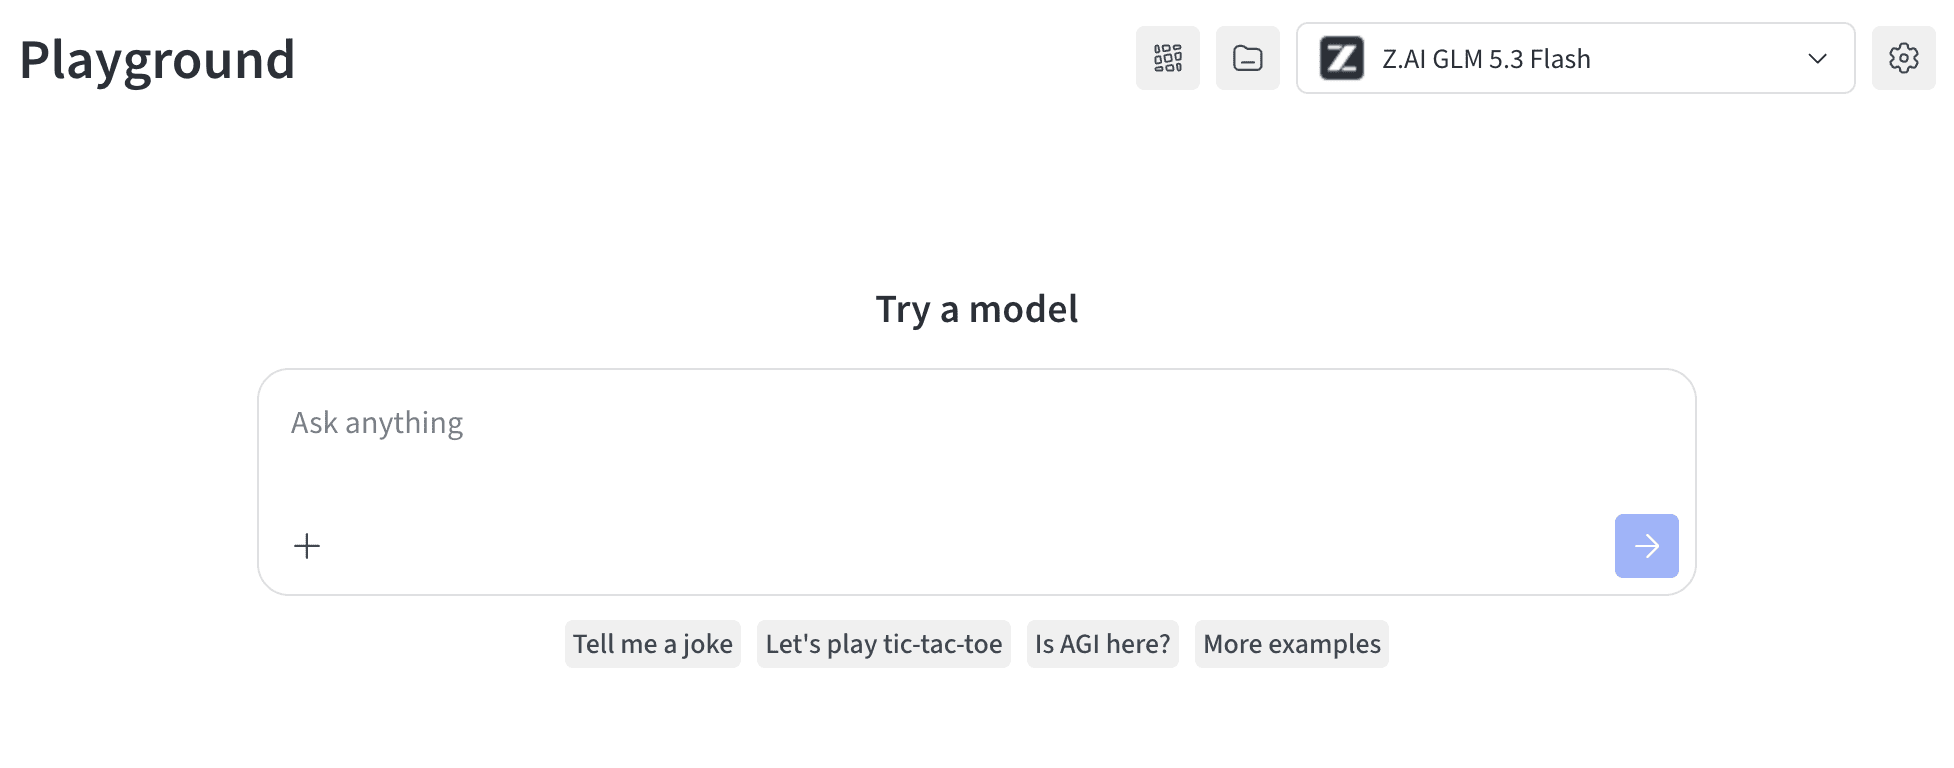 이 밖에도 Playground 제목 툴바에서 다음 작업을 할 수 있습니다.
* Weave 트레이싱을 활성화하거나 비활성화합니다. 활성화하면 대화가 Weave에 기록되므로 나중에 분석하고 살펴볼 수 있습니다.
* 활성화하면 각 메시지 아래에 `View call` 링크가 표시되며, 이 링크를 클릭하면 해당 채팅의 트레이스 트리가 열립니다.
* 프로젝트를 선택합니다. 선택한 프로젝트에 Playground 대화가 연결됩니다. 설정하지 않으면 기본값인 `inference`가 사용됩니다.
* [Playground 설정을 수정합니다](#modify-playground-settings).
모델을 선택한 후에는 다른 곳에 통합하기 전에 Playground에서 모델을 테스트하면서 응답을 평가하고 동작을 조정할 수 있습니다. 메시지를 추가, 편집, 삭제할 수도 있습니다.
`Add a message` 입력 상자에서는 다음 작업도 할 수 있습니다.
* `Add image`: 파일에서 이미지를 업로드합니다.
* `Add image URL`: 이미지 URL을 연결합니다.
* `Specify role`: 작성 중인 메시지의 역할(`System`, `Assistant` 또는 `User`)을 지정합니다.
이 밖에도 Playground 제목 툴바에서 다음 작업을 할 수 있습니다.
* Weave 트레이싱을 활성화하거나 비활성화합니다. 활성화하면 대화가 Weave에 기록되므로 나중에 분석하고 살펴볼 수 있습니다.
* 활성화하면 각 메시지 아래에 `View call` 링크가 표시되며, 이 링크를 클릭하면 해당 채팅의 트레이스 트리가 열립니다.
* 프로젝트를 선택합니다. 선택한 프로젝트에 Playground 대화가 연결됩니다. 설정하지 않으면 기본값인 `inference`가 사용됩니다.
* [Playground 설정을 수정합니다](#modify-playground-settings).
모델을 선택한 후에는 다른 곳에 통합하기 전에 Playground에서 모델을 테스트하면서 응답을 평가하고 동작을 조정할 수 있습니다. 메시지를 추가, 편집, 삭제할 수도 있습니다.
`Add a message` 입력 상자에서는 다음 작업도 할 수 있습니다.
* `Add image`: 파일에서 이미지를 업로드합니다.
* `Add image URL`: 이미지 URL을 연결합니다.
* `Specify role`: 작성 중인 메시지의 역할(`System`, `Assistant` 또는 `User`)을 지정합니다.
Playground 설정 수정
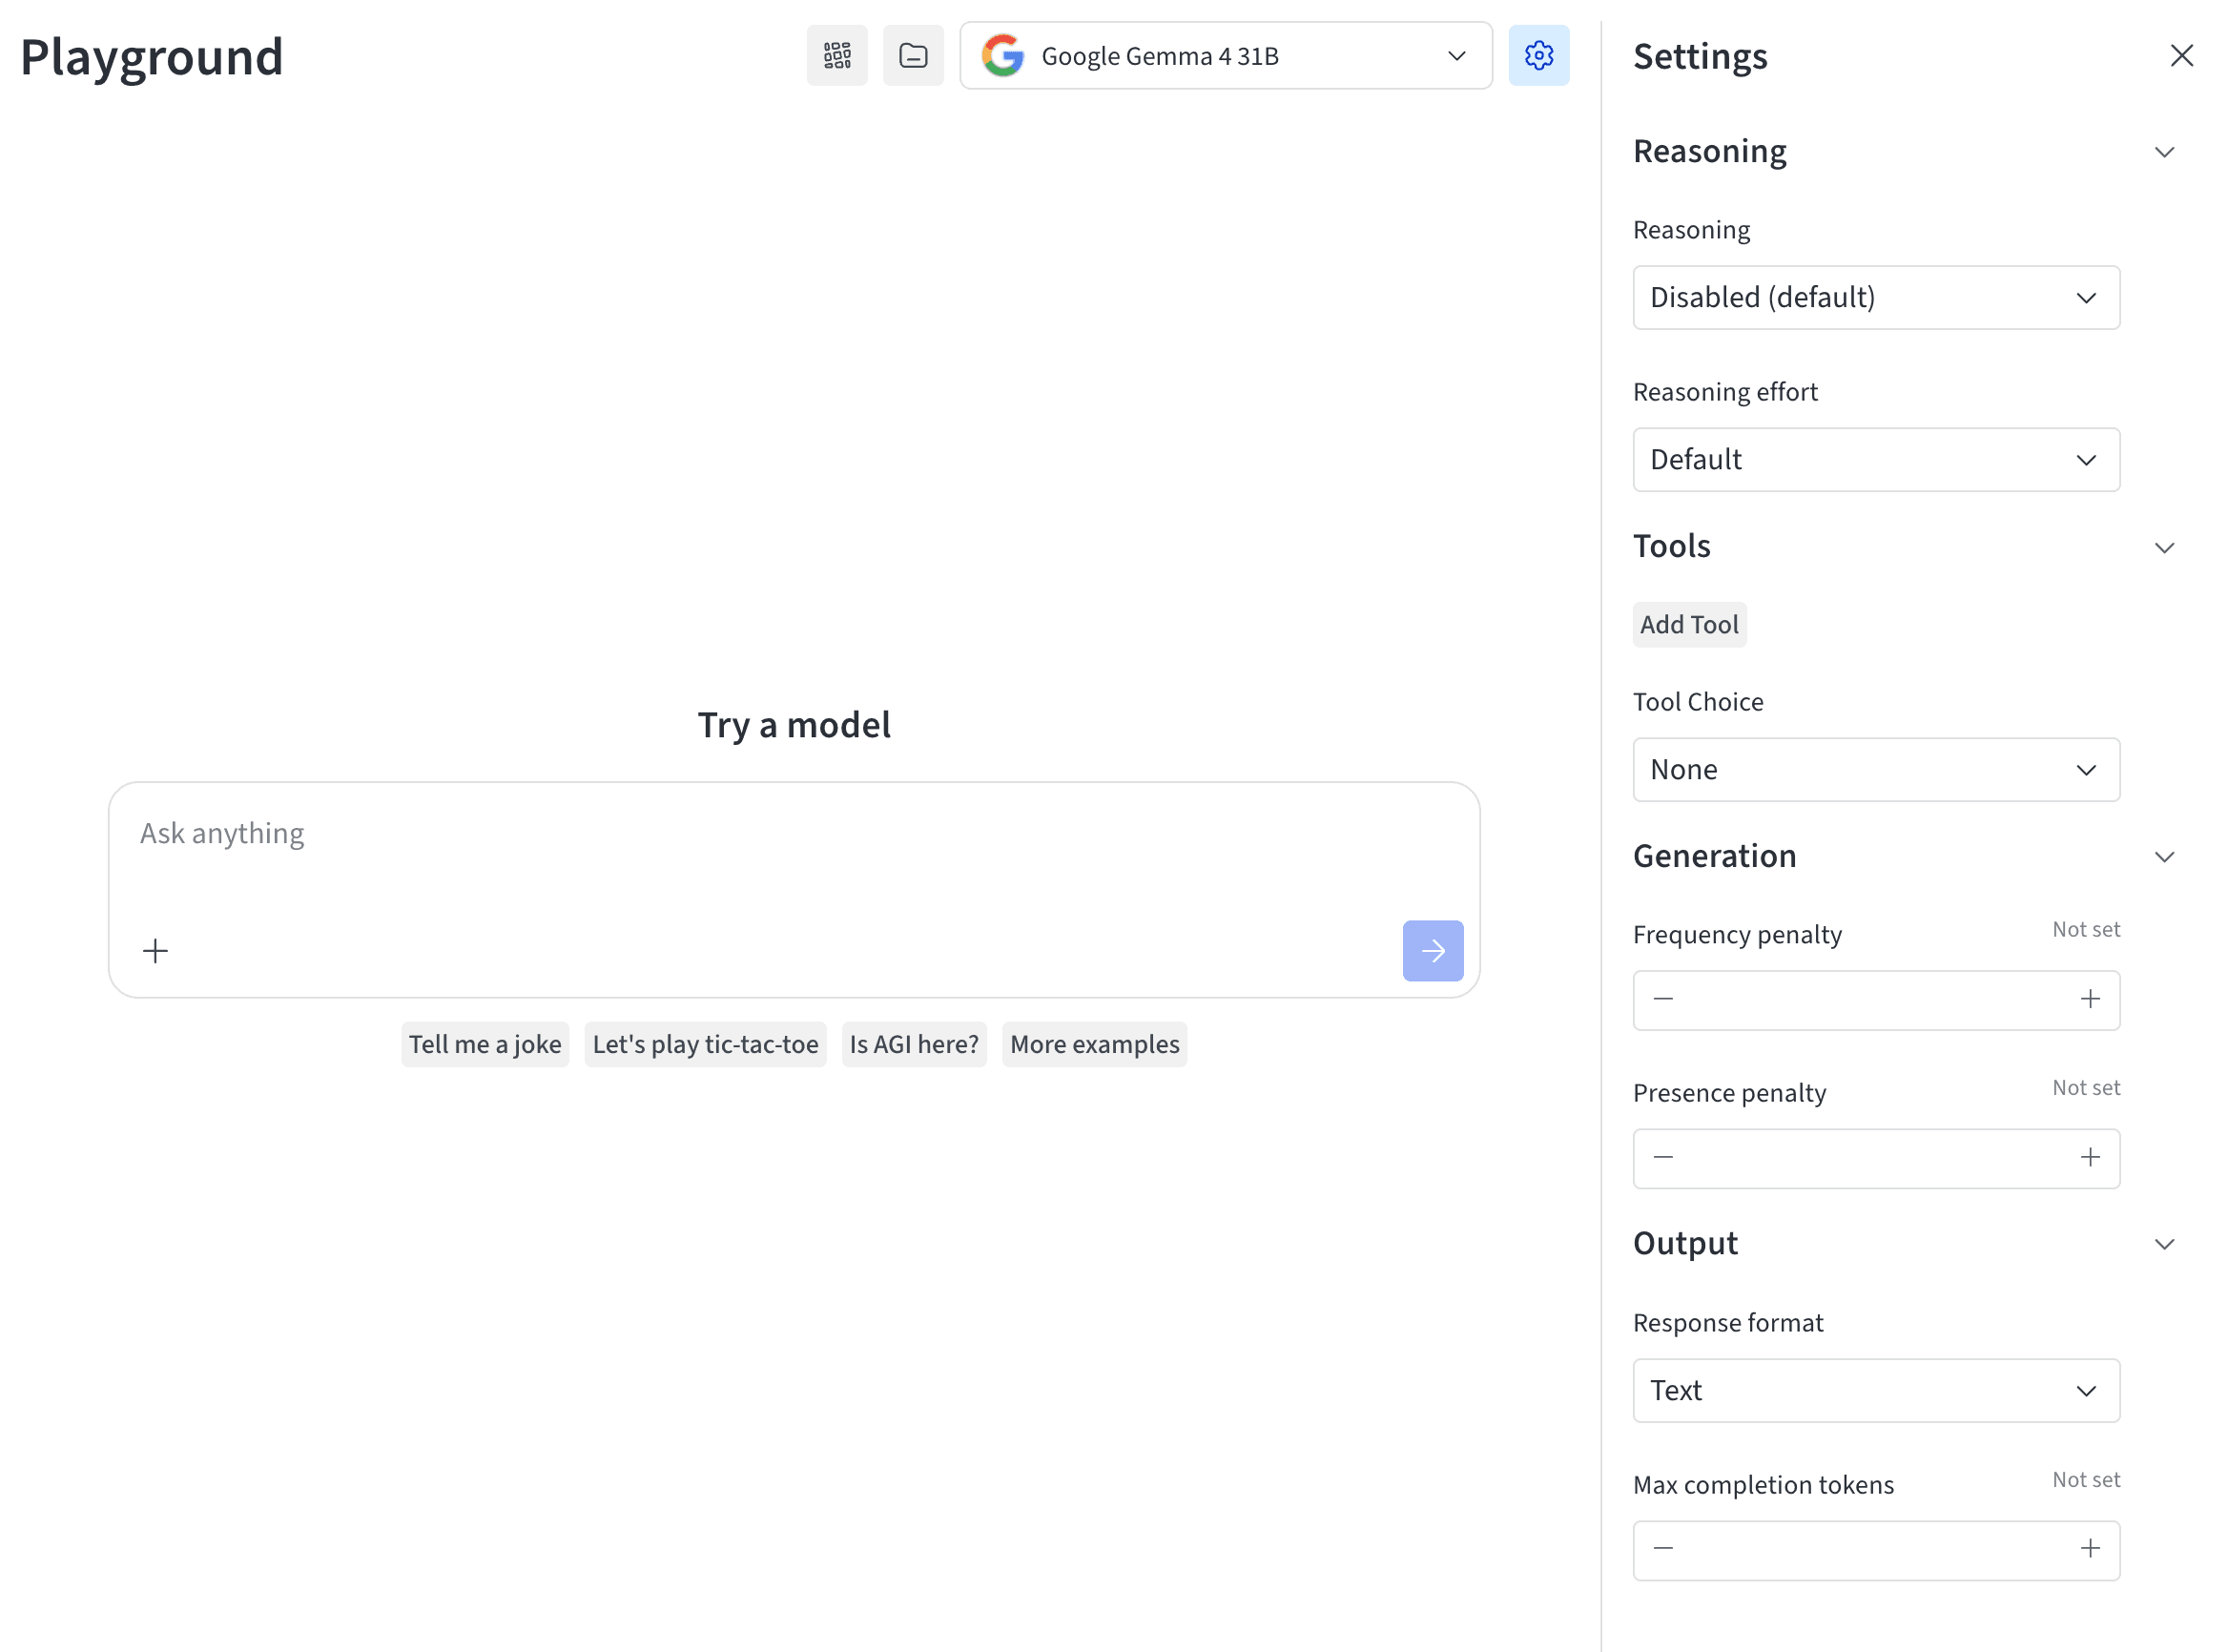
제목 툴바에서 **Settings** 아이콘을 클릭하여 설정 드로어를 여세요. 드로어는 접을 수 있는 네 개의 섹션으로 구성되어 있습니다.
 **Reasoning**
* **Reasoning**: 모델이 최종 답변 전에 추론을 생성할지 여부를 제어합니다. 추론이 항상 켜져 있거나 추론을 지원하지 않는 모델에서는 설정할 수 없습니다.
* **Reasoning effort**: 모델이 추론에 들이는 노력의 정도를 제어합니다. 값을 높이면 지연 시간과 토큰 사용량이 늘어날 수 있습니다.
**Tools**
* **Add Tool**: 모델이 호출할 수 있는 함수를 정의합니다. 함수에는 이름, 설명, JSON Schema 형식의 매개변수를 지정합니다.
* **Tool Choice**: 모델이 도구를 호출하지 못하게 할지, 호출 여부를 스스로 선택하게 할지, 반드시 하나를 호출하게 할지를 제어합니다.
**Generation**
* **Frequency penalty**: 토큰이 이미 등장한 횟수에 비례하여 페널티를 부여합니다. 양수 값은 같은 표현이 그대로 반복되는 것을 줄이고, 음수 값은 반복을 유도합니다.
* **Presence penalty**: 한 번이라도 등장한 토큰에 페널티를 부여합니다. 양수 값은 새로운 주제를 다루도록 유도하고, 음수 값은 기존 주제로 돌아가도록 유도합니다.
**Output**
* **Response format**: 모델이 일반 텍스트, 유효한 JSON 객체, 제공된 JSON Schema에 맞는 출력 중 어떤 형식으로 반환할지 제어합니다.
* **Max completion tokens**: 생성되는 토큰 수의 상한을 설정합니다. 이 상한에는 화면에 표시되는 출력과 추론 토큰이 모두 포함됩니다.
**Reasoning**
* **Reasoning**: 모델이 최종 답변 전에 추론을 생성할지 여부를 제어합니다. 추론이 항상 켜져 있거나 추론을 지원하지 않는 모델에서는 설정할 수 없습니다.
* **Reasoning effort**: 모델이 추론에 들이는 노력의 정도를 제어합니다. 값을 높이면 지연 시간과 토큰 사용량이 늘어날 수 있습니다.
**Tools**
* **Add Tool**: 모델이 호출할 수 있는 함수를 정의합니다. 함수에는 이름, 설명, JSON Schema 형식의 매개변수를 지정합니다.
* **Tool Choice**: 모델이 도구를 호출하지 못하게 할지, 호출 여부를 스스로 선택하게 할지, 반드시 하나를 호출하게 할지를 제어합니다.
**Generation**
* **Frequency penalty**: 토큰이 이미 등장한 횟수에 비례하여 페널티를 부여합니다. 양수 값은 같은 표현이 그대로 반복되는 것을 줄이고, 음수 값은 반복을 유도합니다.
* **Presence penalty**: 한 번이라도 등장한 토큰에 페널티를 부여합니다. 양수 값은 새로운 주제를 다루도록 유도하고, 음수 값은 기존 주제로 돌아가도록 유도합니다.
**Output**
* **Response format**: 모델이 일반 텍스트, 유효한 JSON 객체, 제공된 JSON Schema에 맞는 출력 중 어떤 형식으로 반환할지 제어합니다.
* **Max completion tokens**: 생성되는 토큰 수의 상한을 설정합니다. 이 상한에는 화면에 표시되는 출력과 추론 토큰이 모두 포함됩니다.
다음 단계
* [결제 및 사용량](/ko/products/inference/serverless/usage-limits#view-billing-and-usage-information)을 확인하세요.
* [사용 가능한 모델](/ko/products/inference/serverless/models)을 살펴보고 요구 사항에 가장 적합한 모델을 찾아보세요.
* 프로그래밍 방식으로 액세스하려면 [API](/ko/products/inference/serverless/api-reference)를 사용해 보세요.
* 코드 샘플은 [사용 예시](/ko/products/inference/serverless/examples)를 참조하세요.