> ## Documentation Index
> Fetch the complete documentation index at: https://docs.coreweave.com/llms.txt
> Use this file to discover all available pages before exploring further.
# カスタムモニターを設定する
> 本番トラフィックをパッシブにスコアリングし、傾向や問題を明らかにします
カスタムモニターは、本番トラフィックをモニタリングするための従来の手法です。新たに実装する場合は、Weave for Agents の **Signals** を使用してください。詳しくは、[エージェントのシグナルを表示する](/ja/products/wandb/weave/guides/tracking/view-agent-signals)を参照してください。
このページでは、W\&B Weave でカスタムモニターを設定し、本番トラフィックをパッシブにスコアリングして LLM アプリケーションの傾向や問題を明らかにする方法を説明します。Weave のプリセットのシグナルだけでなく、本番トレースに独自の評価基準を定義したい場合に、このガイドを参照してください。
モニターは LLM ジャッジモデルを使用して本番トラフィックをパッシブにスコアリングし、LLM アプリケーションの傾向や問題を明らかにします。たとえば、アプリケーションの応答が正確かどうか、役に立っているかどうかを監視したり、ユーザーの入力を監視して、ユーザーがエージェントにどのようなことを尋ねているかの傾向を把握したりできます。モニターはすべてのスコアリング結果を Weave のデータベースに自動で保存するため、過去の傾向やパターンを分析できます。
アプリケーションの入力と出力に含まれるテキスト、画像、オーディオを監視できます。
モニターの導入にあたって、アプリケーションのコードを変更する必要はありません。設定は Weights & Biases の UI で行います。
スコアに基づいてアプリケーションの動作に能動的に介入する必要がある場合は、代わりに[ガードレール](/ja/products/wandb/weave/guides/evaluation/guardrails)を使用してください。
シグナルとカスタムモニター
本番トレース向けのプリセットの自動Scorerである[シグナル](/ja/products/wandb/weave/guides/evaluation/monitors)を使用すると、本番モニタリングをすばやく開始できます。そのうえで、アプリケーション固有の評価基準に応じてカスタムモニターを追加してください。
| | シグナル | カスタムモニター |
| - | - | - |
| **設定** | ワンクリックで有効化でき、プロンプトの作成は不要 | スコアリング プロンプト、モデル、パラメーターを自由に設定可能 |
| **スコープ** | プリセットの品質分類器とエラー分類器 | ユーザーが定義する任意の評価基準 |
| **トレースの選択** | 自動 (品質には成功したルートトレース、エラーには失敗したトレースを使用) | 操作、フィルター、サンプリング率を設定可能 |
| **モデル** | Serverless Inference (プリセット) | 任意の商用モデルまたは Serverless Inference モデル |
| **ユースケース** | 実績のある分類器による迅速な本番モニタリング | アプリケーション固有のカスタム評価基準 |
Weave でモニターを作成する
Weave でカスタムモニターを作成するには、次の手順を実行します。
1. [Weights & Biases UI](https://forge.coreweave.com/wandb) を開き、Weights & Biases の project を開きます。
2. Weave のサイドバーで **Monitors** を選択し、**+ New Monitor** ボタンを選択します。**Create new monitor** モーダルダイアログが開きます。
3. **Create new monitor** メニューで、次のフィールドを設定します。
* **Name**: 先頭は英字または数字にする必要があります。英字、数字、ハイフン、アンダースコアを使用できます。
* **Description** (オプション): モニターの機能を説明します。
* **Active monitor** トグル: モニターのオンとオフを切り替えます。
* **Calls to monitor**:
* **Operations**: 監視する `@weave.op` を 1 つ以上選択します。Op を使用可能な Op の一覧に表示するには、その Op を使用するトレースを少なくとも 1 つログしておく必要があります。
* **Filter** (オプション): 対象とする Call を絞り込みます (例: `max_tokens` や `top_p` で絞り込む)。
* **サンプリング率**: スコアリングする Call の割合 (0% ~ 100%) です。
スコアリングの Call ごとにコストが発生するため、サンプリング率を下げるとコストを削減できます。
* **LLM-as-a-judge configuration**:
* **Scorer name**: 先頭は英字または数字にする必要があります。英字、数字、ハイフン、アンダースコアを使用できます。
* **Score Audio**: 使用可能な LLM モデルを絞り込んでオーディオ対応モデルのみを表示し、**Media Scoring JSON Paths** フィールドを開きます。
* **Score Images**: 使用可能な LLM モデルを絞り込んで画像対応モデルのみを表示し、**Media Scoring JSON Paths** フィールドを開きます。
* **Judge model**: Op のスコアリングに使用するモデルを選択します。メニューには、CoreWeave Forge アカウントで設定済みの商用 LLM モデルと、[Serverless Inference モデル](/ja/products/inference/serverless/models)が表示されます。オーディオ対応モデルには、名前の横に **Audio Input** ラベルが表示されます。選択したモデルについて、次の項目を設定します。
* **Configuration name**: このモデルの設定の名前です。
* **System prompt**: 評価を行うモデルの役割とペルソナを定義します。例: 「You are an impartial AI judge.」
* **Response format**: 評価モデルが応答を出力する形式です。`json_object` やプレーンな `text` などを指定します。
* **スコアリング プロンプト**: Op のスコアリングに使用する評価タスクです。スコアリング プロンプトでは、Op の[プロンプト変数](/ja/products/wandb/weave/guides/evaluation/scorers#access-variables-from-your-ops-in-scoring-prompts)を参照できます。例: 「Evaluate whether `{output}` is accurate based on `{ground_truth}`.」
* **Media Scoring JSON Paths**: トレースデータからメディアを抽出するための JSONPath 式 (RFC 9535) を指定します。パスを指定しない場合、モニターはユーザーメッセージに含まれるスコアリング可能なすべてのメディアを対象にします。このフィールドは、**Score Audio** または **Score Images** を有効にすると表示されます。
4. モニターのフィールドを設定したら、**Create monitor** を選択します。モニターが Weights & Biases の project に追加されます。コードがトレースを生成し始めたら、**Traces** タブでモニター名を選択し、表示されるパネルでスコアを確認できます。
また、Weights & Biases UI でモニターのトレースデータを[比較](/ja/products/wandb/weave/guides/tools/comparison)して可視化したり、**Traces** タブのダウンロードボタン () を使用して CSV や JSON などの形式でダウンロードしたりすることもできます。
Weave は、すべての Scorer の結果を [Call](/ja/products/wandb/weave/guides/tracking/tracing#calls) オブジェクトの `feedback` フィールドに自動的に保存します。
例: 真実性モニターを作成する
以下のエンドツーエンドの例では、生成された文の真実性を評価するモニターを作成する手順を説明します。この例を完了すると、Weave プロジェクト内のサンプル op をスコアリングする実行中のモニターが作成され、スコアリングされたトレースを Weights & Biases UI で確認できるようになります。
1. 文を生成する関数を定義します。生成される文には、真実のものとそうでないものがあります。
```python lines theme={"system"}
import weave
import random
import openai
weave.init("my-team/my-weave-project")
client = openai.OpenAI()
@weave.op()
def generate_statement(ground_truth: str) -> str:
if random.random() < 0.5:
response = client.chat.completions.create(
model="gpt-4.1",
messages=[
{
"role": "user",
"content": f"Generate a statement that is incorrect based on this fact: {ground_truth}"
}
]
)
return response.choices[0].message.content
else:
return ground_truth
generate_statement("The Earth revolves around the Sun.")
```
```typescript lines twoslash theme={"system"}
// @noErrors
import * as weave from 'weave';
import OpenAI from 'openai';
await weave.init('my-team/my-weave-project');
const client = new OpenAI();
const generateStatement = weave.op(async (ground_truth: string): Promise => {
if (Math.random() < 0.5) {
const response = await client.chat.completions.create({
model: 'gpt-4.1',
messages: [
{
role: 'user',
content: `Generate a statement that is incorrect based on this fact: ${ground_truth}`,
},
],
});
return response.choices[0]?.message?.content ?? '';
}
return ground_truth;
});
await generateStatement("The Earth revolves around the Sun.");
```
2. 関数を少なくとも 1 回実行して、project にトレースをログします。これにより、Weights & Biases UI でその op をモニタリングの対象として選択できるようになります。
3. Weights & Biases UI で対象の project を開き、サイドバーから **Monitors** を選択します。次に **New Monitor** を選択します。
4. **Create new monitor** メニューで、各フィールドに以下の値を設定します。
* **Name**: `truthfulness-monitor`
* **Description**: `Evaluates the truthfulness of generated statements.`
* **Active monitor**: **on** に切り替えます。
* **Operations**: `generate_statement` を選択します。
* **サンプリング率**: すべての call をスコアリングするため、`100%` に設定します。
* **Scorer name**: `truthfulness-scorer`
* **Judge model**: `o3-mini-2025-01-31`
* **System prompt**: `You are an impartial AI judge. Your task is to evaluate the truthfulness of statements.`
* **Response format**: `json_object`
* **スコアリング プロンプト**:
```text theme={"system"}
Evaluate whether the output statement is accurate based on the input statement.
This is the input statement: {ground_truth}
This is the output statement: {output}
The response should be a JSON object with the following fields:
- is_true: a boolean stating whether the output statement is true or false based on the input statement.
- reasoning: your reasoning as to why the statement is true or false.
```
5. **Create monitor** を選択します。これで、モニターが Weave プロジェクトに追加されます。
6. スクリプト内で、真実性の度合いが異なる文を渡して関数を呼び出し、スコアリング関数をテストします。
```python lines theme={"system"}
generate_statement("The Earth revolves around the Sun.")
generate_statement("Water freezes at 0 degrees Celsius.")
generate_statement("The Great Wall of China was built over several centuries.")
```
```typescript lines twoslash theme={"system"}
// @noErrors
await generateStatement("The Earth revolves around the Sun.");
await generateStatement("Water freezes at 0 degrees Celsius.");
await generateStatement("The Great Wall of China was built over several centuries.");
```
7. いくつかの文でスクリプトを実行したら、Weights & Biases UI を開いて **Traces** タブに移動します。任意の **LLMAsAJudgeScorer.score** トレースを選択すると、結果を確認できます。
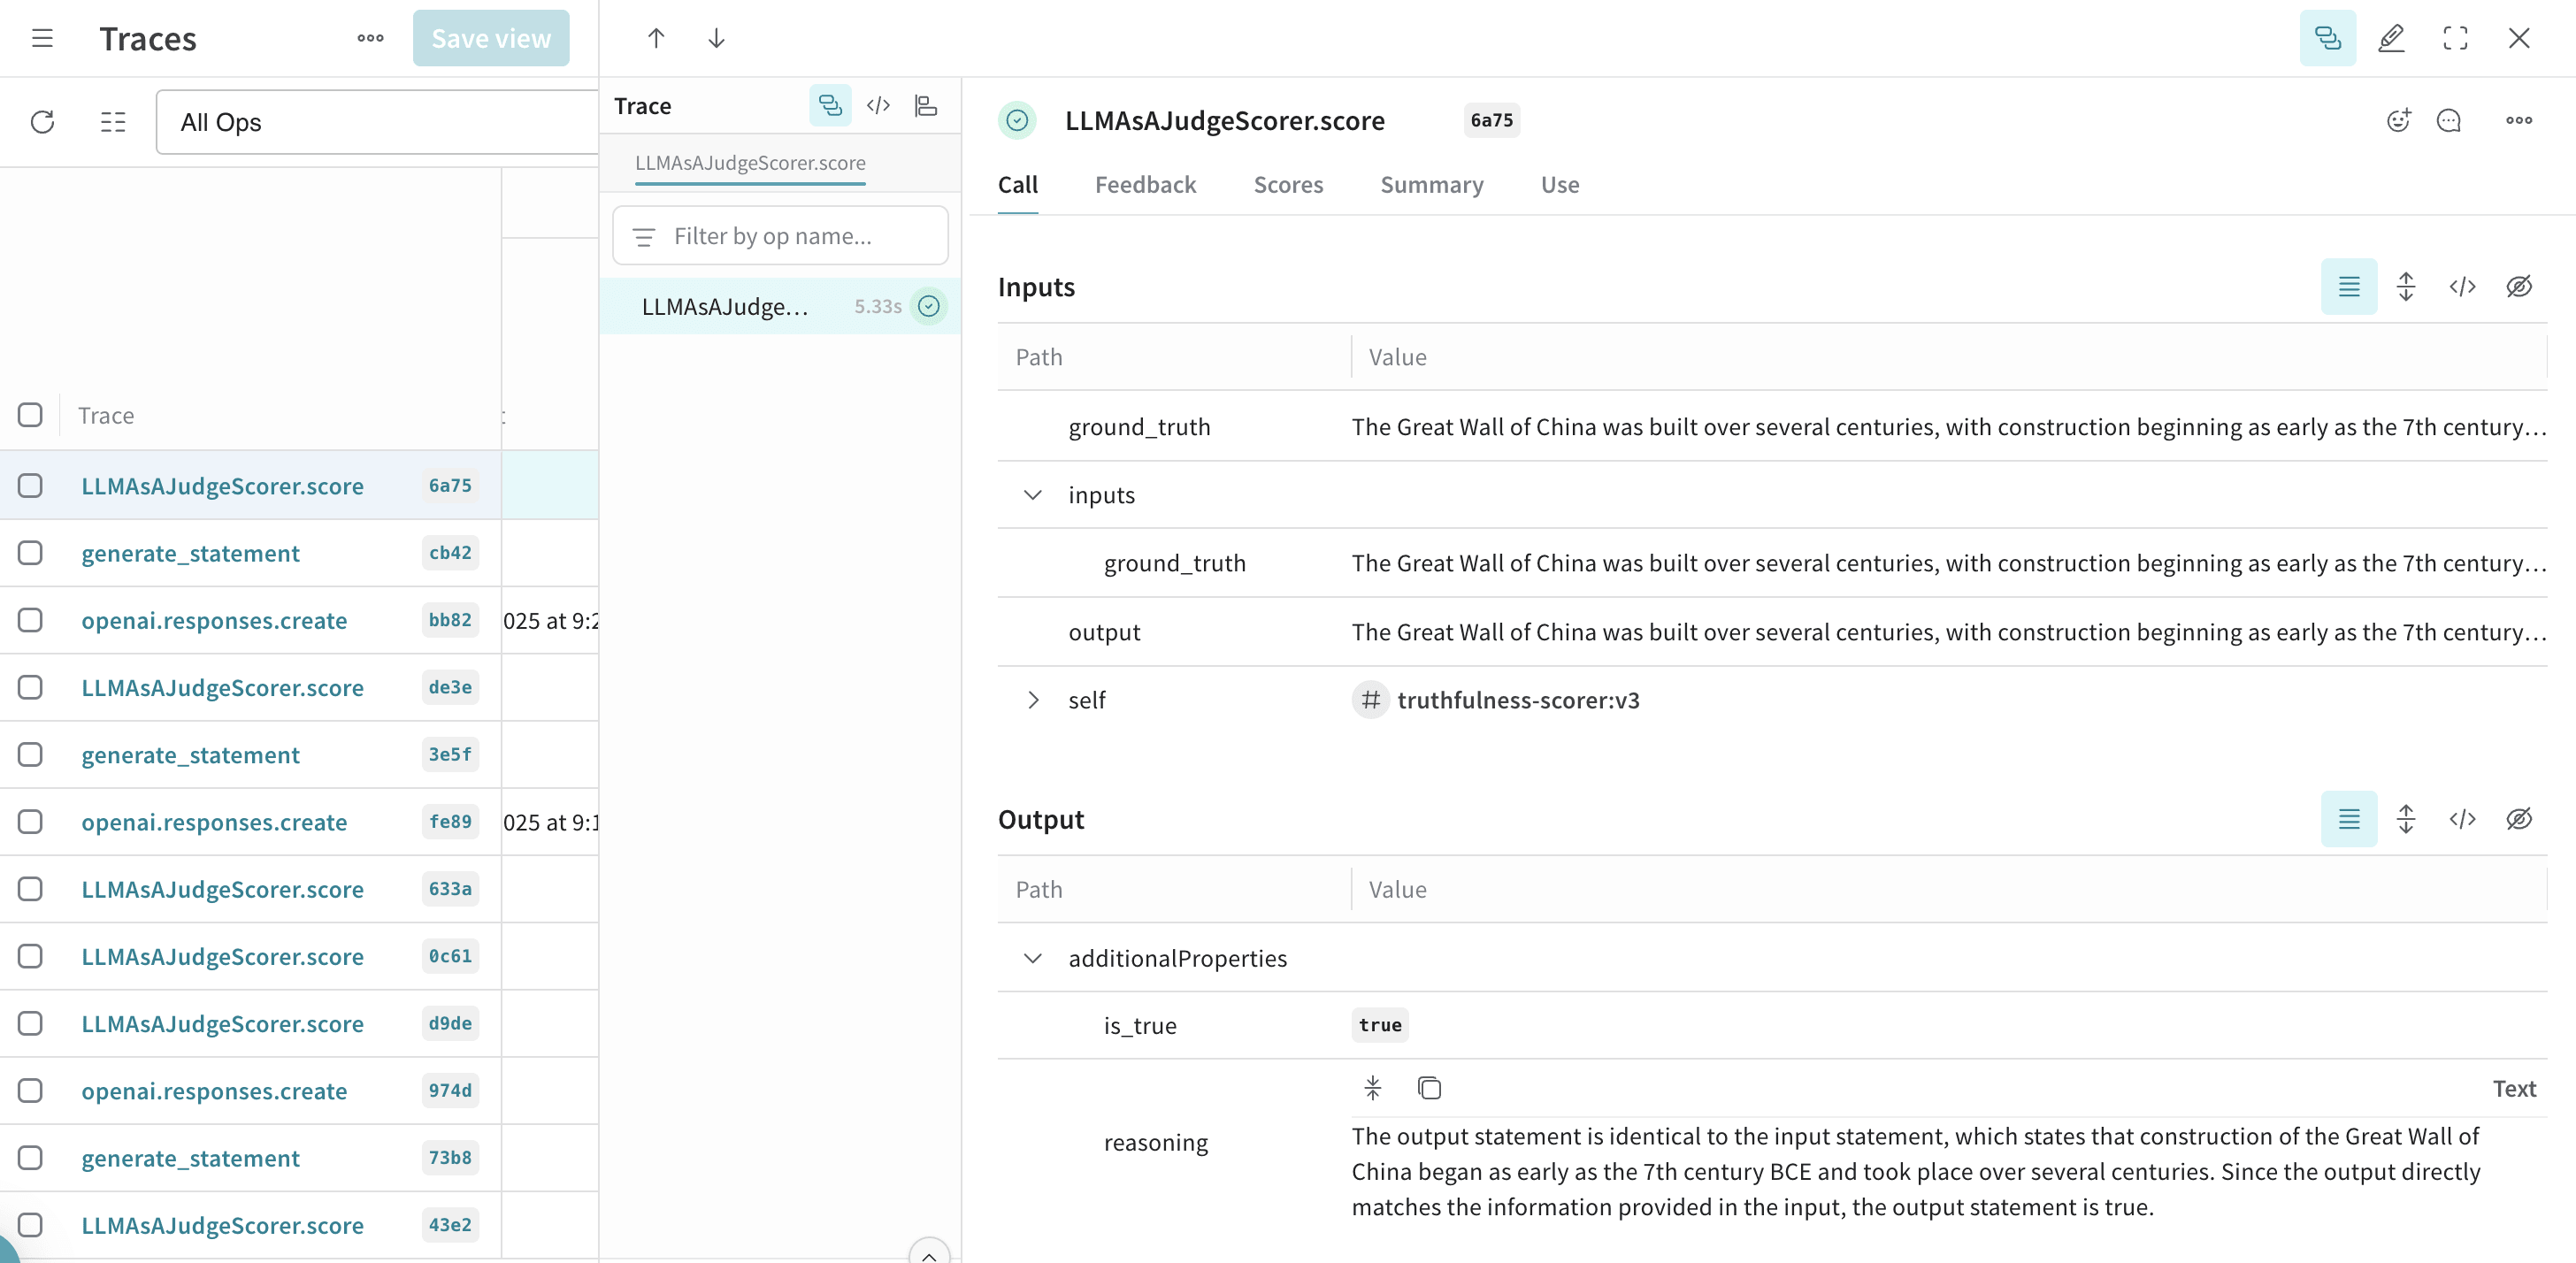 これで、`generate_statement` の各 invocation をスコアリングし、その結果を元のトレースとあわせて保存する真実性モニターが動作するようになりました。保存された結果は、Weights & Biases UI ですぐに分析や比較に利用できます。
## Related topics
- [組み込みシグナルを使用して監視する](/ja/products/wandb/weave/guides/evaluation/monitors.md)
これで、`generate_statement` の各 invocation をスコアリングし、その結果を元のトレースとあわせて保存する真実性モニターが動作するようになりました。保存された結果は、Weights & Biases UI ですぐに分析や比較に利用できます。
## Related topics
- [組み込みシグナルを使用して監視する](/ja/products/wandb/weave/guides/evaluation/monitors.md)