> ## Documentation Index
> Fetch the complete documentation index at: https://docs.coreweave.com/llms.txt
> Use this file to discover all available pages before exploring further.
# Weave でコンピュータビジョンパイプラインをトレースして評価する
> W&B Weave でコンピュータビジョンパイプラインをトレースして評価する方法を学びます
これはインタラクティブなノートブックです。ローカルで実行するか、以下のリンクを使用できます:
* [Google Colab で開く](https://colab.research.google.com/github/wandb/docs/blob/main/weave/cookbooks/source/ocr-pipeline.ipynb)
* [GitHub で View source](https://github.com/wandb/docs/blob/main/weave/cookbooks/source/ocr-pipeline.ipynb)
このチュートリアルでは、手書きの患者情報の画像に対して固有表現抽出 (NER) を実行するコンピュータビジョンパイプラインを構築、トレース、評価する方法を紹介します。最終的には、vision-language model (VLM) を基盤とする実用的な光学文字認識 (OCR) パイプラインと、画像から構造化フィールドをどれだけ正確に抽出できるかを測定する W\&B Weave 評価 が完成します。このガイドは、Weave を使用してプロンプトの改善を繰り返し、マルチモーダル抽出パイプラインの品質を体系的に測定したい開発者を対象としています。
以下のセクションでは、プロンプトの作成と改善、データセットの取得、NER パイプラインの構築、scorer の定義、評価の実行という 5 つのステップを順に説明します。
前提条件
始める前に、必須のライブラリをインストールしてインポートし、W\&B APIキーを取得して、Weave プロジェクトを初期化してください。このステップを完了すると、環境で W\&B の認証を行い、Weave プロジェクトにトレースをログできるようになります。
```python lines theme={"system"}
# 必要な依存関係をインストールします
!pip install openai weave -q
python
import json
import os
from google.colab import userdata
from openai import OpenAI
import weave
python
# APIキーを取得します
os.environ["OPENAI_API_KEY"] = userdata.get(
"OPENAI_API_KEY"
) # 左側のメニューから、キーを Colab 環境のシークレットとして設定してください
os.environ["WANDB_API_KEY"] = userdata.get("WANDB_API_KEY")
# プロジェクト名を設定します
# PROJECT の値をご自身のプロジェクト名に置き換えてください
PROJECT = "vlm-handwritten-ner"
# Weave プロジェクトを初期化します
weave.init(PROJECT)
```
Weave でプロンプトを作成して反復処理する
モデルがエンティティを正しく抽出できるようにするには、適切なプロンプトエンジニアリングが重要です。このセクションでは、最初のプロンプトを作成して Weave にパブリッシュし、変更履歴をトラッキングできるようにしたうえで、より厳格な検証ルールを加えてプロンプトを改良します。
まず、画像データから何を抽出し、どのような形式で出力するかをモデルに指示する基本的なプロンプトを作成します。次に、トラッキングと反復処理のためにプロンプトを Weave に保存します。
````python lines theme={"system"}
# Weave でプロンプト オブジェクトを作成します
prompt = """
Extract all readable text from this image. Format the extracted entities as a valid JSON.
Do not return any extra text, just the JSON. Do not include ```json```
Use the following format:
{"Patient Name": "James James","Date": "4/22/2025","Patient ID": "ZZZZZZZ123","Group Number": "3452542525"}
"""
system_prompt = weave.StringPrompt(prompt)
# プロンプトを Weave にパブリッシュします
weave.publish(system_prompt, name="NER-prompt")
````
次に、指示と検証ルールを追加してプロンプトを改善し、出力のエラーを減らします。改訂版を同じ名でパブリッシュすると、Weave がプロンプトを新しいバージョンとしてトラッキングするため、反復処理ごとの結果を比較できます。
````python lines theme={"system"}
better_prompt = """
You are a precision OCR assistant. Given an image of patient information, extract exactly these fields into a single JSON object (and nothing else):
- Patient Name
- Date (MM/DD/YYYY)
- Patient ID
- Group Number
Validation rules:
1. Date must match MM/DD/YY; if not, set Date to "".
2. Patient ID must be alphanumeric; if unreadable, set to "".
3. Always zero-pad months and days (e.g. "04/07/25").
4. Omit any markup, commentary, or code fences.
5. Return strictly valid JSON with only those four keys.
Do not return any extra text, just the JSON. Do not include ```json```
Example output:
{"Patient Name":"James James","Date":"04/22/25","Patient ID":"ZZZZZZZ123","Group Number":"3452542525"}
"""
# プロンプトを編集します
system_prompt = weave.StringPrompt(better_prompt)
# 編集したプロンプトを Weave にパブリッシュします
weave.publish(system_prompt, name="NER-prompt")
````
データセットを取得する
プロンプトを用意したら、次にパイプラインで処理する入力データが必要です。OCR パイプラインへの入力となる手書きメモのデータセットを取得します。
データセット内の画像はすでに `base64` でエンコードされているため、LLM は前処理なしでデータを使用できます。
```python lines theme={"system"}
# 以下の Weave プロジェクトからデータセットを取得します
dataset = weave.ref(
"weave://wandb-smle/vlm-handwritten-ner/object/NER-eval-dataset:G8MEkqWBtvIxPYAY23sXLvqp8JKZ37Cj0PgcG19dGjw"
).get()
# データセット内の特定のサンプルにアクセスします
example_image = dataset.rows[3]["image_base64"]
# example_image を表示します
from IPython.display import HTML, display
html = f' '
display(HTML(html))
```
'
display(HTML(html))
```
NER パイプラインを構築する
プロンプトとデータセットを用意したら、それらを VLM に接続する NER パイプラインを構築します。パイプラインは次の 2 つの関数で構成されます。
* `encode_image` 関数は、データセットから PIL 画像を受け取り、VLM に渡すことができる `base64` でエンコードされた画像の文字列表現を返します。
* `extract_named_entities_from_image` 関数は、画像とシステムプロンプトを受け取り、システムプロンプトで説明されているようにその画像から抽出されたエンティティを返します。
```python lines theme={"system"}
# GPT-4-Vision を使用するトレース可能な関数
def extract_named_entities_from_image(image_base64) -> dict:
# LLM クライアントを初期化します
client = OpenAI()
# 指示プロンプトを設定します
# 必要に応じて、weave.ref("weave://wandb-smle/vlm-handwritten-ner/object/NER-prompt:FmCv4xS3RFU21wmNHsIYUFal3cxjtAkegz2ylM25iB8").get().content.strip() を使用して Weave に保存されたプロンプトを使用できます
prompt = better_prompt
response = client.responses.create(
model="gpt-4.1",
input=[
{
"role": "user",
"content": [
{"type": "input_text", "text": prompt},
{
"type": "input_image",
"image_url": image_base64,
},
],
}
],
)
return response.output_text
```
次に、以下を行う `named_entity_recognation` という関数を作成します。
* 画像データを NER パイプラインに渡します。
* 結果を正しく整形された JSON として返します。
[`@weave.op()` デコレーター](/ja/products/wandb/weave/reference/python-sdk/trace/op)を使用して、Weights & Biases UI で関数の実行を自動的にトラッキングし、トレースします。
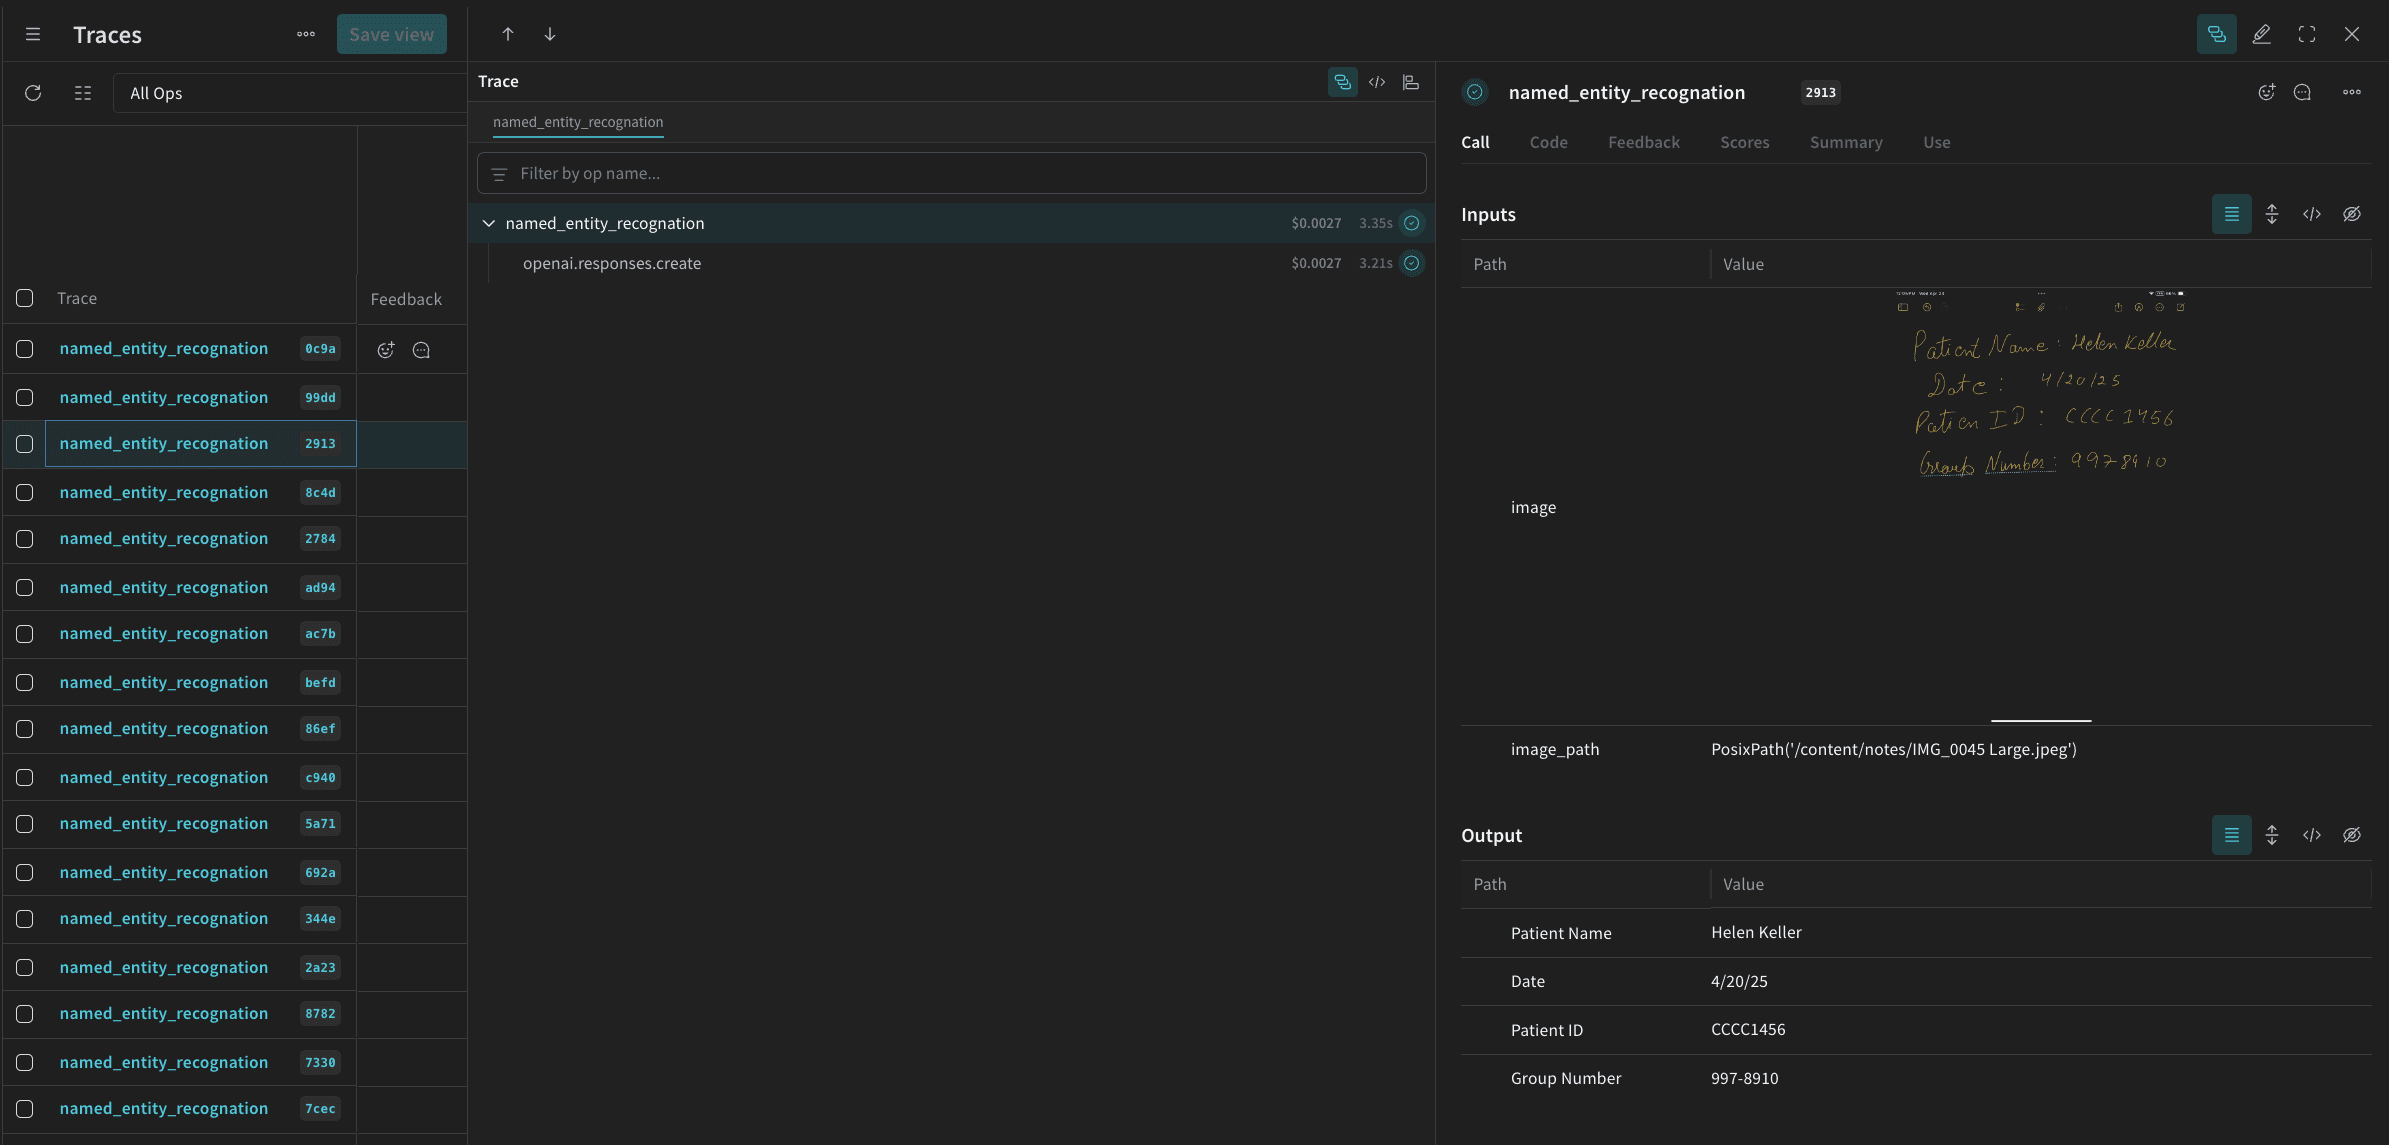
`named_entity_recognation` が実行されるたびに、トレース結果全体が Weights & Biases UI に表示されます。トレースを表示するには、Weave プロジェクトの **Traces** タブにアクセスします。
```python lines theme={"system"}
# 評価用の NER 関数
@weave.op()
def named_entity_recognation(image_base64, id):
result = {}
try:
# 1) vision op を呼び出し、JSON string を取得します
output_text = extract_named_entities_from_image(image_base64)
# 2) JSON を一度だけ解析します
result = json.loads(output_text)
print(f"Processed: {str(id)}")
except Exception as e:
print(f"Failed to process {str(id)}: {e}")
return result
```
最後に、データセットに対してパイプラインを実行し、結果を確認します。このステップでは、次のセクションで評価するモデル出力を生成します。
以下のコードは、データセットを反復処理し、結果をローカルファイル `processing_results.json` に保存します。結果は Weights & Biases の UI でも確認できます。
```python lines theme={"system"}
# 結果を出力します
results = []
# データセット内のすべての画像をループ処理します
for row in dataset.rows:
result = named_entity_recognation(row["image_base64"], str(row["id"]))
result["image_id"] = str(row["id"])
results.append(result)
# すべての結果を JSON ファイルに保存します
output_file = "processing_results.json"
with open(output_file, "w") as f:
json.dump(results, f, indent=2)
print(f"Results saved to: {output_file}")
```
Weights & Biases UI の **Traces** の表に、次のような内容が表示されます。
Weave を使用してパイプラインを評価する
VLM を使用して NER を実行するパイプラインを作成したので、Weave を使用して体系的に評価し、その性能を確認できます。パイプラインを評価することで、抜き取り確認に頼らず、データセット全体にわたって抽出品質を測定できます。Weave の評価の詳細については、[評価の概要](/ja/products/wandb/weave/guides/core-types/evaluations)を参照してください。
Weave の評価の基本となる要素が [Scorer](/ja/products/wandb/weave/guides/evaluation/scorers) です。Scorer は AI の出力を評価し、評価メトリクスを返します。AI の出力を受け取って分析し、結果を辞書として返します。Scorer は必要に応じて入力データを参照として使用でき、評価に伴う説明や推論などの追加情報も出力できます。
このセクションでは、パイプラインを評価するために 2 つの Scorer を作成します。
* プログラムによる Scorer。
* LLM-as-a-judge scorer。
プログラムによるScorer
最初の Scorer は、LLM を使用せずに実行する決定論的なチェックです。プログラムによるScorer `check_for_missing_fields_programatically` は、モデル出力 (`named_entity_recognition` 関数の出力) を受け取り、結果内で欠落している、または空になっている `keys` を特定します。
このチェックは、モデルがいずれかのフィールドを取得し損ねたサンプルを特定するのに役立ちます。
```python lines theme={"system"}
# weave.op() を追加して Scorer の実行をトラッキングする
@weave.op()
def check_for_missing_fields_programatically(model_output):
# すべてのエントリに必須のキー
required_fields = {"Patient Name", "Date", "Patient ID", "Group Number"}
for key in required_fields:
if (
key not in model_output
or model_output[key] is None
or str(model_output[key]).strip() == ""
):
return False # このエントリには欠損または空のフィールドがある
return True # すべての必須フィールドが存在し、空でない
```
LLM-as-a-judge Scorer
プログラムによるScorerは欠落したフィールドや空のフィールドしか検出しないため、抽出された値が画像内の情報と一致するかを確認するには、2 つ目のScorerが必要です。評価のこのステップでは、画像データとモデル出力の両方を提供し、評価が実際の NER パフォーマンスを反映するようにします。モデル出力だけでなく、画像の内容も明示的に参照します。
このステップで使用するScorer `check_for_missing_fields_with_llm` は、LLM (具体的には OpenAI の `gpt-4o`) を使用して採点します。`eval_prompt` の内容で指定されているとおり、`check_for_missing_fields_with_llm` は `Boolean` 値を出力します。すべてのフィールドが画像内の情報と一致し、書式が正しい場合、Scorerは `true` を返します。いずれかのフィールドが欠落している、空である、誤っている、または一致しない場合、結果は `false` となり、Scorerは問題を説明するメッセージも返します。
```python lines theme={"system"}
# 評価者としての LLM 用のシステムプロンプト
eval_prompt = """
You are an OCR validation system. Your role is to assess whether the structured text extracted from an image accurately reflects the information in that image.
Only validate the structured text and use the image as your source of truth.
Expected input text format:
{"Patient Name": "First Last", "Date": "04/23/25", "Patient ID": "131313JJH", "Group Number": "35453453"}
Evaluation criteria:
- All four fields must be present.
- No field should be empty or contain placeholder/malformed values.
- The "Date" should be in MM/DD/YY format (e.g., "04/07/25") (zero padding the date is allowed)
Scoring:
- Return: {"Correct": true, "Reason": ""} if **all fields** match the information in the image and formatting is correct.
- Return: {"Correct": false, "Reason": "EXPLANATION"} if **any** field is missing, empty, incorrect, or mismatched.
Output requirements:
- Respond with a valid JSON object only.
- "Correct" must be a JSON boolean: true or false (not a string or number).
- "Reason" must be a short, specific string indicating all the problem — e.g., "Patient Name mismatch", "Date not zero-padded", or "Missing Group Number".
- Do not return any additional explanation or formatting.
Your response must be exactly one of the following:
{"Correct": true, "Reason": null}
OR
{"Correct": false, "Reason": "EXPLANATION_HERE"}
"""
# weave.op() を追加して Scorer の実行をトラッキングします
@weave.op()
def check_for_missing_fields_with_llm(model_output, image_base64):
client = OpenAI()
response = client.chat.completions.create(
model="gpt-4o",
messages=[
{"role": "developer", "content": [{"text": eval_prompt, "type": "text"}]},
{
"role": "user",
"content": [
{
"type": "image_url",
"image_url": {
"url": image_base64,
},
},
{"type": "text", "text": str(model_output)},
],
},
],
response_format={"type": "json_object"},
)
response = json.loads(response.choices[0].message.content)
return response
```
評価を実行する
2 つの Scorer を定義したので、評価を実行できます。渡された `dataset` を自動的にループ処理し、結果をまとめて Weights & Biases UI にログする評価 Call を定義します。
次のコードで評価を開始し、NER パイプラインのすべての出力に 2 つの Scorer を適用します。結果は Weights & Biases UI の **Evals** タブで確認できます。
```python lines theme={"system"}
evaluation = weave.Evaluation(
dataset=dataset,
scorers=[
check_for_missing_fields_with_llm,
check_for_missing_fields_programatically,
],
name="Evaluate_4.1_NER",
)
print(await evaluation.evaluate(named_entity_recognation))
```
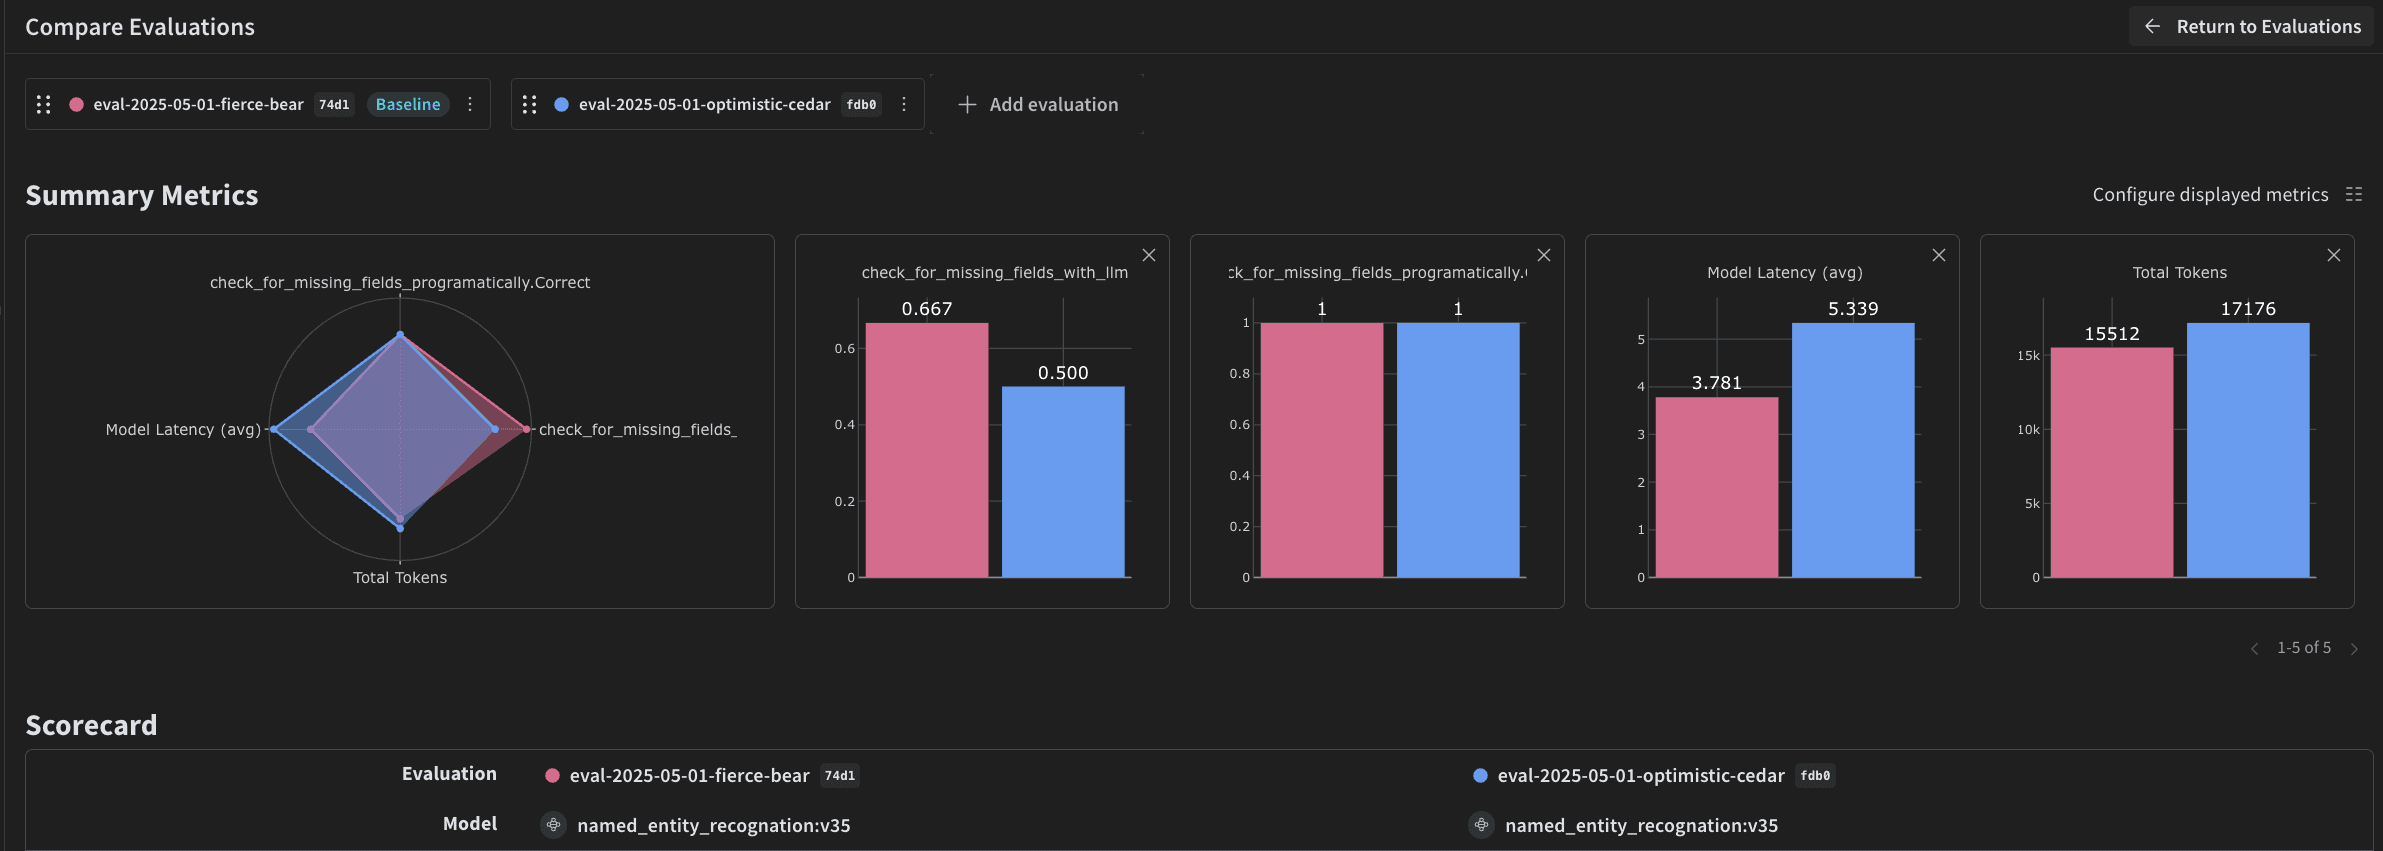
上記のコードを実行すると、Weights & Biases UI の評価表へのリンクが Weave によって生成されます。リンクを開くと結果を確認でき、任意のモデル、プロンプト、データセットでパイプラインの各反復処理を比較できます。Weights & Biases UI では、次のような可視化がチーム向けに自動で作成されます。