> ## Documentation Index
> Fetch the complete documentation index at: https://docs.coreweave.com/llms.txt
> Use this file to discover all available pages before exploring further.
# Chain Of Density
> W&B Weave を使用して Chain of Density 要約手法を実装し、テキストを反復的に圧縮して評価します。
これはインタラクティブなノートブックです。ローカルで実行するか、以下のリンクを使用してください。
* [Google Colab で開く](https://colab.research.google.com/github/wandb/docs/blob/main/weave/cookbooks/source/chain_of_density.ipynb)
* [GitHub でソースを表示](https://github.com/wandb/docs/blob/main/weave/cookbooks/source/chain_of_density.ipynb)
複雑な技術文書を、重要な詳細を損なわずに要約するのは容易ではありません。Chain of Density (CoD) 要約手法は、要約を反復的に改良してより簡潔で情報密度の高いものにすることで、この課題を解決します。このガイドでは、Weave でアプリケーションをトラッキング・評価しながら CoD を実装する方法を説明します。
Chain of Density 要約とは
[](https://arxiv.org/abs/2309.04269)
Chain of Density (CoD) は、要約を反復的に洗練し、より簡潔で情報密度の高い要約を生成する手法です。仕組みは次のとおりです。
1. 最初の要約を作成します
2. 重要な情報を保持しつつ、要約がより簡潔になるよう反復的に改良します
3. 反復のたびに、エンティティや技術的な詳細の密度を高めます
この手法は、詳細な情報の保持が欠かせない科学論文や技術文書の要約に特に有効です。
Weave を使用する理由
このチュートリアルでは、Weave を使用して ArXiv 論文向けの Chain of Density 要約パイプラインを実装し、評価します。このチュートリアルで学ぶ内容は次のとおりです。
* **LLM パイプラインをトラッキングする**: Weave を使用して、要約プロセスの入力、出力、中間ステップを自動的にログします。
* **LLM の出力を評価する**: Weave の組み込みツールを使用して、要約を一貫した基準で評価します。
* **組み合わせ可能なオペレーションを構築する**: Weave のオペレーションを組み合わせて、要約パイプラインのさまざまな部分で再利用します。
* **既存のコードと統合する**: 最小限のオーバーヘッドで、既存の Python コードに Weave を追加します。
このチュートリアルを終えると、Weave の機能を活用してモデルのサービング、評価、結果のトラッキングを行う CoD 要約パイプラインが完成します。
環境を設定する
まず、環境を設定し、必要なライブラリをインポートします。このステップでは、パイプラインに必要な依存関係をインストールします。具体的には、トラッキング用の Weave、LLM 用の Anthropic、ArXiv の PDF を読み込むための PyPDF2 です。
```python lines theme={"system"}
!pip install -qU anthropic weave pydantic requests PyPDF2 set-env-colab-kaggle-dotenv
```
このパイプラインは Anthropic の Claude モデルを呼び出すため、以下のコードを実行する前に Anthropic の APIキーを用意する必要があります。
> Anthropic の APIキーを取得するには、次の手順に従います。
>
> 1. [https://www.anthropic.com](https://www.anthropic.com) でアカウントを作成します。
> 2. アカウント設定の API セクションにアクセスします。
> 3. 新しい APIキーを生成します。
> 4. 生成した APIキーを `.env` ファイルに安全に保存します。
```python lines theme={"system"}
import io
import os
from datetime import datetime, timezone
import anthropic
import requests
from pydantic import BaseModel
from PyPDF2 import PdfReader
from set_env import set_env
import weave
set_env("WANDB_API_KEY")
set_env("ANTHROPIC_API_KEY")
weave.init("summarization-chain-of-density-cookbook")
anthropic_client = anthropic.Anthropic(api_key=os.getenv("ANTHROPIC_API_KEY"))
```
このコードでは、実験のトラッキングに Weave を使用し、テキスト生成に Anthropic の Claude モデルを使用します。`weave.init([PROJECT_NAME])` を呼び出すと、要約タスク用の新しい Weave プロジェクトがセットアップされます。
ArxivPaper モデルを定義する
環境の準備が整ったら、次はパイプラインで扱うデータ構造を定義します。データを表す `ArxivPaper` クラスを作成します。
```python lines theme={"system"}
# ArxivPaper モデルを定義
class ArxivPaper(BaseModel):
entry_id: str
updated: datetime
published: datetime
title: str
authors: list[str]
summary: str
pdf_url: str
# サンプルの ArxivPaper を作成
arxiv_paper = ArxivPaper(
entry_id="http://arxiv.org/abs/2406.04744v1",
updated=datetime(2024, 6, 7, 8, 43, 7, tzinfo=timezone.utc),
published=datetime(2024, 6, 7, 8, 43, 7, tzinfo=timezone.utc),
title="CRAG -- Comprehensive RAG Benchmark",
authors=["Xiao Yang", "Kai Sun", "Hao Xin"], # 簡潔にするため一部省略
summary="Retrieval-Augmented Generation (RAG) has recently emerged as a promising solution...", # 一部省略
pdf_url="https://arxiv.org/pdf/2406.04744",
)
```
このクラスは、要約パイプラインへの入力となる ArXiv 論文のメタデータとコンテンツをカプセル化します。
PDF コンテンツを読み込む
`ArxivPaper` モデルはメタデータと PDF の URL を保持していますが、要約パイプラインでは論文の全文が必要です。論文全体を扱えるように、PDF を読み込んでテキストを抽出する関数を追加します。
```python lines theme={"system"}
@weave.op()
def load_pdf(pdf_url: str) -> str:
# PDF をダウンロード
response = requests.get(pdf_url)
pdf_file = io.BytesIO(response.content)
# PDF を読み込み
pdf_reader = PdfReader(pdf_file)
# 全ページからテキストを抽出
text = ""
for page in pdf_reader.pages:
text += page.extract_text()
return text
```
Chain of Density 要約を実装する
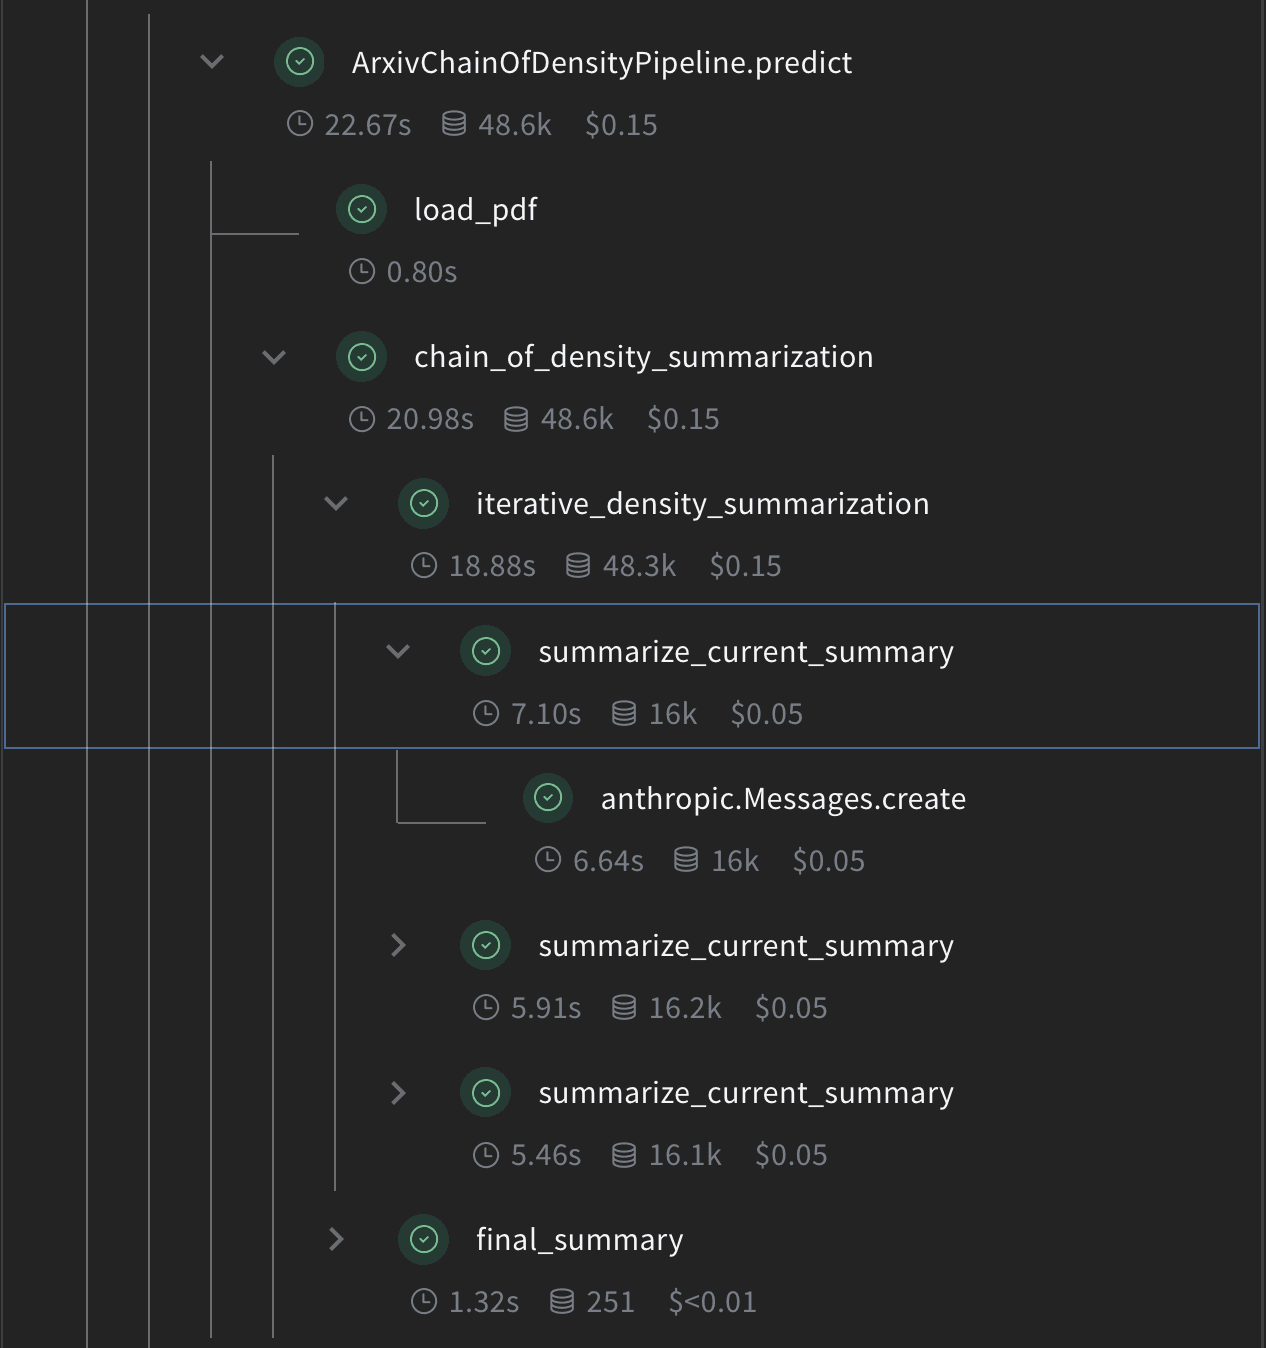
次に、Weave のオペレーションを使用して、CoD 要約の中核となるロジックを実装します。
 ```python lines theme={"system"}
# Chain of Density 要約
@weave.op()
def summarize_current_summary(
document: str,
instruction: str,
current_summary: str = "",
iteration: int = 1,
model: str = "claude-3-sonnet-20240229",
):
prompt = f"""
Document: {document}
Current summary: {current_summary}
Instruction to focus on: {instruction}
Iteration: {iteration}
Generate an increasingly concise, entity-dense, and highly technical summary from the provided document that specifically addresses the given instruction.
"""
response = anthropic_client.messages.create(
model=model, max_tokens=4096, messages=[{"role": "user", "content": prompt}]
)
return response.content[0].text
@weave.op()
def iterative_density_summarization(
document: str,
instruction: str,
current_summary: str,
density_iterations: int,
model: str = "claude-3-sonnet-20240229",
):
iteration_summaries = []
for iteration in range(1, density_iterations + 1):
current_summary = summarize_current_summary(
document, instruction, current_summary, iteration, model
)
iteration_summaries.append(current_summary)
return current_summary, iteration_summaries
@weave.op()
def final_summary(
instruction: str, current_summary: str, model: str = "claude-3-sonnet-20240229"
):
prompt = f"""
Given this summary: {current_summary}
And this instruction to focus on: {instruction}
Create an extremely dense, final summary that captures all key technical information in the most concise form possible, while specifically addressing the given instruction.
"""
return (
anthropic_client.messages.create(
model=model, max_tokens=4096, messages=[{"role": "user", "content": prompt}]
)
.content[0]
.text
)
@weave.op()
def chain_of_density_summarization(
document: str,
instruction: str,
current_summary: str = "",
model: str = "claude-3-sonnet-20240229",
density_iterations: int = 2,
):
current_summary, iteration_summaries = iterative_density_summarization(
document, instruction, current_summary, density_iterations, model
)
final_summary_text = final_summary(instruction, current_summary, model)
return {
"final_summary": final_summary_text,
"accumulated_summary": current_summary,
"iteration_summaries": iteration_summaries,
}
```
各関数の役割は次のとおりです。
* `summarize_current_summary`: 現在の状態をもとに、要約の反復を 1 回分生成します。
* `iterative_density_summarization`: `summarize_current_summary` を複数回呼び出して、CoD 手法を適用します。
* `chain_of_density_summarization`: 要約プロセス全体を統括し、結果を返します。
`@weave.op()` デコレーターを付けることで、Weave がこれらの関数の入力、出力、実行をトラッキングします。
```python lines theme={"system"}
# Chain of Density 要約
@weave.op()
def summarize_current_summary(
document: str,
instruction: str,
current_summary: str = "",
iteration: int = 1,
model: str = "claude-3-sonnet-20240229",
):
prompt = f"""
Document: {document}
Current summary: {current_summary}
Instruction to focus on: {instruction}
Iteration: {iteration}
Generate an increasingly concise, entity-dense, and highly technical summary from the provided document that specifically addresses the given instruction.
"""
response = anthropic_client.messages.create(
model=model, max_tokens=4096, messages=[{"role": "user", "content": prompt}]
)
return response.content[0].text
@weave.op()
def iterative_density_summarization(
document: str,
instruction: str,
current_summary: str,
density_iterations: int,
model: str = "claude-3-sonnet-20240229",
):
iteration_summaries = []
for iteration in range(1, density_iterations + 1):
current_summary = summarize_current_summary(
document, instruction, current_summary, iteration, model
)
iteration_summaries.append(current_summary)
return current_summary, iteration_summaries
@weave.op()
def final_summary(
instruction: str, current_summary: str, model: str = "claude-3-sonnet-20240229"
):
prompt = f"""
Given this summary: {current_summary}
And this instruction to focus on: {instruction}
Create an extremely dense, final summary that captures all key technical information in the most concise form possible, while specifically addressing the given instruction.
"""
return (
anthropic_client.messages.create(
model=model, max_tokens=4096, messages=[{"role": "user", "content": prompt}]
)
.content[0]
.text
)
@weave.op()
def chain_of_density_summarization(
document: str,
instruction: str,
current_summary: str = "",
model: str = "claude-3-sonnet-20240229",
density_iterations: int = 2,
):
current_summary, iteration_summaries = iterative_density_summarization(
document, instruction, current_summary, density_iterations, model
)
final_summary_text = final_summary(instruction, current_summary, model)
return {
"final_summary": final_summary_text,
"accumulated_summary": current_summary,
"iteration_summaries": iteration_summaries,
}
```
各関数の役割は次のとおりです。
* `summarize_current_summary`: 現在の状態をもとに、要約の反復を 1 回分生成します。
* `iterative_density_summarization`: `summarize_current_summary` を複数回呼び出して、CoD 手法を適用します。
* `chain_of_density_summarization`: 要約プロセス全体を統括し、結果を返します。
`@weave.op()` デコレーターを付けることで、Weave がこれらの関数の入力、出力、実行をトラッキングします。
Weave モデルを作成する
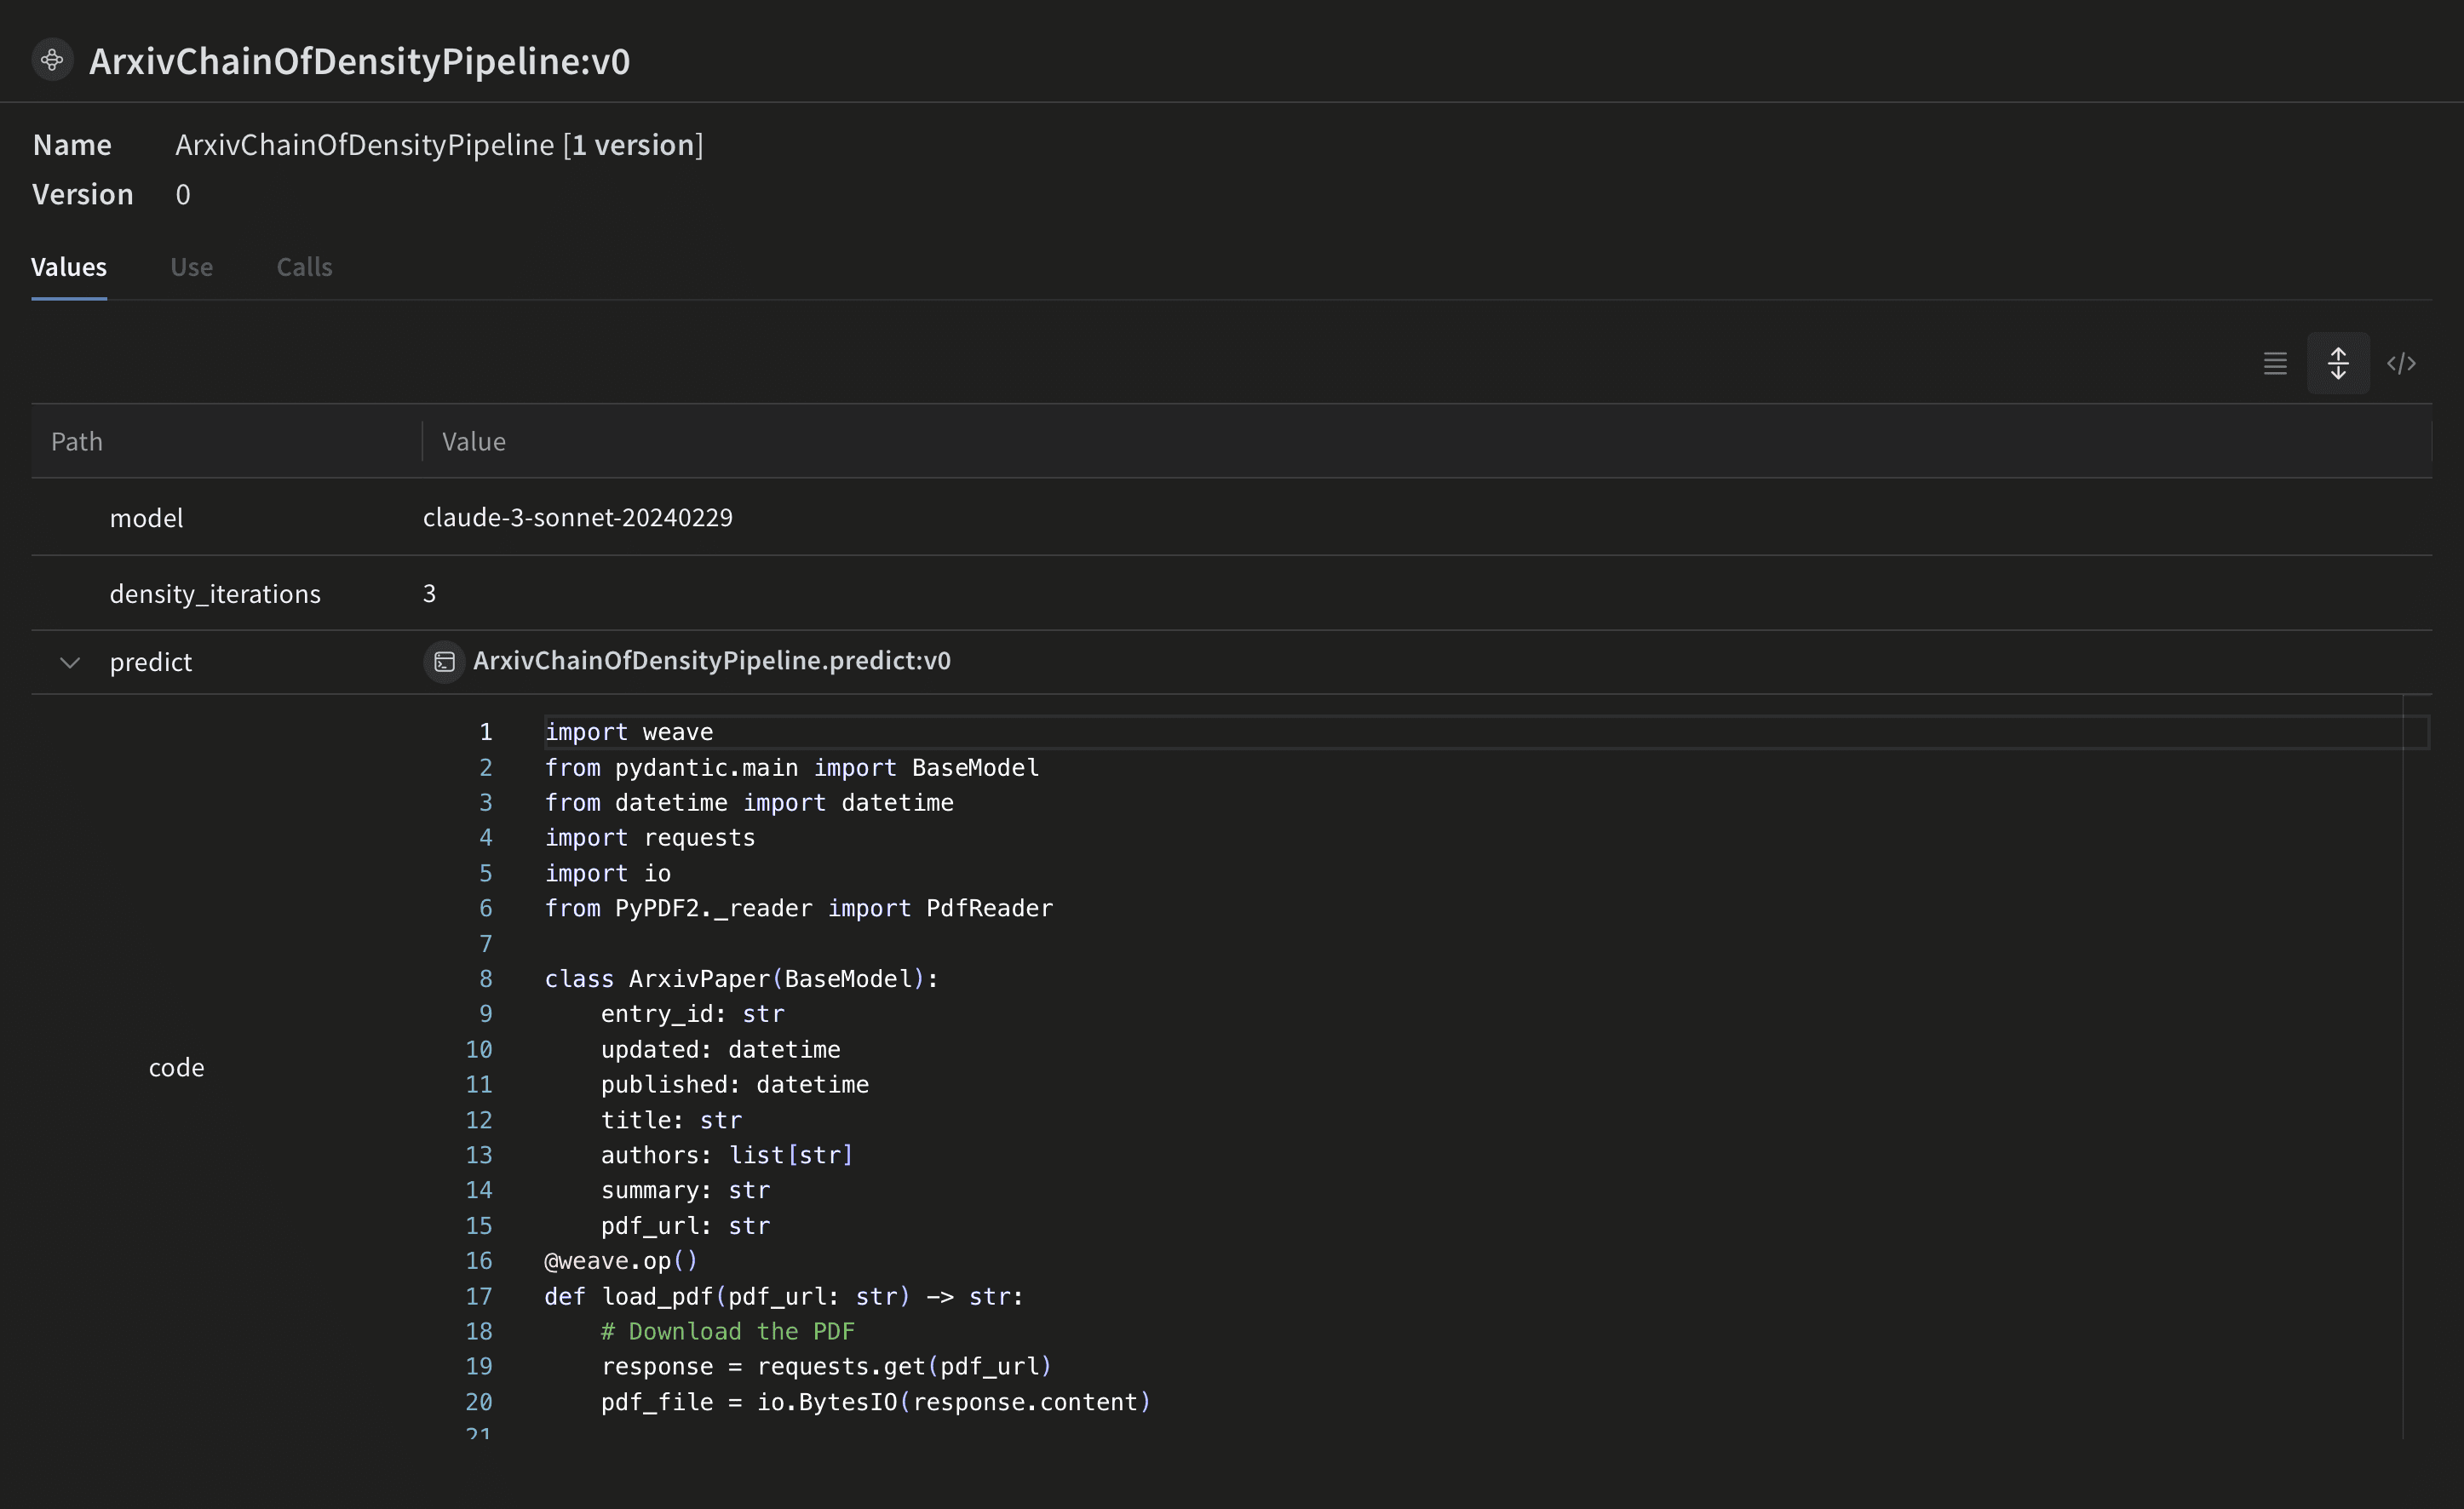
要約関数の準備ができたら、次はそれらを Weave モデルとしてパッケージ化し、run、パラメーター、バージョンをまとめて追跡できるようにします。では、要約パイプラインを Weave モデルでラップしましょう。
 ```python lines theme={"system"}
# Weave モデル
class ArxivChainOfDensityPipeline(weave.Model):
model: str = "claude-3-sonnet-20240229"
density_iterations: int = 3
@weave.op()
def predict(self, paper: ArxivPaper, instruction: str) -> dict:
text = load_pdf(paper.pdf_url)
result = chain_of_density_summarization(
text,
instruction,
model=self.model,
density_iterations=self.density_iterations,
)
return result
```
この `ArxivChainOfDensityPipeline` クラスは、要約ロジックを Weave モデルとしてカプセル化しており、次のような利点があります。
* 自動的な実験管理: Weave は、モデルの run ごとに入力、出力、パラメーターを取得します。
* バージョン管理: モデルの属性やコードを変更すると自動的にバージョン管理されるため、要約パイプラインの変遷を明確な履歴として確認できます。
* 再現性: バージョン管理とトラッキングにより、要約パイプラインの過去の結果や設定をいつでも再現できます。
* ハイパーパラメーター管理: モデルの属性 (`model` や `density_iterations` など) が明確に定義され、run をまたいで追跡されるため、実験を進めやすくなります。
* Weave エコシステムとのインテグレーション: `weave.Model` を使用すると、評価やサービング機能など、他の Weave ツールと連携できます。
```python lines theme={"system"}
# Weave モデル
class ArxivChainOfDensityPipeline(weave.Model):
model: str = "claude-3-sonnet-20240229"
density_iterations: int = 3
@weave.op()
def predict(self, paper: ArxivPaper, instruction: str) -> dict:
text = load_pdf(paper.pdf_url)
result = chain_of_density_summarization(
text,
instruction,
model=self.model,
density_iterations=self.density_iterations,
)
return result
```
この `ArxivChainOfDensityPipeline` クラスは、要約ロジックを Weave モデルとしてカプセル化しており、次のような利点があります。
* 自動的な実験管理: Weave は、モデルの run ごとに入力、出力、パラメーターを取得します。
* バージョン管理: モデルの属性やコードを変更すると自動的にバージョン管理されるため、要約パイプラインの変遷を明確な履歴として確認できます。
* 再現性: バージョン管理とトラッキングにより、要約パイプラインの過去の結果や設定をいつでも再現できます。
* ハイパーパラメーター管理: モデルの属性 (`model` や `density_iterations` など) が明確に定義され、run をまたいで追跡されるため、実験を進めやすくなります。
* Weave エコシステムとのインテグレーション: `weave.Model` を使用すると、評価やサービング機能など、他の Weave ツールと連携できます。
評価メトリクスを実装する
パイプラインで要約を生成できるようになったので、次は要約の品質を体系的に測定する方法が必要です。要約の品質を評価するために、シンプルな評価メトリクスを実装します。
```python lines theme={"system"}
import json
@weave.op()
def evaluate_summary(
summary: str, instruction: str, model: str = "claude-3-sonnet-20240229"
) -> dict:
prompt = f"""
Summary: {summary}
Instruction: {instruction}
Evaluate the summary based on the following criteria:
1. Relevance (1-5): How well does the summary address the given instruction?
2. Conciseness (1-5): How concise is the summary while retaining key information?
3. Technical Accuracy (1-5): How accurately does the summary convey technical details?
Your response MUST be in the following JSON format:
{{
"relevance": {{
"score": ,
"explanation": ""
}},
"conciseness": {{
"score": ,
"explanation": ""
}},
"technical_accuracy": {{
"score": ,
"explanation": ""
}}
}}
Ensure that the scores are integers between 1 and 5, and that the explanations are concise.
"""
response = anthropic_client.messages.create(
model=model, max_tokens=1000, messages=[{"role": "user", "content": prompt}]
)
print(response.content[0].text)
eval_dict = json.loads(response.content[0].text)
return {
"relevance": eval_dict["relevance"]["score"],
"conciseness": eval_dict["conciseness"]["score"],
"technical_accuracy": eval_dict["technical_accuracy"]["score"],
"average_score": sum(eval_dict[k]["score"] for k in eval_dict) / 3,
"evaluation_text": response.content[0].text,
}
```
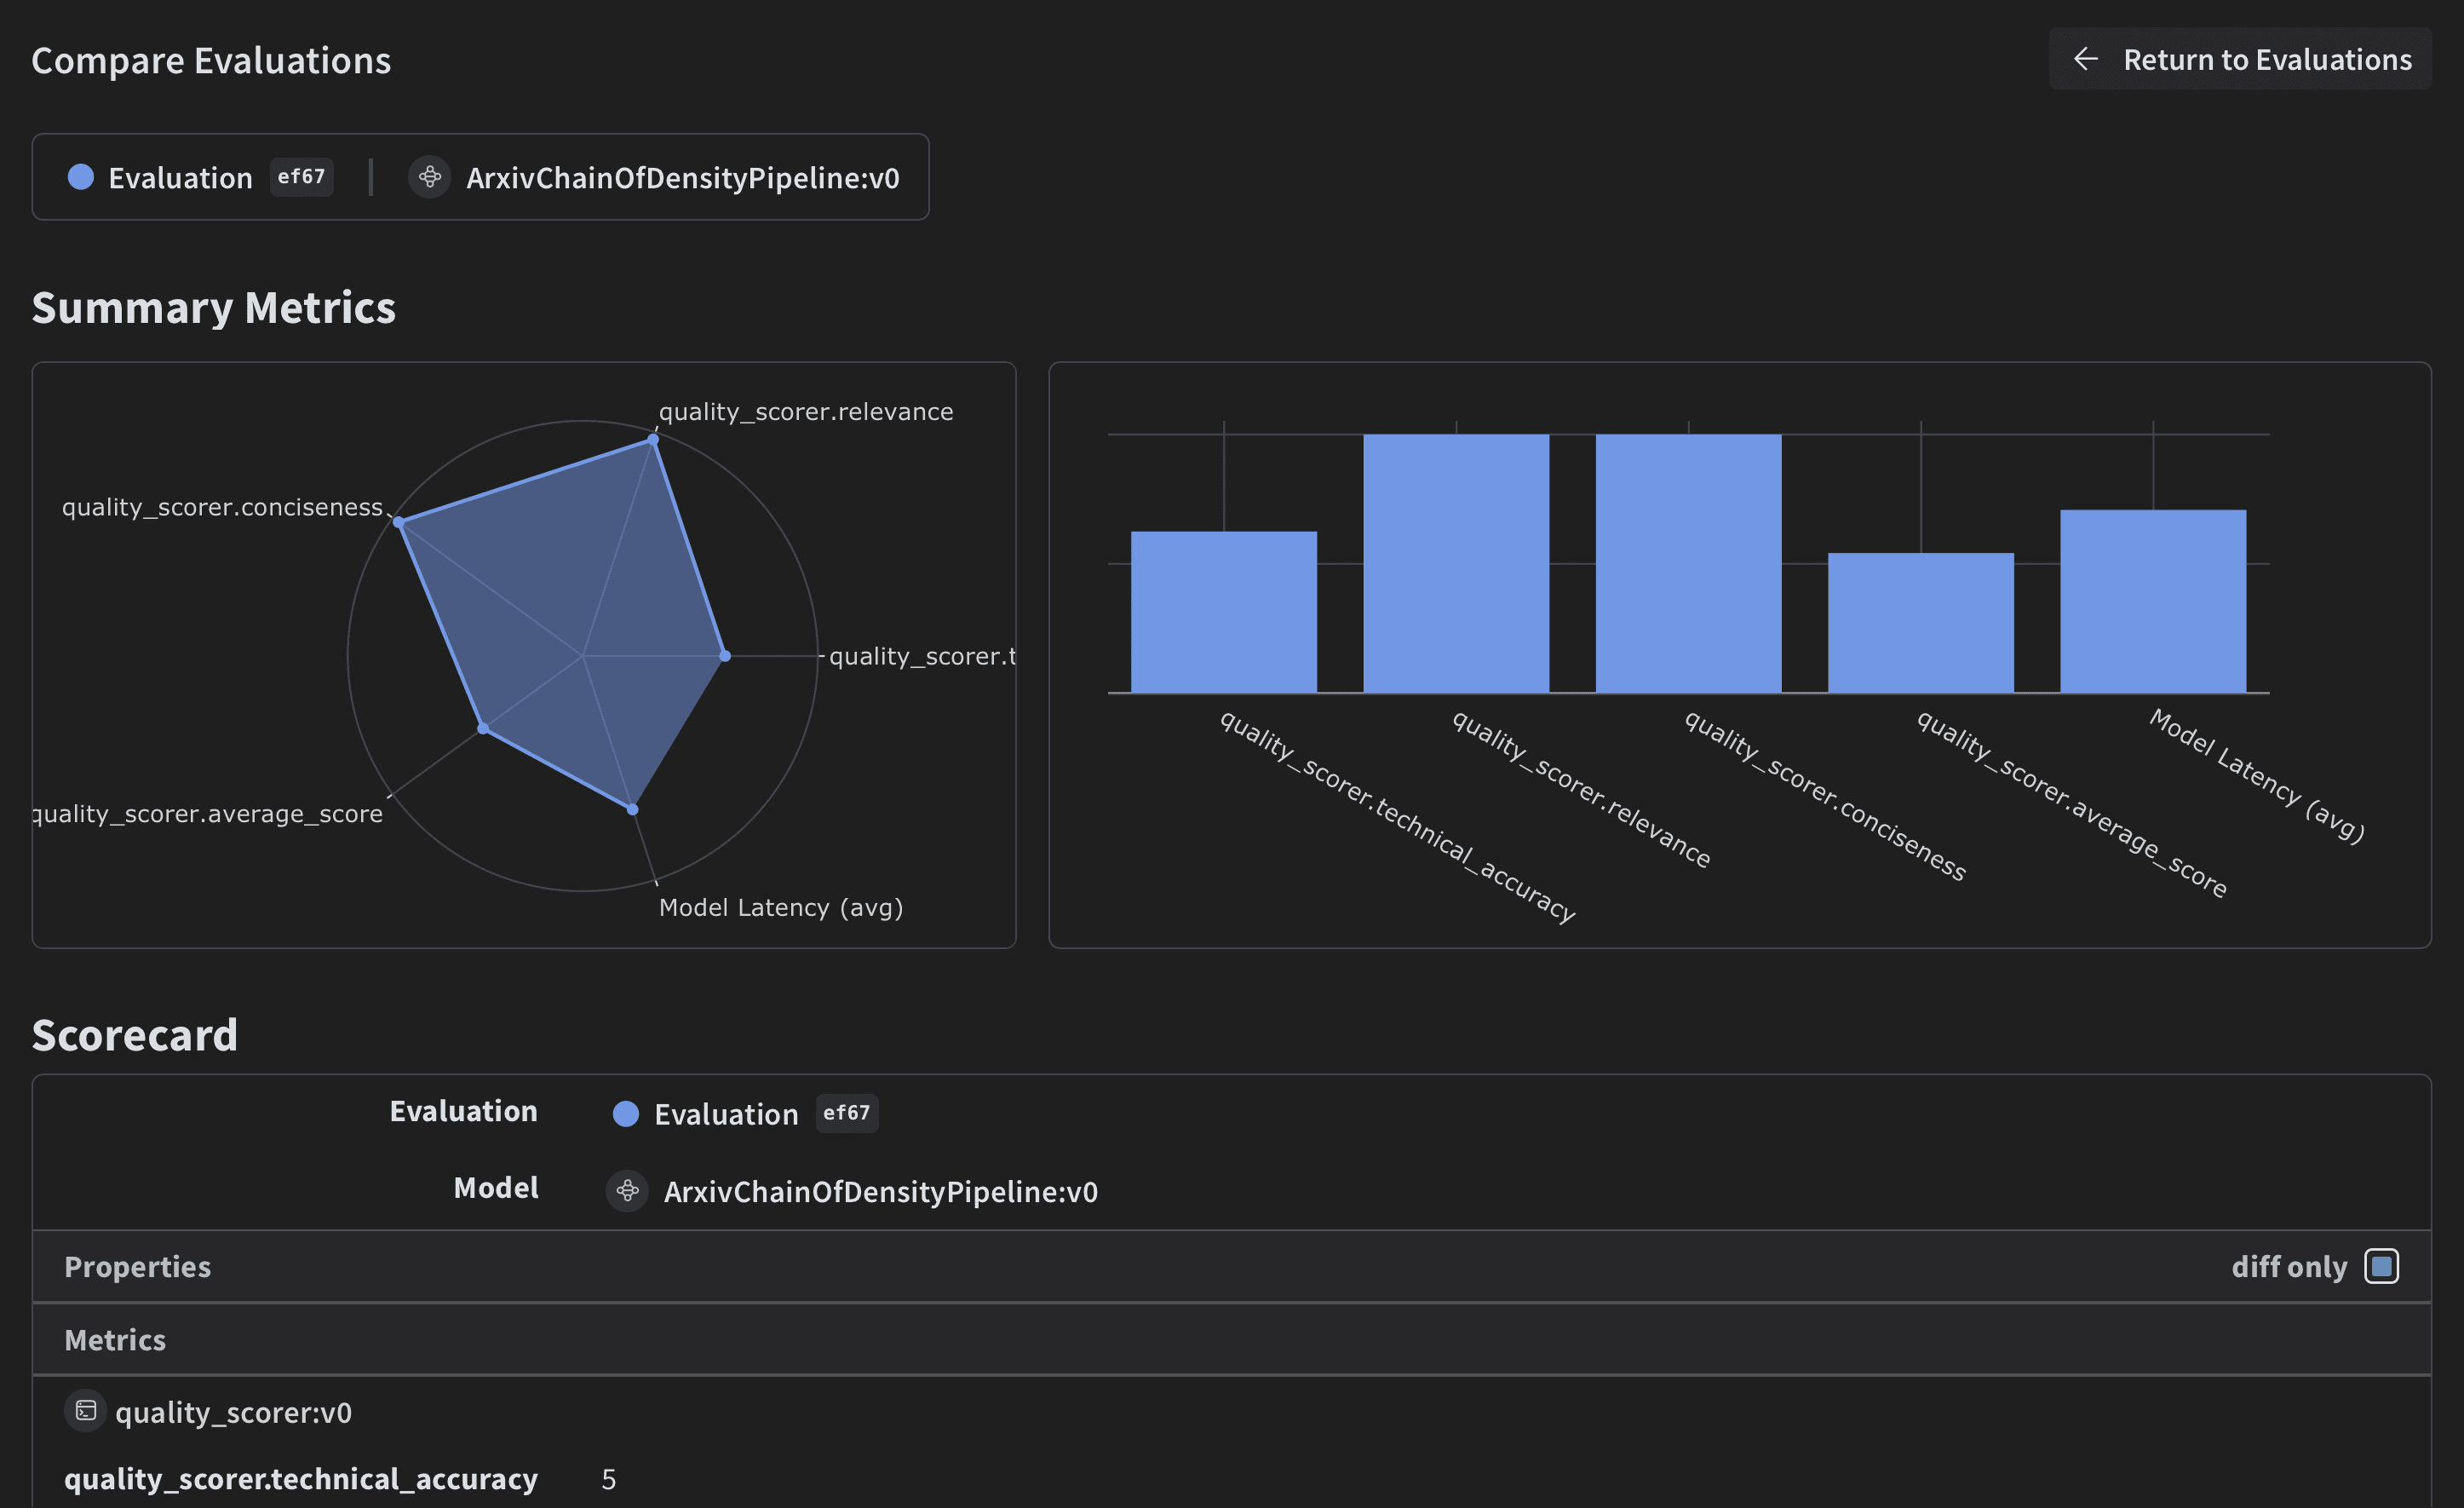
これらの評価関数は、Claude モデルを使用して、生成された要約の品質を関連性、簡潔さ、技術的な精度の観点から評価します。
Weave Dataset を作成して評価を実行する
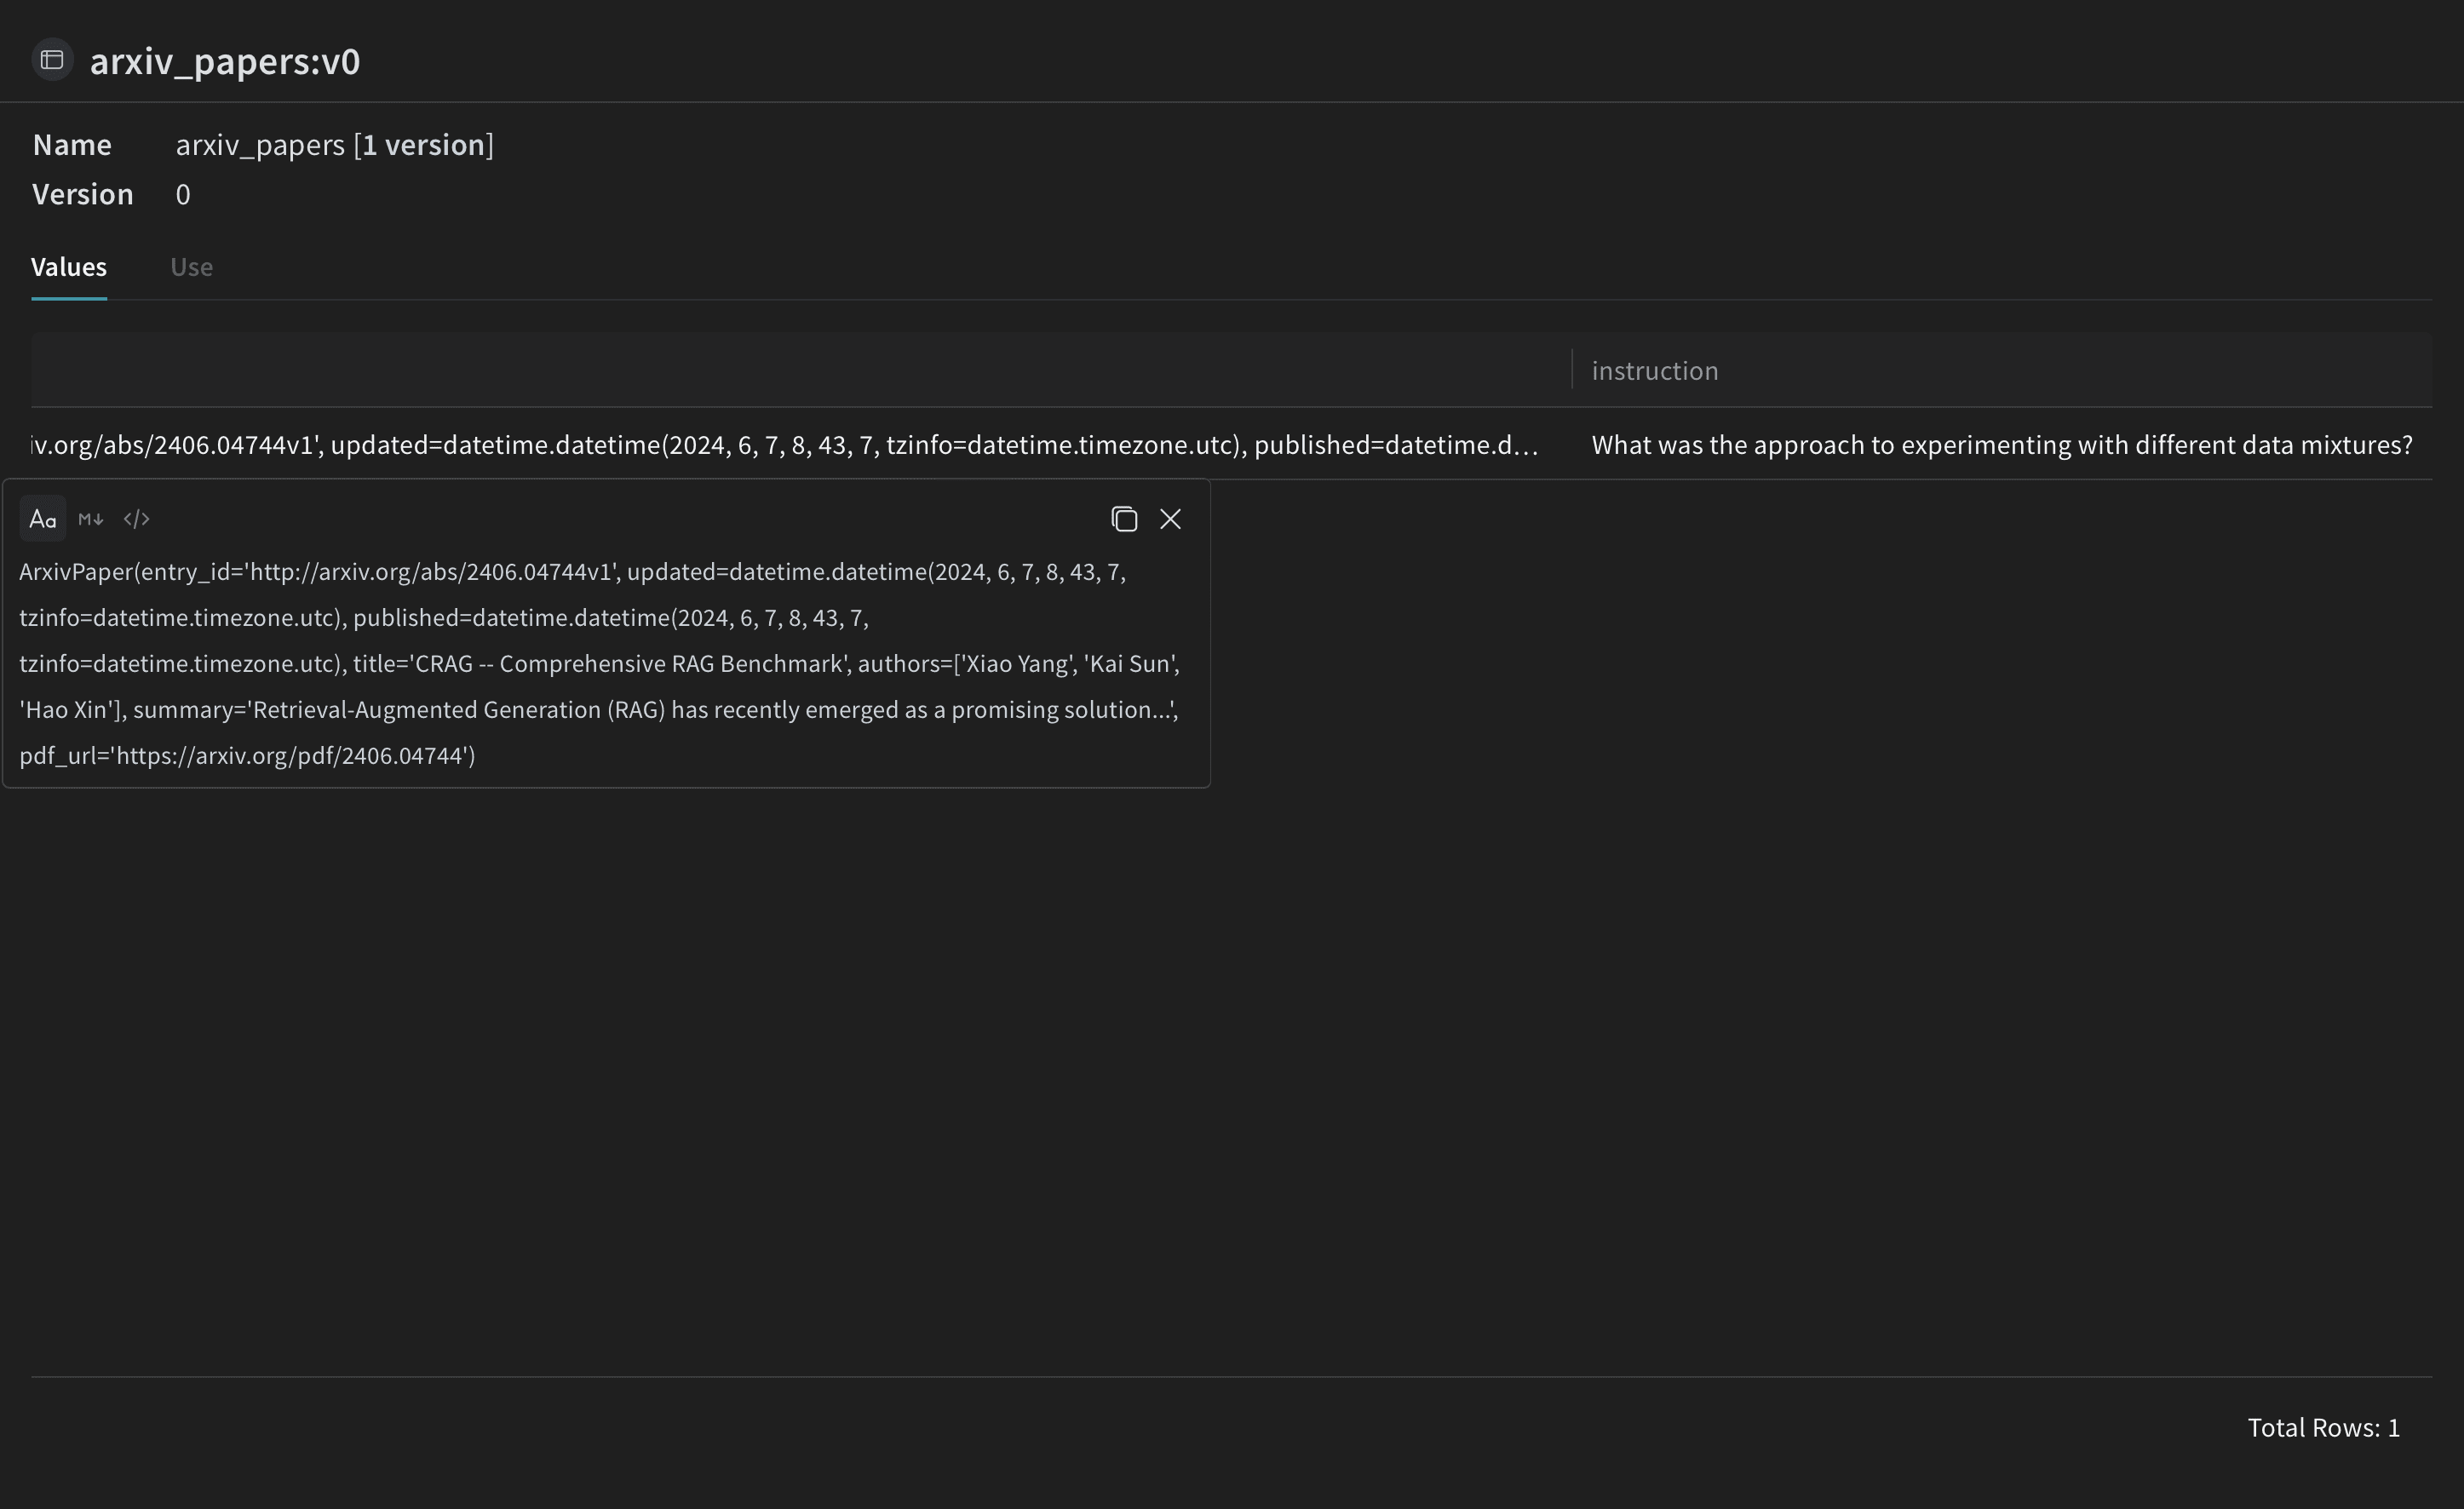
スコアリング関数を定義できたので、最後に、この関数をサンプル入力に適用して評価を実行します。パイプラインを評価するには、次のように Weave Dataset を作成して評価を実行します。
 ```python lines theme={"system"}
# Weave Dataset を作成
dataset = weave.Dataset(
name="arxiv_papers",
rows=[
{
"paper": arxiv_paper,
"instruction": "What was the approach to experimenting with different data mixtures?",
},
],
)
weave.publish(dataset)
```
評価には、LLM-as-a-judge のアプローチを使用します。この手法では、言語モデルを使用して、別のモデルやシステムが生成した出力の品質を評価します。LLM の理解力と推論能力を活かすことで、従来のメトリクスでは十分に評価できないタスクでも、きめ細かな評価が可能になります。
[](https://arxiv.org/abs/2306.05685)
```python lines theme={"system"}
# Scorer 関数を定義する
@weave.op()
def quality_scorer(instruction: str, output: dict) -> dict:
result = evaluate_summary(output["final_summary"], instruction)
return result
```
```python lines theme={"system"}
# 評価を実行
evaluation = weave.Evaluation(dataset=dataset, scorers=[quality_scorer])
arxiv_chain_of_density_pipeline = ArxivChainOfDensityPipeline()
results = await evaluation.evaluate(arxiv_chain_of_density_pipeline)
```
このコードでは、サンプルの ArXiv 論文を含むデータセットを作成し、品質を評価する Scorer を定義したうえで、要約パイプラインの評価を実行します。
```python lines theme={"system"}
# Weave Dataset を作成
dataset = weave.Dataset(
name="arxiv_papers",
rows=[
{
"paper": arxiv_paper,
"instruction": "What was the approach to experimenting with different data mixtures?",
},
],
)
weave.publish(dataset)
```
評価には、LLM-as-a-judge のアプローチを使用します。この手法では、言語モデルを使用して、別のモデルやシステムが生成した出力の品質を評価します。LLM の理解力と推論能力を活かすことで、従来のメトリクスでは十分に評価できないタスクでも、きめ細かな評価が可能になります。
[](https://arxiv.org/abs/2306.05685)
```python lines theme={"system"}
# Scorer 関数を定義する
@weave.op()
def quality_scorer(instruction: str, output: dict) -> dict:
result = evaluate_summary(output["final_summary"], instruction)
return result
```
```python lines theme={"system"}
# 評価を実行
evaluation = weave.Evaluation(dataset=dataset, scorers=[quality_scorer])
arxiv_chain_of_density_pipeline = ArxivChainOfDensityPipeline()
results = await evaluation.evaluate(arxiv_chain_of_density_pipeline)
```
このコードでは、サンプルの ArXiv 論文を含むデータセットを作成し、品質を評価する Scorer を定義したうえで、要約パイプラインの評価を実行します。
まとめ
この例では、Weave を使用して ArXiv 論文向けの Chain of Density 要約パイプラインを実装する方法を紹介しました。ここで学んだ内容は次のとおりです。
* 要約プロセスの各ステップに対応する Weave オペレーションを作成する
* トラッキングと評価のために、パイプラインを Weave モデルでラップする
* Weave オペレーションを使用してカスタム評価メトリクスを実装する
* データセットを作成し、パイプラインの評価を実行する
Weave は要約プロセス全体を通じて入力、出力、中間ステップをトラッキングするため、LLM アプリケーションのデバッグ、最適化、評価を容易に行えます。
この例を拡張すれば、より大規模なデータセットの処理、より高度な評価メトリクスの実装、他の LLM ワークフローとの統合なども可能です。
W\&B で report の全文を表示