> ## Documentation Index
> Fetch the complete documentation index at: https://docs.coreweave.com/llms.txt
> Use this file to discover all available pages before exploring further.
# Get Started with W&B Models
> W&B Models を使用して、実験をトラッキングし、メトリクスをログし、数行のコードで結果を可視化する方法を学びます。
W\&B を使用して機械学習のワークフローでモデル アーティファクトをトラッキング、共有、管理するタイミングと方法を学びます。このページでは、実験のログ、report の生成、適切な W\&B API を使用したログされたデータへのアクセスについて説明します。
このチュートリアルでは以下を使用します:
* [W\&B Python SDK](/ja/products/wandb/ref/python) (`wandb.sdk`): トレーニング中の実験をログし、監視します。
* [W\&B Public API](/ja/products/wandb/ref/python/public-api) (`wandb.apis.public`): ログされた実験データをクエリし、分析します。
* [W\&B Reports and Workspaces API](/ja/products/wandb/ref/wandb_workspaces) (`wandb.wandb-workspaces`): 検出結果をまとめる report を作成します。
サインアップしてAPIキーを作成する
W\&B でマシンを認証するには、まず [forge.coreweave.com/settings](https://forge.coreweave.com/settings) でAPIキーを発行する必要があります。APIキーをコピーし、安全に保管してください。
パッケージのインストールとインポート
W\&B ライブラリと、この手順説明に必要なその他のパッケージをインストールします。
```python theme={"system"}
pip install wandb
```
W\&B Python SDK をインポートします:
```python theme={"system"}
import wandb
```
次のコードブロックでチームの entity を指定します。
```python theme={"system"}
TEAM_ENTITY = "team_entity" # ご自身のチーム entity に置き換えてください
PROJECT = "my-awesome-project"
```
モデルをトレーニングする
次のコードは、モデルをトレーニングし、メトリクスをログし、モデルをアーティファクトとして保存するという、基本的な機械学習ワークフローをシミュレートします。
トレーニング中に W\&B とやり取りするには、W\&B Python SDK (`wandb.sdk`) を使用します。[`wandb.Run.log()`](/ja/products/wandb/ref/python/experiments/run#method-runlog) を使用して損失をログし、[`wandb.Artifact`](/ja/products/wandb/ref/python/experiments/artifact) を使用してトレーニング済みモデルをアーティファクトとして保存します。最後に、[`Artifact.add_file`](/ja/products/wandb/ref/python/experiments/artifact#add_file) を使用してモデルファイルを追加します。
```python theme={"system"}
import random # データをシミュレートするため
def model(training_data: int) -> int:
"""Model simulation for demonstration purposes."""
return training_data * 2 + random.randint(-1, 1)
# Simulate weights and noise
weights = random.random() # ランダムな重みを初期化
noise = random.random() / 5 # ノイズをシミュレートするための小さなランダムノイズ
# Hyperparameters and configuration
config = {
"epochs": 10, # トレーニングするエポック数
"learning_rate": 0.01, # オプティマイザーの学習率
}
# コンテキストマネージャーを使用して W&B run を初期化およびクローズ
with wandb.init(entity=TEAM_ENTITY, project=PROJECT, config=config) as run:
# トレーニングループをシミュレート
for epoch in range(config["epochs"]):
xb = weights + noise # シミュレートされた入力トレーニングデータ
yb = weights + noise * 2 # シミュレートされたターゲット出力(入力ノイズの2倍)
y_pred = model(xb) # モデル予測
loss = (yb - y_pred) ** 2 # 平均二乗誤差損失
print(f"epoch={epoch}, loss={loss}")
# エポックと損失を W&B にログする
run.log({
"epoch": epoch,
"loss": loss,
})
# モデル アーティファクトの一意の名前、
model_artifact_name = f"model-demo"
# シミュレートされたモデルファイルを保存するローカルパス
PATH = "model.txt"
# モデルをローカルに保存
with open(PATH, "w") as f:
f.write(str(weights)) # モデルの重みをファイルに保存
# アーティファクト オブジェクトを作成
# ローカルに保存されたモデルをアーティファクト オブジェクトに追加
artifact = wandb.Artifact(name=model_artifact_name, type="model", description="My trained model")
artifact.add_file(local_path=PATH)
artifact.save()
```
前のコードブロックの要点は次のとおりです。
* `wandb.Run.log()` を使用して、トレーニング中にメトリクスをログします。
* `wandb.Artifact` を使用して、モデル (データセットなど) をアーティファクトとして W\&B の プロジェクト に保存します。
モデルをトレーニングし、アーティファクトとして保存したので、W\&B の Registry にパブリッシュできます。[`wandb.Run.use_artifact()`](/ja/products/wandb/ref/python/experiments/run#method-runuse_artifact) を使用して project からアーティファクトを取得し、モデルレジストリへのパブリッシュを準備します。`wandb.Run.use_artifact()` には、次の 2 つの主な役割があります。
* project からアーティファクト オブジェクトを取得します。
* アーティファクトを run への入力としてマークし、再現性と追跡可能性を確保します。詳細は、[リネージマップの作成と表示](/ja/products/registry/lineage)を参照してください。
ダッシュボードでトレーニングデータを確認する
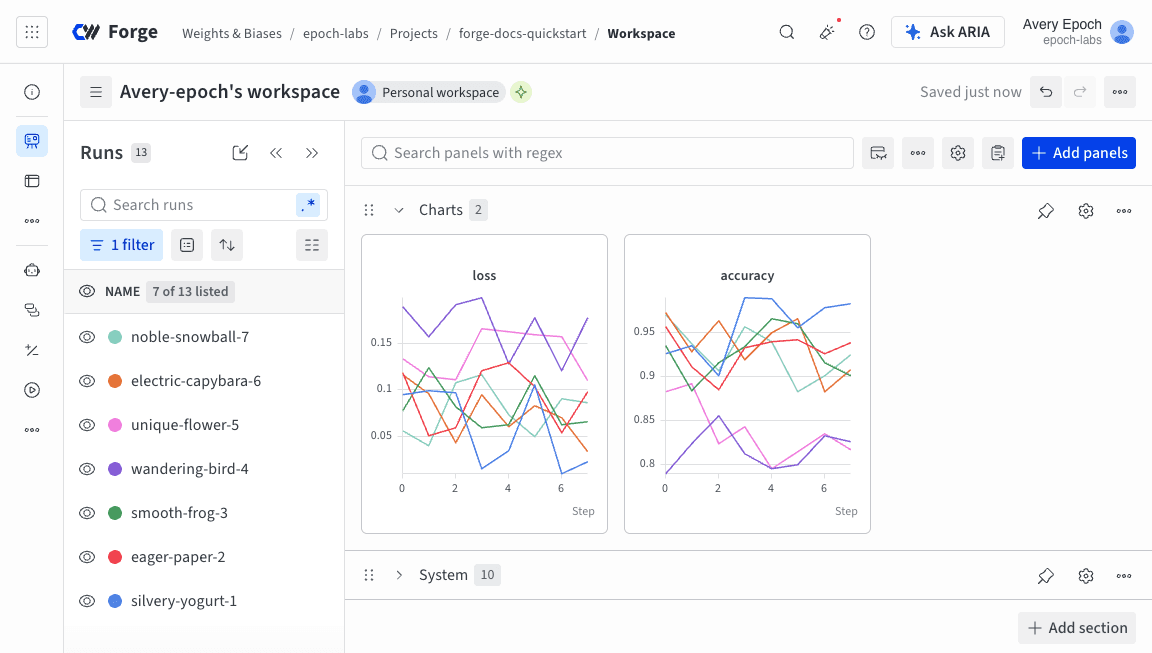
W\&B ダッシュボードにアクセスします。**Projects** タブを選択し、`my-awesome-project` (または上記で使用したプロジェクト名) を検索します。これをクリックして、project のワークスペースを開きます。
ここでは、これまでに実行したすべての run の詳細を確認できます。このスクリーンショットでは、コードを数回再実行して複数の run を生成しており、それぞれにランダムに生成された run 名が付けられています。
モデルを Registry にパブリッシュする
組織内の他のユーザーとモデルを共有するには、`wandb.Run.link_artifact()` を使用して[コレクション](/ja/products/registry/create_collection)にパブリッシュします。次のコードは、アーティファクトを [Registry](/ja/products/registry) にリンクし、チームがアクセスできるようにします。
```python theme={"system"}
# アーティファクト名でチームの project 内の特定のアーティファクトのバージョンを指定します
artifact_name = f'{TEAM_ENTITY}/{PROJECT}/{model_artifact_name}:v0'
print("Artifact name: ", artifact_name)
REGISTRY_NAME = "DemoRegistry" # Registry 名
COLLECTION_NAME = "DemoModels" # Registry 内のコレクション名
# Registry 内のアーティファクトのリンク先パスを作成します
target_path = f"wandb-registry-{REGISTRY_NAME}/{COLLECTION_NAME}"
print("Target path: ", target_path)
with wandb.init(entity=TEAM_ENTITY, project=PROJECT) as run:
model_artifact = run.use_artifact(artifact_or_name=artifact_name, type="model")
run.link_artifact(artifact=model_artifact, target_path=target_path)
```
`wandb.Run.link_artifact()` を実行すると、モデル アーティファクトがRegistryの `DemoModels` コレクションに追加されます。そこから、バージョン履歴、[リネージマップ](/ja/products/registry/lineage)、その他の[メタデータ](/ja/products/registry/registry_cards)などの詳細を確認できます。
アーティファクトをRegistryにリンクする方法の詳細については、[アーティファクトをRegistryにリンクする](/ja/products/registry/link_version)を参照してください。
推論用のモデル アーティファクトを Registry から取得する
モデルを推論に使用するには、`wandb.Run.use_artifact()` を使用して、パブリッシュされたアーティファクトを Registry から取得します。これによりアーティファクト オブジェクトが返されます。その後、[`wandb.Artifact.download()`](/ja/products/wandb/ref/python/experiments/artifact#method-artifactdownload) を使用して、アーティファクトをローカルファイルにダウンロードできます。
```python theme={"system"}
REGISTRY_NAME = "DemoRegistry" # Registry 名
COLLECTION_NAME = "DemoModels" # Registry 内のコレクション名
VERSION = 0 # 取得するアーティファクトのバージョン
model_artifact_name = f"wandb-registry-{REGISTRY_NAME}/{COLLECTION_NAME}:v{VERSION}"
print(f"Model artifact name: {model_artifact_name}")
with wandb.init(entity=TEAM_ENTITY, project=PROJECT) as run:
registry_model = run.use_artifact(artifact_or_name=model_artifact_name)
local_model_path = registry_model.download()
```
Registry からアーティファクトを取得する方法の詳細は、[Registry からアーティファクトをダウンロードする](/ja/products/registry/download_use_artifact)を参照してください。
機械学習フレームワークによっては、重みを読み込む前にモデルのアーキテクチャを再作成する必要があります。具体的な手順は使用するフレームワークとモデルによって異なるため、読者自身で実装してください。
調査結果を report で共有する
W\&B Report and Workspace API は public preview です。
作業をまとめるために [report](/ja/products/wandb/reports) を作成して共有します。プログラムで report を作成するには、[W\&B Report and Workspace API](/ja/products/wandb/ref/wandb_workspaces/reports) を使用します。
まず、W\&B Reports API をインストールします:
```bash theme={"system"}
pip install wandb wandb-workspaces -qqq
```
以下のコードブロックは、Markdown やパネルグリッドなど、複数のブロックで構成される report を作成します。ブロックを追加したり、既存のブロックの内容を変更したりして、report をカスタマイズできます。
コードブロックを実行すると、作成された report の URL へのリンクが出力されます。このリンクをブラウザーで開くと、report を表示できます。
```python theme={"system"}
import wandb_workspaces.reports.v2 as wr
experiment_summary = """This is a summary of the experiment conducted to train a simple model using W&B."""
dataset_info = """The dataset used for training consists of synthetic data generated by a simple model."""
model_info = """The model is a simple linear regression model that predicts output based on input data with some noise."""
report = wr.Report(
entity=TEAM_ENTITY,
project=PROJECT,
title="My Awesome Model Training Report",
description=experiment_summary,
blocks= [
wr.TableOfContents(),
wr.H2("Experiment Summary"),
wr.MarkdownBlock(text=experiment_summary),
wr.H2("Dataset Information"),
wr.MarkdownBlock(text=dataset_info),
wr.H2("Model Information"),
wr.MarkdownBlock(text = model_info),
wr.PanelGrid(
panels=[
wr.LinePlot(title="Train Loss", x="Step", y=["loss"], title_x="Step", title_y="Loss")
],
),
]
)
# report を W&B に保存します
report.save()
```
詳細については、W\&B App で report をプログラムで作成する方法やインタラクティブに作成する方法については、W\&B Docs 開発者ガイドの [Create a report](/ja/products/wandb/reports/create-a-report) を参照してください。
Registry をクエリする
[W\&B Public API](/ja/products/wandb/ref/python/public-api) を使用して、W\&B の履歴データをクエリ、分析、管理します。これは、アーティファクトのリネージをトラッキングしたり、異なるバージョンを比較したり、モデルのパフォーマンスを分析したりするのに役立ちます。
次のコードブロックは、特定のコレクション内のすべてのアーティファクトについてモデルレジストリをクエリする方法を示しています。コレクションを取得し、そのバージョンを反復処理して、各アーティファクトの名とバージョンを出力します。
```python theme={"system"}
import wandb
# wandb API を初期化します
api = wandb.Api()
# `model` という string を含み、
# `text-classification` というタグまたは `latest` という alias を持つすべてのアーティファクトのバージョンを検索します
registry_filters = {
"name": {"$regex": "model"}
}
# 論理 $or オペレーターを使用してアーティファクトのバージョンをフィルターします
version_filters = {
"$or": [
{"tag": "text-classification"},
{"alias": "latest"}
]
}
# フィルターに一致するすべてのアーティファクトのバージョンのイテラブルを返します
artifacts = api.registries(filter=registry_filters).collections().versions(filter=version_filters)
# 見つかった各アーティファクトの名、コレクション、aliases、tags、および created_at の日付を出力します
for art in artifacts:
print(f"artifact name: {art.name}")
print(f"collection artifact belongs to: { art.collection.name}")
print(f"artifact aliases: {art.aliases}")
print(f"tags attached to artifact: {art.tags}")
print(f"artifact created at: {art.created_at}\n")
```
Registry をクエリする方法の詳細は、[レジストリ項目をクエリする](/ja/products/registry/search_registry#query-registry-items-with-mongodb-style-queries) を参照してください。
## Related topics
- [About CoreWeave Inference](/products/inference.md)