

--segment can be rejected.
Concepts
The Slurm Topology/Block Plugin adds new features for managing job placement within NVLink domains. Key concepts include Blocks, Segments, and the--exclusive=topo option.
When SUNK auto-generates the topology file, it defines Blocks based on the ds.coreweave.com/nvlink.domain label on CKS Nodes. For GB200 and GB300 NVL72-powered nodes, this label is a globally unique rack identifier, for example, DH4-016-US-EAST-02A.
In clusters with both NVLink-enabled multi-node systems and standard nodes, SUNK creates a topology.conf file that includes Block and switch definitions. This configuration doesn’t affect behavior unless you explicitly enable the Topology/Block Plugin, which ensures safe integration and runtime flexibility.
Blocks
A Block is a group of nodes in the same Slurm cluster, defined in thetopology.conf file. SUNK automatically generates this file, so you don’t need to create or manage it manually. It specifies which nodes belong to each Block and defines the Block size, the number of nodes in a Block.
Each Block has a unique ID and cannot overlap with others. CoreWeave dynamically updates the topology configuration to reflect changes in node availability. By default, each GB200 or GB300 NVL72-based system corresponds to a Block containing 18 nodes in the same NVLink domain. A node that is drained or down stays in the Block, so the Block size is unchanged and the Block simply has fewer nodes available to schedule. Run scontrol show topology to see the current BlockSize and node list for each Block.
Segments
A Segment is a set of nodes within a Block that Slurm allocates together. It must fit within a single Block and cannot cross Block boundaries. Segments reduce resource fragmentation because they keep allocations intact. If a job spans multiple Blocks, Slurm schedules equal-sized Segments in each Block. A Block can hold multiple Segments if space allows. By default, if you don’t provide a segment size, Slurm uses the full Block size. The following are best practices when configuring segment size:-
When you select a segment size for your job, default to
--segment=1. This makes your job more flexible because it can run on any available nodes across all Blocks, which improves scheduling efficiency. -
On GB200 NVL72 systems, don’t use a segment size larger than
--segment=16. This gives a buffer for nodes to fail on a rack before it becomes unusable for your job. - On GB200 NVL72 systems, balance segment sizes across jobs on your cluster with factors of 16 (8, 4, 2, 1). This minimizes the number of idle nodes on each rack left unavailable to your jobs.
-
Always set the segment size explicitly. If you omit the segment size, Slurm defaults to
--segment=18. This adds additional scheduling constraints and can cause submission failures.
Exclusive option
The--exclusive=topo option ensures that only the job being submitted runs in a Block. The job won’t share a Block with any other job, and no new jobs can be placed there until the original job completes. Unused nodes in the Block remain idle. Use this option for benchmarking or to avoid resource competition.
Example scenarios
The following scenarios show how to use the Topology/Block Plugin to optimize job placement within GB200 and GB300 NVL72-based systems. Use them as reference patterns when sizing your own jobs and choosing segment sizes. Each diagram shows multiple 18-node NVL72 systems (Blocks). Node colors represent status:- Green: nodes running the requested job (light green indicates a second job or Segment)
- Gray: Unavailable: drained, down, or running unrelated jobs
- White: Idle
A job that fits in a Block
A job requests 10 nodes, which is less than the Block size. The segment size is set to 1, following best practice.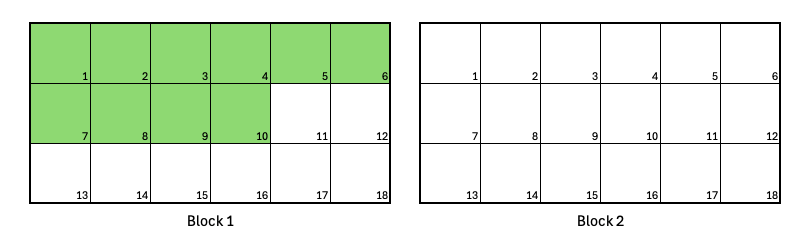
Job requests 10 nodes.
Jobs larger than the Block size
A job requests 20 nodes, which exceeds the Block size of 18. The segment size is set to 1, following best practice.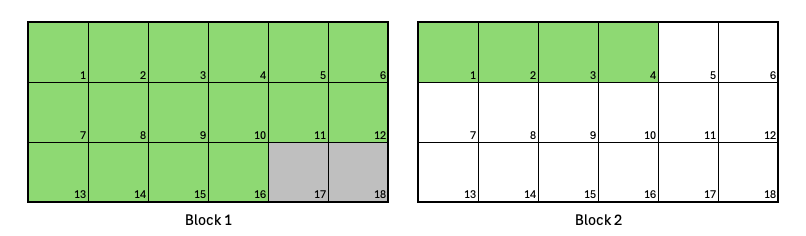
Job requests 20 nodes
Two jobs in a single Block
You submit two jobs. The first requests 8 nodes, and the second requests 4. The segment size is set to 1 for both jobs, following best practice.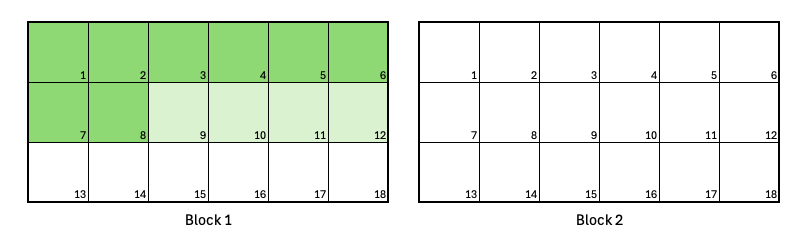
Two jobs can fit in a single Block
Realistic training example: A job with two Segments
A job requests 32 nodes, divided into two Segments of 16 nodes each.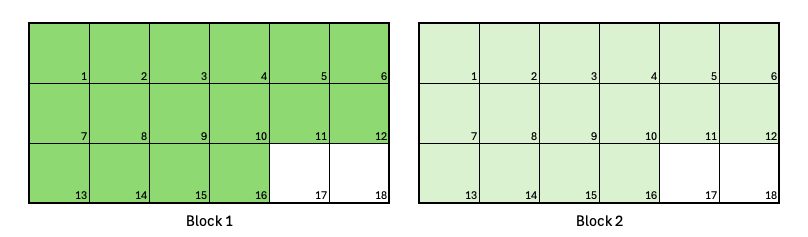
A job with two Segments
Exclusive jobs
A job requests 16 nodes with the--exclusive=topo option. The segment size is set to 1, following best practice.
--exclusive=topo prevents it from running in Block 1 while a competing job (light green) is active. The rest of Block 2 remains idle, and no other jobs can run there until this job completes.
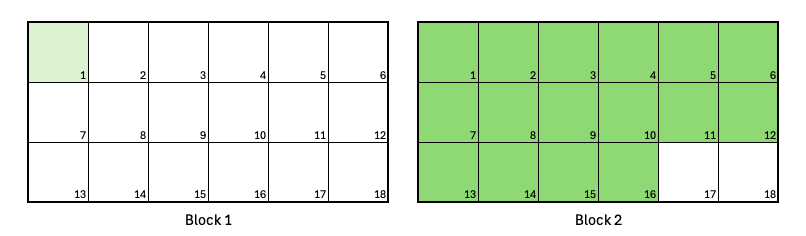
Exclusive jobs
Combining Segments and the exclusive option
A job requests 16 nodes, divided into two 8-node Segments, using--exclusive=topo.
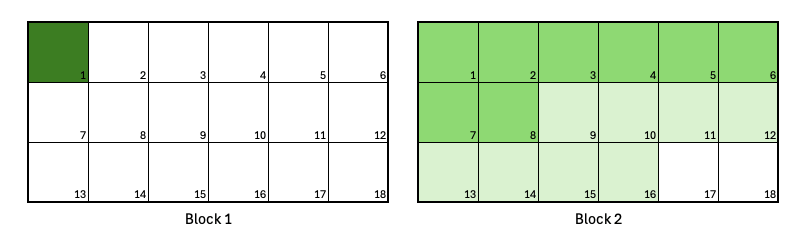
Combining Segments and Exclusive jobs
Identify idle nodes in a Block
Before you submit a job, you can check how many nodes are currently idle in each Block to choose a segment size that schedules promptly. Use the script at/usr/share/sunk/bin/segment-calc.sh on the Slurm login node to check for idle nodes within a Block. By default, it reports idle nodes per topology Block. You can optionally provide the --segment N argument to report only those Blocks with at least N idle nodes available.
Example usage
Troubleshoot “Requested node configuration is not available” with --segment
A job that uses --segment, often combined with --exclude, can be rejected at submission or stay PENDING with the reason Requested node configuration is not available. This usually means the segment math can’t be satisfied, not that the cluster is out of capacity.
Work through these causes in order:
-
You combined
--segmentwith--nodelist. Slurm doesn’t support both at once, so this combination always fails, whatever the cluster’s state. Drop one of them. To steer a job toward particular hardware, use--constraintinstead of a node list. See Block limitations in the Slurm documentation. -
You requested GPUs with
--gpus-per-task.--gpus-per-taskcombined with--segmentis rejected even when enough nodes are idle. Use--gpus-per-nodeinstead. To confirm this is the cause, submit the same job three ways with--test-only: with no GPU flag, with--gpus-per-node, and with--gpus-per-task. Only the last one fails. -
The segment size is larger than the available nodes in any single Block. A Segment must fit within one Block and can’t cross Block boundaries. If drains have reduced a Block below your requested segment size, no Block can hold the Segment. Check how many nodes are idle per Block with
/usr/share/sunk/bin/segment-calc.shas shown in Identify idle nodes in a Block, then choose a segment size that fits. -
--excluderemoved nodes a Block needs to reach the segment size. Excluding specific nodes can drop a Block below the requested segment size, leaving no Block able to satisfy the request. Relax or remove the--excludelist, or lower the segment size to fit the remaining nodes. If you need nodes kept out of scheduling for longer, ask an administrator for a reservation or a drain, which works with--segmentwhere--excludestruggles. -
The total node count isn’t divisible by the segment size. If a job spans multiple Blocks, Slurm schedules equal-sized Segments in each Block. Make sure
--nodesis a multiple of--segment. - You omitted the segment size, so it defaulted higher than expected. If you don’t set a segment size, Slurm defaults to the full Block size, which adds constraints that can cause submission failures. Always set the segment size explicitly.