Fine-tune Stable Diffusion Models with CoreWeave Cloud
Fine-tune and train Stable Diffusion models using Argo Workflows
It's no secret that fine-tuning and training Stable Diffusion models can be computationally expensive. However, CoreWeave Cloud allows you to train Stable Diffusion models with on-demand compute resources that can autoscale Pods, including Scale-to-Zero once training is complete, in order to prevent incurring charges for idle resources.
This guide is a reference example of how to use an Argo Workflow to create a pipeline at CoreWeave to fine-tune and train Stable Diffusion models. It's a working demonstration to get you started, but it's not intended to be a production application.
This article covers both DreamBooth and Textual Inversion training methods. Most of the steps are the same for both methods, but there are some important differences. Please see the respective tabbed sections we've included; these indicate which training method applies to the step you're performing.
Prerequisites
This guide contains all the information you'll require to train Stable Diffusion. It assumes that you have already followed the process to set up the CoreWeave Kubernetes environment. If you haven't already, please follow the steps in Cloud Account and Access before proceeding any further.
The steps outlined below also assume you are familiar with the topics covered in these articles:
Resources
Hardware
Here's a reference example for a hardware setup through which you could run all the steps of this guide:
- 8 vCPU (AMD EPYC)
- 32GB RAM
- NVIDIA A40/A6000 GPUs (48GB VRAM)
This reference example uses an optimal container configuration for training Stable Diffusion models, but you can use any configuration you wish provided it meets the minimum requirements. This configuration is currently $1.52 per hour using CoreWeave's resource-based pricing model.
There is also an optional test Inference endpoint that you can enable and deploy automatically when the model completes fine-tuning, which features:
- 4 vCPUs
- 8GB RAM
- NVIDIA Quadro RTX 5000 (16GB VRAM)
This Inference container defaults to the following configuration, which currently costs $0.65 per hour with resource-based pricing.
GitHub repository
To follow this guide, clone the latest version of the CoreWeave kubernetes-cloud repository and navigate to the project directory for your preferred fine-tuning method.
-
DreamBooth fine-tuning templates are in kubernetes-cloud/sd-dreambooth-workflow
-
Textual Inversion fine-tuning templates are in kubernetes-cloud/sd-finetuner-workflow
Understanding the Argo Workflows
Each of the Argo Workflow templates used in the examples in this guide has a similar structure. They consist of three important sections:
- Workflow parameters
- Main template
- Individual step templates
Throughout this guide, you will see many template tags, surrounded by double braces: {{ and }}. Many of these are simple variable substitutions using workflow and step parameters. Expression template tags that start with {{= contain expr code.
Permissions Setup
Argo workflows are functionally config YAML files, and they help you run and scale the pipelines you'll need for a multitude of purposes. However in order to perform tasks, including spinning up inferences, the Argo Workflow job needs special permissions. These permissions are declared in inference-role.yaml. Applying the below manifest grants Argo the required permissions:
$kubectl apply -f inference-role.yaml
Parameters
All of the Workflow parameters and their default values are defined at the top of the workflow templates, and cover the following categories:
- Fine-tuning hyperparameters
- File paths
- Workflow step controls
- Container images
All the parameters have suitable defaults, but make sure to review them and adjust according to your needs.
Main template
The workflow is defined by a main template that lists the steps in the order they should be run. Each of these steps have their parameters defined. Some also include a when value, which informs the workflow when the step should be skipped.
Step templates
Step templates define how the job will be run, including the container image, resource requests, commands, and so on.
The step template that creates the Inference Service (InferenceService) is more complex than the others, because it applies a manifest to the cluster, instead of running a custom job. This manifest defines the Inference Service. Because of this, this guide will ask you to create a service account which has permission to create Inference Services. The workflow will then use this service account to apply the manifest.
The Inference Service step has custom-defined conditions for success and failure. Without these, Argo would mark the step as successful as soon as it applied the manifest. By applying these custom conditions, Argo can monitor the new Inference Service more effectively. In these circumstances, it will only consider the step complete after the Inference Service starts successfully. Custom conditions which ensure successful inference deployment make running additional steps using the Inference Service much easier afterward.
Triggering the Argo Workflows
Now that you've been introduced to what Argo Workflows are and how they work, this guide offers two ways to deploy everything you need to trigger workflows yourself.
The first approach is through the Argo Workflow UI. From there, you can see all of the deployed Workflow templates. Clicking on one will allow you to submit a new run after editing all of the parameter's default values.
The second is through the Argo Rest API's /api/v1/events/<namespace>/<discriminator> endpoint. The discriminator will be defined in a WorkflowEventBinding deployed alongside each WorkflowTemplate.
You can view all of the available endpoints in your Argo Workflows deployment by clicking on the API Docs button in the sidebar of the UI.
About the fine-tuning methods
This guide explains how to deploy an Argo Workflow to fine-tune a Stable Diffusion base model on a custom dataset, then use the fine-tuned model in an inference service.
The base model being trained on can be provided directly in a PVC (PersistentVolumeClaim), or in a Stable Diffusion model identifier from Hugging Face's model repository. The dataset trained upon needs to be in the same PVC in text and image format.
As described earlier, you can choose one of two different methods to train the base model, either DreamBooth or Textual Inversion. Here's a short orientation for each method before you get started.
DreamBooth method
The DreamBooth method allows you to fine-tune Stable Diffusion on a small number of examples, producing images containing a specific object or person. This method for fine-tuning diffusion models was introduced in a paper published in 2022, DreamBooth: Fine-Tuning Text-to-Image Diffusion Models for Subject-Driven Generation. A lighter introductory text was also released along with the paper in this blog post.
To summarize, the DreamBooth method is a way to teach a diffusion model about a specific object or style using approximately three to five example images. After the model is fine-tuned on a specific object using DreamBooth, it can produce images containing that object in new settings.
The DreamBooth method uses "Prior Preservation Loss", which means class-specific loss is combined with the loss from your custom dataset. For example, let's say you wanted to use the DreamBooth method to teach the model about a specific breed of dog. The model also gets fine-tuned against generic images of dogs, which helps prevent it from forgetting what dogs in general look like.
In the paper, a special token - sks - is used in the prompts for the custom dataset. It isn't necessary to use a special token like sks, but it allows you to use this token in inference prompts to create images containing the dog in the custom dataset. The sks token was chosen because it appears very rarely in the data used to train the text encoder.
Textual Inversion method
The Textual Inversion training method captures new concepts from a small number of example images, and associates the concepts with words from the pipeline's text encoder. The model then uses these words and concepts to create images using fine-grained control from text prompts. Textual Inversion was introduced in the 2022 paper An Image is Worth One Word: Personalizing Text-to-Image Generation using Textual Inversion.
The Textual Inversion examples in this guide allow you to fine-tune Stable Diffusion with your own dataset with the same technique used for pre-training.
Example templates
The GitHub repository for this guide has template files for both training methods. Refer to the tables below to learn about each file.
- Dreambooth
- Textual Inversion
DreamBooth Templates
| Filename | Description |
|---|---|
db-workflow-template.yaml | The Argo Workflow Template itself. |
db-workflow-event-binding.yaml | The Event Binding used to trigger the Workflow via an API call. |
inference-role.yaml | The inference role you configured earlier. |
db-finetune-pvc.yaml | The model storage volume described earlier. |
huggingface-secret.yaml | The Hugging Face token used to download a base model. |
wandb-secret.yaml | The Weights and Biases token used for reporting during fine-tuning. |
Textual Inversion Templates
| Filename | Description |
|---|---|
sd-finetune-workflow-template.yaml | The Argo Workflow Template itself |
sd-finetune-workflow-event-binding.yaml | The Event Binding used to trigger the Workflow via an API call. |
inference-role.yaml | The inference role you configured earlier in this demo. |
sd-finetune-pvc.yaml | A model storage volume, as described earlier in this demo. |
sd-finetuner/Dockerfile | A Dockerfile that can be used to build your own fine-tuner image, should you modify the fine-tuner code. |
sd-finetuner/finetuner.py | The entry point for the Stable Diffusion fine-tuner. |
sd-finetuner/datasets.py | Script that contains the functionality to handle different dataset formats (i.e. DreamBooth vs textual inversion). |
sd-finetuner/requirements.txt | The Python requirements which list the dependencies for the fine-tuner. |
huggingface-secret.yaml | The Hugging Face token used to download a base model. |
wandb-secret.yaml | The Weights and Biases token used for reporting during finetuning. |
Required components
You will need the following Kubernetes components to follow this guide. Deploy each of them before proceeding to the database setup step.
Argo Workflows
Deploy Argo Workflows using the Application Catalog.
From the application deployment menu, click on the Catalog tab, then search for argo-workflows to find and deploy the application.
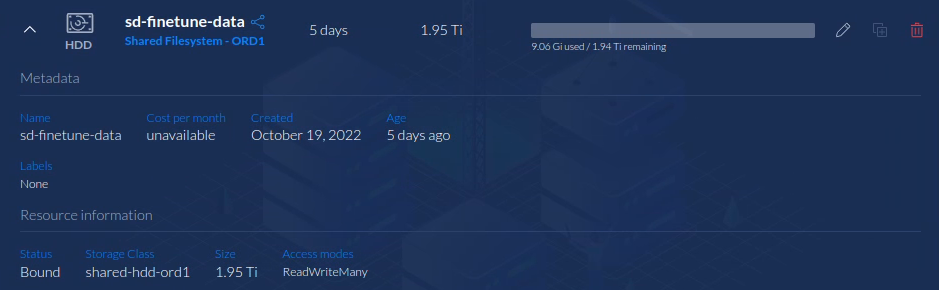
PVC
Create a ReadWriteMany PVC storage volume from the Storage menu. By default, this workflow uses a specific PVC depending on your fine-tuning method:
- The DreamBooth PVC name should be
db-finetune-data - The Textual Inversion PVC name should be
sd-finetune-data - You don't need to name the PVC root for your dataset. For example, proper usage would look like "dataset-name-here," while improper usage might look like "/pvc/dataset-name-here".
This name can be changed in the configuration after you are familiar with the workflow.
1TB to 2TB is recommended for training Stable Diffusion models, depending on the size of the dataset and how many fine-tunes you wish to run. Later, if you need more space, it's easy to increase the size of the PVC as required.
The PVC can be shared between multiple fine-tune runs. We recommend using HDD type storage, because the fine-tuner doesn't require high-performance storage.
If you prefer, you can also deploy the PVC with the YAML snippet for your method below. You'll then use kubectl apply -f to apply it.
- Dreambooth
- Textual Inversion
DreamBooth YAML
apiVersion: v1kind: PersistentVolumeClaimmetadata:name: db-finetune-dataspec:storageClassName: shared-hdd-las1accessModes:- ReadWriteManyresources:requests:storage: 2000Gi
Textual Inversion YAML
apiVersion: v1kind: PersistentVolumeClaimmetadata:name: sd-finetune-dataspec:storageClassName: shared-hdd-ord1accessModes:- ReadWriteManyresources:requests:storage: 2000Gi
Kubernetes Secrets
The workflow requires two Kubernetes Secrets to be created — one from a Weights and Biases API key, the other from a Hugging Face user access token. These Secrets will be leveraged to log metrics during fine-tuning, and (potentially) download the base model from Hugging Face.
To create the Weights and Biases Secret, encode your Weights and Biases API key with base64.
$echo -n "example-wandb-api-key" | base64
Output:
ZXhhbXBsZS1hcGkta2V5IC1uCg==
Add the encoded string to wandb-secret.yaml at line 3 as shown. The string will be unique to the API key.
apiVersion: v1data:token: ZXhhbXBsZS1hcGkta2V5IC1uCg==kind: Secretmetadata:name: wandb-token-secrettype: Opaque
Next, create the Hugging Face Secret by encoding the user access token from your account.
$echo "hugging-face-token" -n | base64
Output:
aHVnZ2luZy1mYWNlLXRva2VuIC1uCg==
Add the string to huggingface-secret.yaml. The string is unique to the token.
apiVersion: v1data:token: aHVnZ2luZy1mYWNlLXRva2VuIC1uCg==kind: Secretmetadata:name: huggingface-token-secrettype: Opaque
Apply both manifests to create the Secrets.
$kubectl apply -f wandb-secret.yaml$kubectl apply -f huggingface-secret.yaml
Optional Component: filebrowser
The File Browser component is optional but recommended, as it usually makes your interaction with the PVC easier. This application allows you to easily transfer files and folders to and from your PVC. You can deploy File Browser from the Application Catalog.
We recommend using a short name—such as finetune—for your File Browser application to avoid SSL CNAME issues. When deploying File Browser, make sure to add the PVC you created earlier to the File Browser list of mounts.
One of CoreWeave's key advantages in this arena is its flexibility; for example, if you wish to, you can use a Virtual Server to interact with the PVC via SSH.
Dataset Setup
At this point, you should have a PVC set up that is accessible via the filebrowser application or some other mechanism. Now it's time to populate the PVC with your dataset.
Select the tab for your chosen fine-tuning method.
- Dreambooth
- Textual Inversion
DreamBooth Dataset
For each dataset you want to use, create a directory with a meaningful name such as data/example-dog and place your dataset images in that directory.
.76aa915.879.png)
The fine-tuner will use Prior Preservation loss which means "generic" images (AKA class images) will be used during fine-tuning. The fine-tuner will generate these "generic" images prior to starting the training loop using the base model and a provided prompt, but you can also upload these images to a separate folder in the PVC. For example, if you are fine-tuning the model based on pictures of your dog, you would want to use images of random dogs for the "generic" images. By default, the workflow will use 100 class images.
.1f33c0b.863.png)
These generic datasets can be reused for different fine-tuned models.
Textual Inversion Dataset
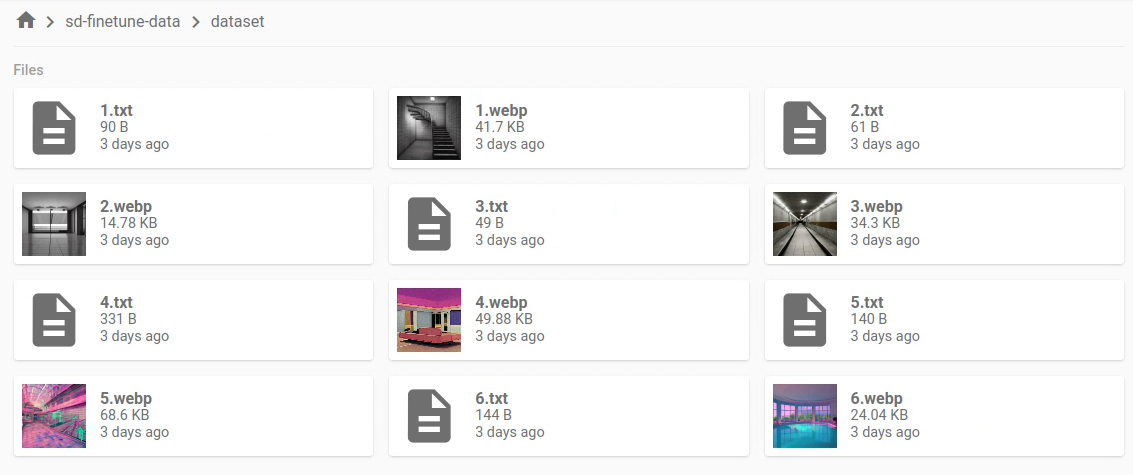
For each dataset you want to use, create a directory with a meaningful name such as dataset.
The data will be text-image pairs, where each pair has the same filename. The caption files must have the .txt file extension, and image formats supported are .png, .jpg, .jpeg, .bmp, and .webp.
Here's an example dataset. You'll see below that it is in the directory named dataset, which contains six text-image pairs. Each image's caption is contained in a corresponding .txt file.
Deploy the Workflow template
To deploy the workflow template, you can use kubectl or the Argo CLI.
Select the tab for your chosen fine-tuning method.
- Dreambooth
- Textual Inversion
DreamBooth Workflow deployment
To use kubectl, run the following command:
$kubectl apply -f db-workflow-template.yaml
To use Argo's CLI, run the following command:
$argo template create db-workflow-template.yaml
Textual Inversion Workflow Deployment
To use kubectl, run the following command:
$kubectl apply -f sd-finetune-workflow-template.yaml
To use Argo's CLI, run the following command:
$argo template create sd-finetune-workflow-template.yaml
Run the Workflow
You can trigger runs of the workflow from the Argo UI, or by setting up a webhook.
Use Argo Workflows UI
Once the Workflow template is applied, you should see it in the Argo Workflows UI. An example using the Textual Inversion method is shown below. If you are using the DreamBooth method, everything will look the same as this example, except that the name will be db-finetune-template.
.a119ff4.880.png)
To trigger a new run of the workflow through the UI, click on the template, then the submit button, then change the necessary parameters. The most common parameters are shown below, but there are many other workflow parameters you may want to review.
- Dreambooth
- Textual Inversion
DreamBooth parameters
| Parameter | Description |
|---|---|
run_name | The workflow name, also used in WandB logs. |
instance_dataset | The populated dataset directory. |
instance_prompt | The prompt with identifier specifying the instance. |
class_dataset | The path where generic images are located in the filebrowser. |
class_prompt | The prompt to specify images in the same class as provided instance images. |
output | The output directory. |
It is important to note that the run_name parameter must be in lowercase, and contain no numbers or underscores. If the run_name contains forbidden characters the Inference Service step will fail.
Textual Inversion Parameters
run_name | The workflow name, also used in WandB logs. |
dataset | The populated dataset directory. |
Use Webhook
To trigger workflow runs by calling an Argo REST endpoint, you first need to deploy a WorkflowEventBinding. This sets a custom discriminator that tells Argo how to map an endpoint to the workflow template you just deployed.
Select the tab for your chosen fine-tuning method.
- Dreambooth
- Textual Inversion
DreamBooth WorkflowEventBinding
The WorkflowEventBinding is defined in db-workflow-event-binding.yaml and the discriminator is set to db-finetune. It also maps a few values in the body of the HTTP request to parameters in the workflow template as an example.
To deploy the WorkflowEventBinding, run the following:
$kubectl apply -f db-workflow-event-binding.yaml
Now you can trigger the workflow with the /api/v1/events/<namespace>/db-finetune.
Textual Inversion WorkflowEventBinding
The WorkflowEventBinding is defined in sd-finetune-workflow-event-binding.yaml and the discriminator is set to sd-finetune. It also maps a few values in the body of the HTTP request to parameters in the workflow template as an example.
To deploy the WorkflowEventBinding, run the following:
$kubectl apply -f sd-finetune-workflow-event-binding.yaml
Now you can trigger the workflow with the /api/v1/events/<namespace>/sd-finetune.
The domain used for the API is the same one used to navigate to the UI. You can find the URL by running kubectl get ingress.
The namespace in the URL is the Kubernetes namespace where you've deployed all of the resources. To find your default namespace, run:
$kubectl config view --minify --output 'jsonpath={..namespace}'
The Argo API uses the same authentication that you used to login to the UI. For more information about generating the token, see Get Started with Workflows.
Use the information you've collected above to complete the bash commands below, which will hit the endpoint to trigger workflow runs.
- Dreambooth
- Textual Inversion
DreamBooth Endpoint
$export ARGO_API=<enter the URL>$export NAMESPACE=<enter your k8s namespace>$export ARGO_TOKEN=<enter your Argo token>$export INSTANCE_DATASET=<path to instance dataset>$export INSTANCE_PROMPT=<instance prompt to use>$export CLASS_DATASET=<path to the class dataset>$export CLASS_PROMPT=<class prompt to use>$export NUM_CLASS_IMAGES=<number of class images to generate and/or use>$export OUTPUT=<path to folder where the model will be saved>$curl --location "https://${ARGO_API}/api/v1/events/${NAMESPACE}/db-finetune" \--header "${ARGO_TOKEN}" \--header 'Content-Type: application/json' \--data "{\"run_name\": \"example-dog\",\"instance_dataset\": \"${INSTANCE_DATASET}\",\"instance_prompt\": \"${INSTANCE_PROMPT}\",\"class_dataset\": \"${CLASS_DATASET}\",\"class_prompt\": \"${CLASS_PROMPT}\",\"num_class_image\": \"${NUM_CLASS_IMAGES}\",\"output\": \"${OUTPUT}\"}"
Textual Inversion Endpoint
$export ARGO_API=<enter the URL>$export NAMESPACE=<enter your k8s namespace>$export ARGO_TOKEN=<enter your Argo token>$export DATASET=<enter the name of your dataset directory>$curl --location "https://${ARGO_API}/api/v1/events/${NAMESPACE}/sd-finetune" \--header "${ARGO_TOKEN}" \--header 'Content-Type: application/json' \--data "{\"run_name\": \"full-test\",\"dataset\": \"${DATASET}\"}"
Observe the Workflow
At this point, we can observe the running workflow via several mechanisms.
argo list
Using the argo list command, you can see information about all of the workflows. Use this command to find the name of the workflow that was just launched.
You can also filter by statuses. To get all running workflows, run:
$argo list --status Running
- For DreamBooth, the output should look like this:
NAME STATUS AGE DURATION PRIORITY MESSAGEdb-finetune-template-4fe7b Running 3m 3m 0
- For Textual Inversion, the output should look like this:
NAME STATUS AGE DURATION PRIORITY MESSAGEsd-finetune-template-5zx10 Running 2m 2m 0
argo watch
Invoking argo watch <workflow name> tells Argo that we want to watch the job as it goes through all of its stages. Here is example output:
- Dreambooth
- Textual Inversion
DreamBooth Output
Name: db-finetune-template-4fe7bNamespace: tenant-exampleServiceAccount: inferenceStatus: RunningConditions:PodRunning TrueCreated: Mon Apr 10 11:32:53 -0400 (3 minutes ago)Started: Mon Apr 10 11:32:53 -0400 (3 minutes ago)Duration: 3 minutes 22 secondsProgress: 1/2ResourcesDuration: 13s*(1 cpu),1m26s*(100Mi memory)Parameters:run_name: example-dogpvc: db-finetune-datamodel: stabilityai/stable-diffusion-2-1-baseinstance_dataset: data/example-doginstance_prompt: a photo of sks dogprior_loss_weight: 1class_dataset: generic/dogs-2class_prompt: a photo of dogoutput: finetunes/docs-examplenum_class_images: 100lr: 2e-6lr_scheduler: constantlr_warmup_steps: 0batch_size: 1epochs: 4seed: 42checkpointing_steps: 200image_log_steps: 100image_log_amount: 4resolution: 512use_tensorizer: truerun_inference: trueinference_only: falseregion: LAS1trainer_gpu: A40trainer_gpu_count: 1inference_gpu: Quadro_RTX_5000downloader_image: ghcr.io/wbrown/gpt_bpe/model_downloaderdownloader_tag: e2ef65ffinetuner_image: navarrepratt/sd-finetunerfinetuner_tag: df-14serializer_image: navarrepratt/sd-serializerserializer_tag: df-14inference_image: navarrepratt/sd-inferenceinference_tag: df-14-3STEP TEMPLATE PODNAME DURATION MESSAGE● db-finetune-template-4fe7b main├───✔ downloader(0) model-downloader db-finetune-template-4fe7b-model-downloader-956898090 49s└───● finetuner model-finetuner db-finetune-template-4fe7b-model-finetuner-1551742686 2m
Textual Inversion Output
Name: sd-finetune-template-5zx10Namespace: tenant-sta-nav-nprattServiceAccount: inferenceStatus: RunningConditions:PodRunning TrueCreated: Mon Apr 10 10:45:06 -0400 (4 minutes ago)Started: Mon Apr 10 10:45:06 -0400 (4 minutes ago)Duration: 4 minutes 24 secondsProgress: 1/2ResourcesDuration: 12s*(1 cpu),1m16s*(100Mi memory)Parameters:run_name: full-testpvc: sd-finetune-datamodel: stabilityai/stable-diffusion-2dataset: pokemon/512_smalllr: 5e-6epochs: 10batch_size: 1use_ema: Falsegradient_checkpointing: Falseuse_8bit_adam: Falseadam_beta1: 0.9adam_beta2: 0.999adam_weight_decay: 1e-2adam_epsilon: 1e-8seed: 42save_steps: 500resolution: 512resize: Falsecenter_crop: Falseresize_interp: lanczosshuffle: Trueimage_log_steps: 500image_log_amount: 4project_id: sd-finetuneuse_tensorizer: truerun_inference: trueinference_only: falseregion: ORD1trainer_gpu: RTX_A6000trainer_gpu_count: 1inference_gpu: Quadro_RTX_5000downloader_image: ghcr.io/wbrown/gpt_bpe/model_downloaderdownloader_tag: e526c65finetuner_image: navarrepratt/sd-finetunerfinetuner_tag: ucgserializer_image: navarrepratt/sd-serializerserializer_tag: df-14inference_image: navarrepratt/sd-inferenceinference_tag: df-14-3STEP TEMPLATE PODNAME DURATION MESSAGE● sd-finetune-template-5zx10 main├───✔ downloader(0) model-downloader sd-finetune-template-5zx10-model-downloader-956898090 15s└───● finetuner model-finetuner sd-finetune-template-5zx10-model-finetuner-1551742686 4m
argo logs
Invoking argo logs -f <workflow name> watches the logs in real time.
If this process appears to hang and outputs the message Loading the model, it's due to a bug in the terminal display code that gets exposed during initial model download and caching. To fix this, kill the relevant Pod or job, then resubmit it. This should result in the proper progress display.
During fine-tuning, you'll see the time elapsed displayed, alongside the expected time to complete. Checkpointing and loss reporting is also included in the logs as well as in WandB.
You can instantly watch a submitted workflow by using the --watch option when running the submit command:
$argo submit --watch
WandB Logging
Logs for the fine-tuning workflow can be tracked and visualized using Weights & Biases (WandB).
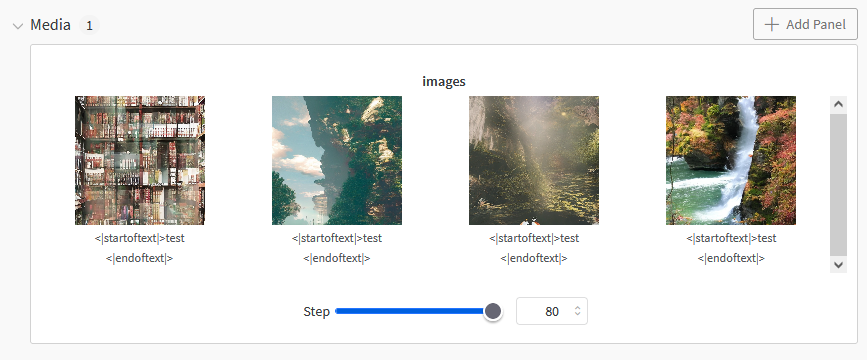
You can see images being generated in the Media tab during the fine-tuning process for every image_log_steps amount of steps. This can also be adjusted depending on how often you want to sample from the model during fine-tuning.
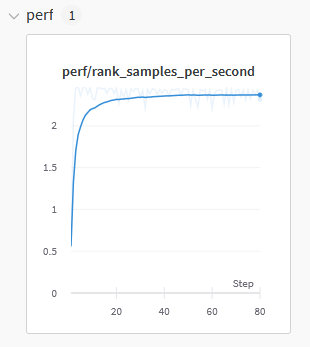
In the performance tab you will see how fast the GPU is performing in a metric of samples per second.
.5d502d3.856.png)
The training tab records a multitude of fine-tuning metrics, which indicate whether or not the workflow is making progress by reducing loss over time. These metrics can be very useful in determining whether or not the model has reached convergence.
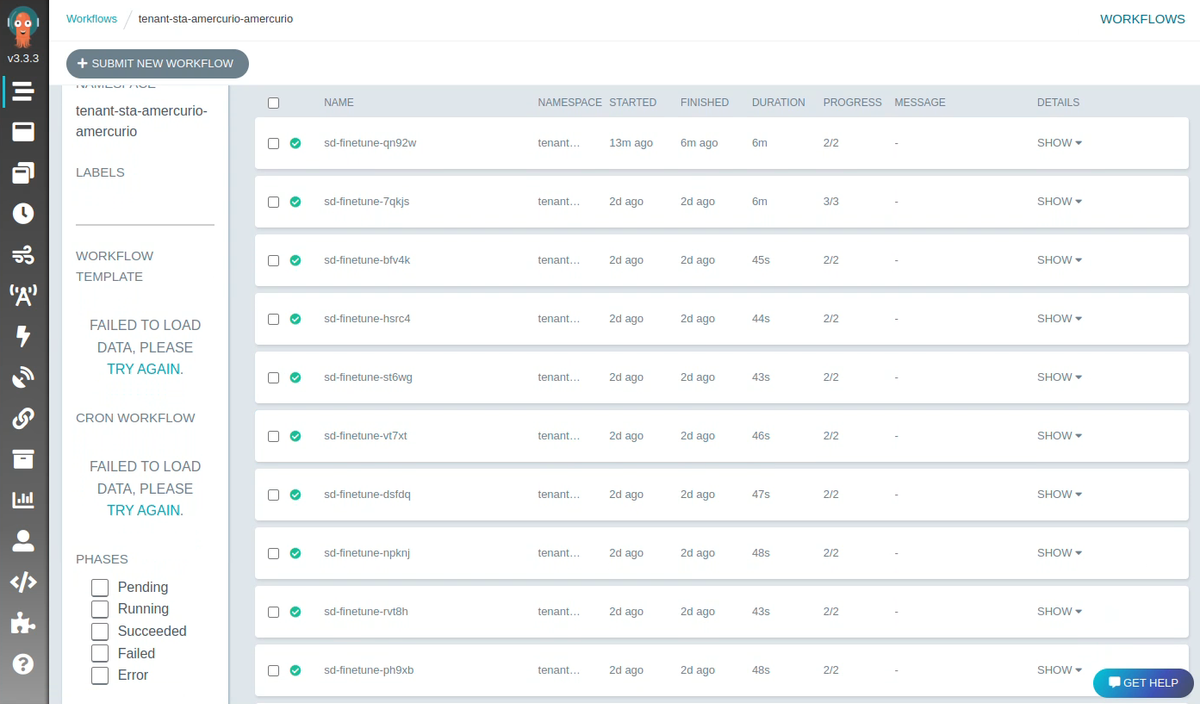
Web UI
You can access your Argo Workflow application via the web UI to see all the fine-tuner jobs, and to check their statuses.
Artifacts
Once the model completes fine-tuning, the model artifacts are available in the respective directory:
- For DreamBooth, the directory is supplied to the workflow as the
outputparameter. - For Textual Inversion, the directory name pattern is
{{pvc}}/finetunes/{{run_name}}.
You can download the model from the respective location.
Inference
If you set up the inference service, you can query the URL endpoint to test the model.
- If the KNative client is installed, get the URL by invoking
kn service list. - Retrieve the URL without KNative by executing
kubectl get ksvc.
See the example output for your fine-tuning method:
- Dreambooth
- Textual Inversion
DreamBooth Output
NAME URL LATESTCREATED LATESTREADY READY REASONinference-example-dog-predictor-default https://inference-example-dog-predictor-default.tenant-example.knative.chi.coreweave.com inference-example-dog-predictor-default-00001 inference-example-dog-predictor-default-00001 True
Textual Inversion Output
NAME URL LATESTCREATED LATESTREADY READY REASONinference-test-predictor-default http://inference-test-predictor-default.tenant-example.knative.chi.coreweave.com inference-test-predictor-default-00001 inference-test-predictor-default-00001 True
Test Query
To run a test query, run the curl example for your fine-tuning method with the URL retrieved from the previous step.
- Dreambooth
- Textual Inversion
DreamBooth Test Query
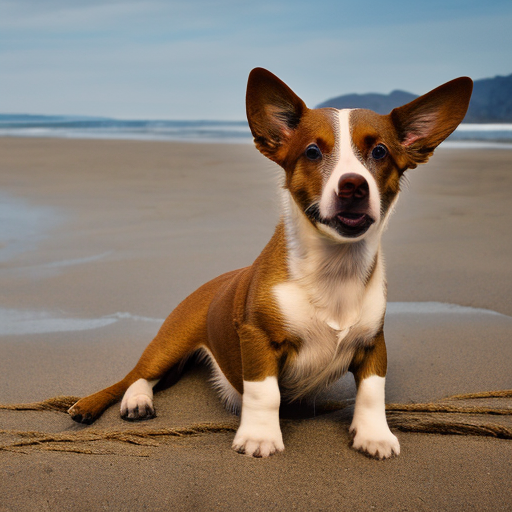
Replace <output parameter> with the value from your run.
$curl https://inference-example-dog-predictor-default.tenant-example.knative.chi.coreweave.com/v1/models/<output parameter>:predict \-d '{"prompt": "A photo of sks dog at the beach", "parameters": {"seed": 42, "width": 512, "height": 512}}' \--output beach_dog.png
The above command should produce an image similar to:
Textual Inversion Test Query
Replace <run_name> with the value from your run.
$curl http://inference-test-predictor-default.tenant-example.knative.chi.coreweave.com/v1/models/<run_name>:predict \-d '{"prompt": "California sunset on the beach, red clouds, Nikon DSLR, professional photography", "parameters": {"seed": 42, "width": 512, "height": 512}}' \--output sunset.png
The above command should produce an image similar to this:
.a13131c.512.png)
The model and dataset have now been run through the fine-tuning process, allowing test inferences against the new model.
Cleaning Up
Once you are finished with the example, you can delete all of the resources that were created.
First, you can run kubectl delete -f <file name> for all of the yaml files that were previously used to deploy resources.
For the PVC to be deleted, everything using it will need to be deleted first.
You can delete the Argo deployment through the CoreWeave Cloud UI from the Application page.
To delete all of the inference services that were created from the workflow runs, you need to use the kubectl delete isvc <inference service name> command. In order to see all of the current inference services, you can run kubectl get isvc.
By default, the Inference Service will scale to zero active Pods if they have not been used within 30 minutes. When scaled to zero, Pods won't incur any charges, since no compute is being used.
This concludes the demonstration. Now that you know how to run a simple Argo workflow at CoreWeave, you can expand this example for production jobs.